How to Test Stream on OBS: Ultimate Step-by-Step Guide
Testing your stream on OBS is essential. It ensures a smooth broadcast without unexpected issues.
OBS, or Open Broadcaster Software, is a popular tool for live streaming and recording. Before going live, it’s crucial to test your stream. This step helps identify and fix potential problems. A test stream can check audio levels, video quality, and overall performance.
It can save you from embarrassing moments during your actual broadcast. By following a few simple steps, you can ensure your stream runs smoothly. This guide will show you how to test your stream on OBS. You’ll learn how to make sure everything works perfectly. Let’s dive in and get your stream ready for a flawless live experience!

Credit: heyshadylady.com
System Requirements
Testing your stream on OBS requires a reliable computer, stable internet connection, and proper OBS settings. Ensure your CPU and GPU meet OBS requirements for smooth streaming.
Testing your stream on OBS (Open Broadcaster Software) is crucial to ensure a smooth and professional broadcast. One key aspect to consider before you start is your system requirements. Having the right setup can make all the difference in your streaming experience. Let’s break down what you need. ###Minimum Requirements
To run OBS effectively, you need to meet certain minimum requirements. At the very least, your system should include: – CPU: Intel i5 2000-series or AMD Ryzen 5 1500X – RAM: 4 GB – Graphics Card: DirectX 10 capable If you’re just starting out, these specs can get you up and running. However, you might encounter limitations like lower frame rates or reduced video quality. ###Recommended Specifications
For a more stable and high-quality stream, aim for higher specifications. Consider upgrading to: – CPU: Intel i7 4000-series or AMD Ryzen 7 3700X – RAM: 8 GB or more – Graphics Card: NVIDIA GeForce GTX 1050 or AMD Radeon RX 560 These specs will provide better performance and reliability. Personally, when I upgraded my setup to an Intel i7 and 16 GB of RAM, the difference was night and day. My streams were smoother, and I could manage multiple tasks without any hiccups. Are you wondering if your current setup can handle your streaming needs? Try running a few test streams with OBS, monitor your system’s performance, and adjust accordingly. A higher-end setup might be an investment worth considering if you’re serious about streaming. What adjustments can you make to optimize your streaming experience today?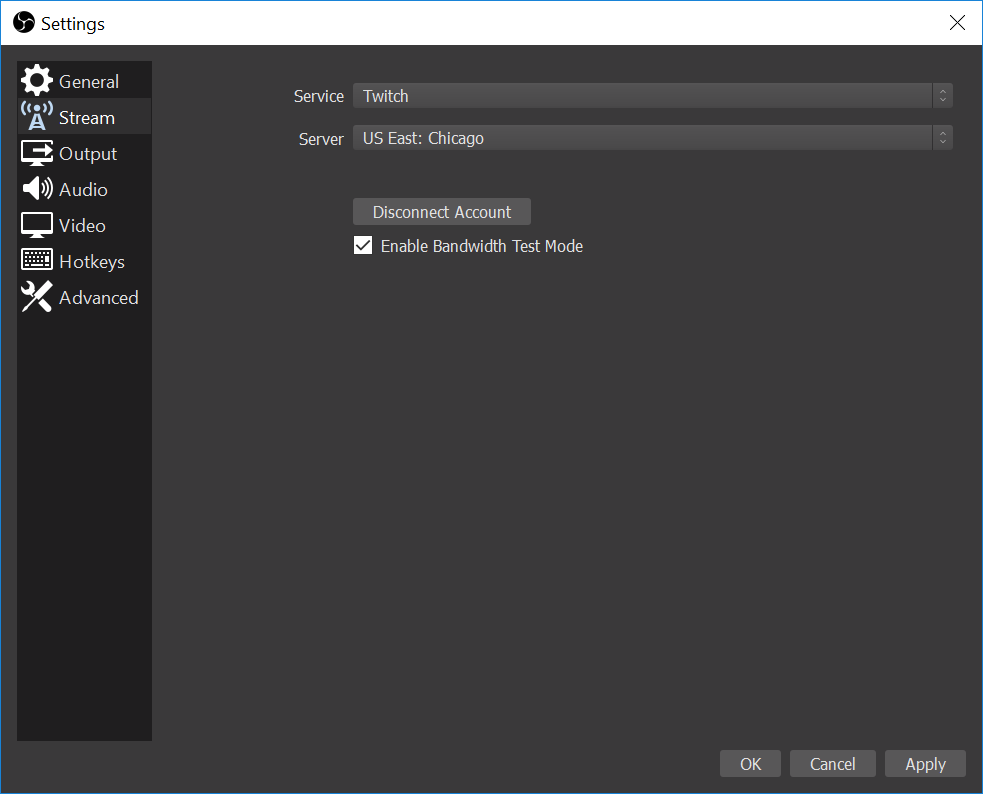
Credit: www.reddit.com
Downloading And Installing Obs
Downloading and installing OBS (Open Broadcaster Software) is the first step in your streaming journey. OBS is a powerful, free tool that helps you stream live video content. Before you start streaming, you need to get this software on your computer. Let’s dive into the download and installation process.
Where To Download Obs
First, you need to get OBS from its official website. Open your web browser. Type in the URL: https://obsproject.com/. This is the safest place to download the software. Avoid downloading from other sites to protect your computer from malware.
Installation Process
Once the download is complete, locate the file in your downloads folder. Double-click on the file to start the installation. A setup window will appear. Follow the on-screen instructions. Click ‘Next’ to proceed through the steps. You can use the default settings provided by the installer.
After the installation is complete, click ‘Finish’. OBS will now be installed on your computer. You can find the OBS icon on your desktop or in your start menu. Double-click the icon to launch OBS. You are now ready to start setting up your stream!
Initial Obs Setup
Setting up OBS for streaming can be daunting. But with a few simple steps, you can get started. This guide will help you through the initial OBS setup. It covers setting up audio and configuring video settings.
Setting Up Audio
First, open OBS and go to the settings menu. Click on the ‘Audio’ tab. Here, you will see different audio settings. Select your main microphone from the ‘Mic/Auxiliary Audio’ dropdown menu. This ensures OBS captures your voice. Adjust the volume levels as needed. You can also add other audio devices if required.
Configuring Video Settings
Next, navigate to the ‘Video’ tab in the settings menu. Set your base (canvas) resolution. This is the resolution of your OBS workspace. It should match the resolution of your monitor. Then, set the output (scaled) resolution. This is the resolution your viewers will see. A common choice is 720p for smoother streaming. Adjust the ‘Common FPS Values’ to 30 or 60, depending on your preference. Higher FPS can provide smoother video but requires more resources.
Creating A Scene
Testing your stream on OBS ensures smooth broadcasting. Start by setting up a scene with your desired sources. Check audio and video settings to prevent glitches.
Creating a Scene in OBS (Open Broadcaster Software) is the foundation of your live stream. It’s where you bring together all the elements that your audience will see. Think of it as setting the stage for a play. The better you set it up, the smoother your stream will go.Adding Sources
Start by clicking the “+” button in the Sources box. You can add different sources like your webcam, screen capture, or images. Select the type of source you want, name it, and click OK. You’ll then need to configure the settings for your source. This could be choosing which window to capture or adjusting the resolution of your webcam. A practical tip: if you’re adding multiple sources, name them clearly. This helps you keep track of what’s what.Organizing Layers
After adding your sources, you need to organize them. Think of each source as a layer in a stack. You can drag and drop them to change the order. The higher a source is in the list, the more it will appear on top. For example, if you have a webcam feed and a game capture, place the game capture below your webcam. This way, your face will appear on top of the game footage. It’s essential to preview your scene and make adjustments. Sometimes, you may need to resize or move sources around to get the perfect layout. Are you unsure if your layout looks good? Ask a friend to give you feedback or take a screenshot and review it yourself. Getting your scene right might take some time, but it’s worth the effort. A well-organized scene can make your stream look professional and engaging. What’s your favorite way to organize your OBS scenes? Share your tips in the comments!Configuring Stream Settings
Configuring stream settings in OBS is crucial for a smooth broadcast. Proper settings ensure your stream is stable and high-quality. This section guides you through the key configurations.
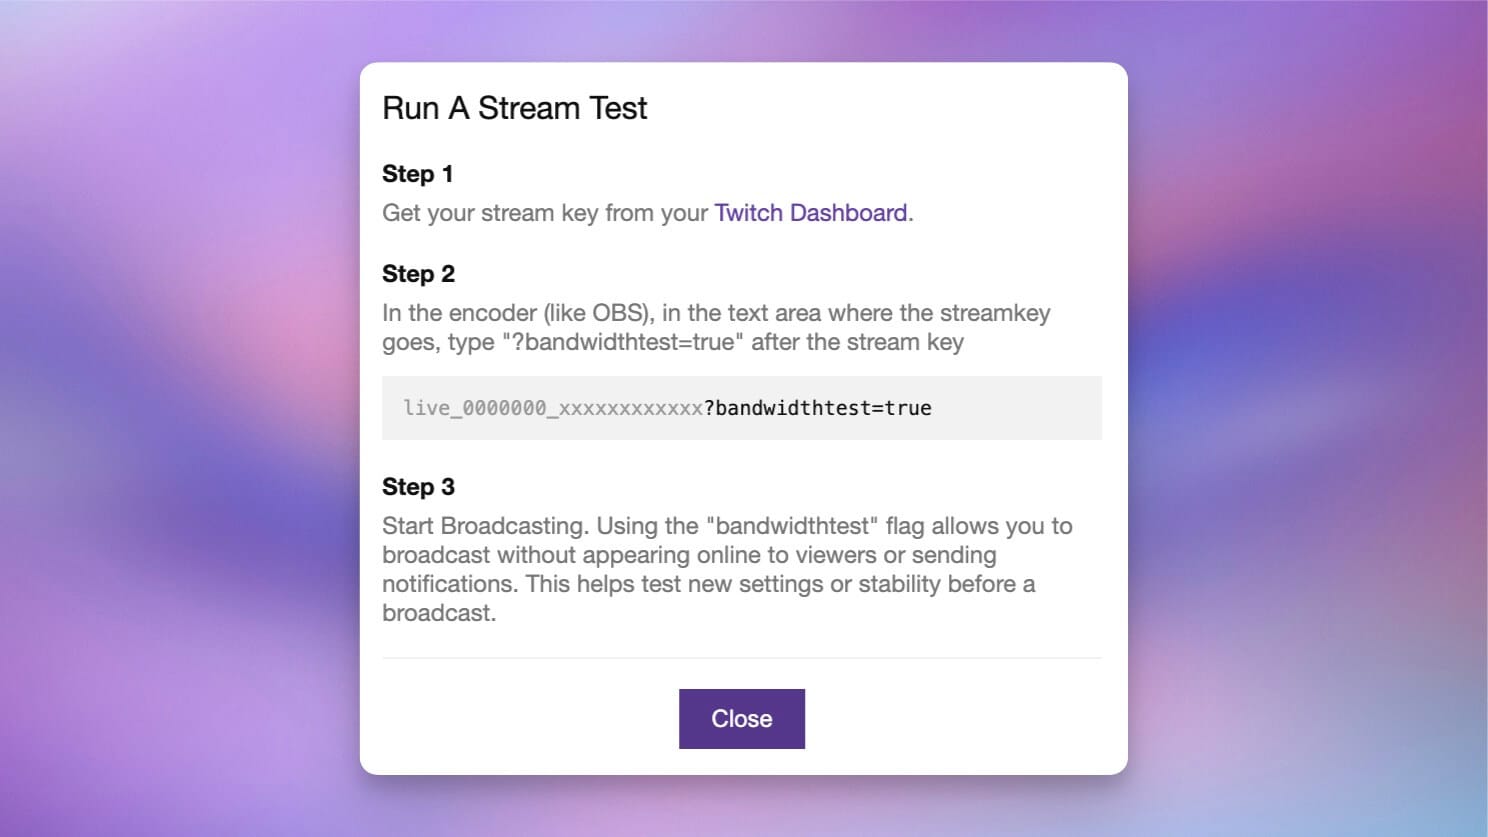
Setting Up Stream Key
First, you need your stream key from your streaming platform. This key is essential. It links OBS to your account. Go to your platform’s settings. Find the stream key. Copy it.
Next, open OBS. Click on “Settings.” Go to the “Stream” tab. Select your streaming service from the dropdown menu. Paste your stream key in the provided field. Click “Apply” and “OK.”
Choosing The Right Server
Selecting the right server is vital. It affects your stream’s stability. In OBS, still in the “Stream” tab, find the “Server” dropdown menu. Choose the server closest to your location. This reduces latency. It improves stream quality.
Test different servers. Find the one that works best. Sometimes, a nearby server might be congested. Another close server may perform better. Always test before going live.
Testing Your Stream
Before going live, it’s crucial to ensure your stream runs smoothly. OBS (Open Broadcaster Software) offers various tools to test your setup. This ensures that your audience enjoys a seamless viewing experience. Let’s dive into the steps for testing your stream.
Running A Test Stream
Start by setting up a private stream. Most platforms allow private or unlisted streams. This way, only you can see the broadcast. Open OBS and configure your settings as if you were going live. Make sure to select the right video resolution and bitrate. These settings impact the quality of your stream.
Next, click on ‘Start Streaming’ in OBS. Watch the stream on your platform’s preview window. Check for any delays or glitches. If you notice issues, adjust your settings and test again. The goal is to find the perfect balance between quality and performance.
Monitoring Performance
While running your test stream, monitor your computer’s performance. Keep an eye on CPU and GPU usage. High usage can cause lag and affect the stream’s quality. OBS has built-in performance metrics. Use these tools to track your system’s performance.
Additionally, check your internet connection. A stable connection is vital for streaming. Use a wired connection if possible. This reduces the risk of disconnections and lag. Run a speed test to ensure your upload speed meets the platform’s requirements.
Lastly, listen to your audio. Clear audio is essential for a good stream. Test your microphone and background sounds. Make sure there is no echo or distortion. Adjust audio levels in OBS if needed.
Troubleshooting Common Issues
When you’re streaming with OBS (Open Broadcaster Software), encountering issues can be frustrating. But don’t worry, troubleshooting common issues can get your stream back on track. Let’s look at some frequent problems and how to solve them.
Fixing Lag And Buffering
Lag and buffering can ruin the viewing experience for your audience. Start by checking your internet connection. A stable connection is crucial. You might need to upgrade your plan or connect directly to your router using an Ethernet cable.
Adjust your OBS settings to match your internet speed. Lowering your bitrate can reduce lag. Use the OBS Auto-Configuration Wizard to find the best settings for your setup. Also, close other applications that are using your bandwidth.
Have you updated OBS recently? Sometimes, updates can fix bugs causing lag. Make sure you’re running the latest version. Regular maintenance can prevent many issues.
Resolving Audio Problems
Audio issues can be tricky. Start by checking your audio settings in OBS. Ensure the correct devices are selected for your microphone and speakers. Sometimes, simply re-selecting them can solve the problem.
Is your audio out of sync? Adjust the sync offset in OBS. A delay of 100-200 milliseconds can often fix sync issues. Test it out and fine-tune as needed.
Background noise can be distracting. Use noise suppression filters in OBS to improve audio quality. Experiment with the settings to find what works best for you. A quiet, professional-sounding stream is more enjoyable for your viewers.
Have you ever spent hours preparing for a stream only to face technical issues? Share your experience in the comments. Your tips might help others, and you could learn new solutions too.
Credit: get.bandcamp.help
Tips For A Successful Stream
Creating a successful stream on OBS requires more than just setting up your equipment. The right techniques can make your stream engaging and high-quality. Here are some tips to help you achieve that.
Engaging With Your Audience
Engagement is key. Speak directly to your viewers. Ask them questions. Encourage them to comment. This interaction makes your stream lively. Respond to comments in real-time. It shows you value their participation. Use polls to involve them in decisions. This can be fun and interactive.
Improving Stream Quality
High-quality streams attract more viewers. Ensure your internet connection is stable. Use a wired connection if possible. Adjust your OBS settings for optimal performance. Set your resolution and bitrate according to your internet speed. Test your audio and video before going live. Clear, crisp audio is essential. Good lighting enhances video quality. A clean, clutter-free background is also important.
Frequently Asked Questions
Is There A Way To Test Stream On Obs?
Yes, you can test stream on OBS by using the “Start Recording” option. This allows you to check settings and performance locally.
How Do I Preview Obs Streaming?
To preview OBS streaming, open OBS Studio, configure your settings, and click “Start Streaming. ” Monitor the stream in the preview window.
How To Test Streaming Response?
Use tools like Postman or cURL to test streaming responses. Check for continuous data flow and correct content type.
How To Test Stream Alerts On Obs?
To test stream alerts on OBS, add your alert source, then trigger test alerts in your alert service dashboard. Ensure OBS is live or in preview mode to see the results.
Conclusion
Testing your stream on OBS is simple with these steps. Make sure to check audio and video settings. Adjust them for the best quality. Always monitor your stream’s performance. This ensures a smooth experience for viewers. Remember to test before going live.
This avoids unwanted surprises. Happy streaming!


