Best Streamlabs Settings for Twitch: Maximize Your Streaming Quality
Streaming on Twitch has become very popular. Good Streamlabs settings can make a big difference.
If you want to provide your viewers with a smooth and enjoyable experience, setting up Streamlabs correctly is crucial. Streamlabs offers many settings that can enhance your stream quality and performance. But finding the best settings can be tricky. This guide will help you understand the best Streamlabs settings for Twitch.
We’ll break down each important setting and explain how to optimize them for your stream. By the end, you’ll know how to tweak Streamlabs for the best streaming experience. Let’s dive in and make your Twitch stream shine!
Introduction To Streamlabs
Streamlabs is a popular tool for Twitch streamers. It offers many features that enhance the streaming experience. Understanding its settings can help you get the best results.
What Is Streamlabs?
Streamlabs is software that streamers use to broadcast their content. It combines different tools into one platform. With Streamlabs, you can add overlays, alerts, and widgets to your stream. This makes your broadcast more engaging and interactive.
Importance For Streamers
Using Streamlabs can make a big difference for streamers. It helps create a professional look for your stream. With its easy-to-use interface, you can quickly set up your stream. This saves time and lets you focus on your content.
Streamlabs also offers many customization options. You can tailor your stream to match your style. This helps you stand out from other streamers. Viewers are more likely to return to a well-designed stream.
Streamlabs provides useful data and analytics. You can track your viewer count and engagement. This information helps you understand what works and what doesn’t. You can use these insights to improve your streams.
Credit: streamlabs.com
Setting Up Streamlabs
Setting up Streamlabs for Twitch can seem overwhelming at first, but it’s easier than you think. With the right settings, you’ll stream like a pro in no time. Let’s dive into the essentials to get you started.
Installation Guide
First things first, you need to install Streamlabs OBS. Head over to the Streamlabs website and download the software. Follow the on-screen instructions to complete the installation.
Once installed, launch Streamlabs OBS. You’ll be prompted to log in with your Twitch account. This step is crucial as it connects Streamlabs to your Twitch channel.
After logging in, Streamlabs will automatically configure some settings based on your system’s specs. This is a good starting point, but there’s more to optimize.
Basic Configuration
Open the settings menu by clicking the gear icon at the bottom left of the screen. Start with the “Stream” tab. Ensure your “Service” is set to Twitch and that your account is linked.
Next, move to the “Output” tab. This is where you set your bitrate and encoder. A higher bitrate means better quality but requires more bandwidth. A good starting point is 2500 Kbps.
For the encoder, if you have a dedicated GPU, choose NVENC. Otherwise, use x264. NVENC offloads the encoding process to your GPU, freeing up your CPU for other tasks.
Don’t forget the “Video” tab. Set your base resolution to match your monitor’s resolution. For output resolution, 1280×720 is a good balance between quality and performance.
Remember to adjust your FPS (frames per second). 30 FPS is standard for most streams, but if your system can handle it, 60 FPS will make your stream look smoother.
What challenges have you faced while setting up Streamlabs? Share your experiences below!
Optimal Video Settings
When it comes to streaming on Twitch, having the right video settings can make all the difference in providing a high-quality viewer experience. Whether you’re new to streaming or looking to optimize your current setup, adjusting your Streamlabs video settings can help you achieve the best possible results. Let’s dive into the optimal video settings for Twitch, focusing on resolution options and frame rate settings.
Resolution Options
Your resolution setting is crucial for ensuring your stream looks crisp and clear. The most common resolution for Twitch streaming is 1920×1080, also known as 1080p. This provides a high-definition experience that viewers will appreciate.
However, streaming at 1080p requires a higher bitrate and stronger internet connection. If you experience lag or buffering issues, consider lowering your resolution to 1280×720 (720p). It still offers good quality without putting too much strain on your system.
As a rule of thumb, always test your stream at different resolutions to find what works best for your setup. This trial and error can save you from poor viewer experiences and help you maintain a smooth stream.
Frame Rate Settings
Frame rate settings determine how smooth your video appears. The standard frame rate for most Twitch streams is 60 frames per second (FPS). This provides fluid motion, especially for fast-paced games or action scenes.
Streaming at 60 FPS requires a powerful PC and a stable internet connection. If your setup struggles with this, try lowering the frame rate to 30 FPS. It reduces the load on your hardware while still delivering a decent viewer experience.
Think about the type of content you stream. For example, if you stream slower-paced games or creative content, 30 FPS might be sufficient. Always balance quality with performance to keep your stream running smoothly.
Have you ever wondered if your viewers notice the difference in frame rate? Experimenting with these settings can provide surprising insights into what your audience prefers. Don’t hesitate to ask for feedback during your streams to ensure you’re giving them the best possible viewing experience.
Audio Settings
Good audio settings are vital for a great streaming experience. Viewers often tolerate lower video quality but not poor audio. Streamlabs offers several options to fine-tune your audio settings. This guide will walk you through the best audio settings for Twitch streaming.
Microphone Configuration
A clear microphone is crucial for engaging streams. Start by selecting your microphone under the audio settings in Streamlabs. Adjust the gain to ensure your voice is clear but not too loud. Use the noise suppression filter to reduce background noise. This makes your voice the focus. Next, use the compressor. It balances your audio levels, making loud sounds softer and soft sounds louder. This keeps your audio at a consistent level. Lastly, apply the equalizer. It helps to fine-tune your voice. Boost the mid-range frequencies for a clearer sound. Adjust the low and high frequencies to your liking.
Background Music Management
Background music adds depth to your stream. But it should never overpower your voice. Use the audio mixer in Streamlabs to adjust the music volume. Keep it lower than your microphone. This ensures your voice remains clear. You can also set music to fade in and out during important moments. This creates a professional feel. Consider using royalty-free music. This avoids copyright issues. Platforms like YouTube Audio Library offer a variety of options.
Stream Overlays And Alerts
Stream overlays and alerts are crucial for creating an engaging Twitch stream. They make your stream look professional and help you stand out. Let’s dive into how you can set up the best overlays and alerts for your Twitch channel.
Choosing Overlays
Overlays are the visual elements displayed on your stream. They can include your webcam frame, recent follower notifications, and more. You want overlays that match your brand and personality.
Think about the colors and styles that represent you. If you’re into retro gaming, maybe pixel art overlays are the way to go. If you’re more into sleek and modern, opt for clean and minimal designs.
Make sure the overlays don’t clutter the screen. They should enhance your content, not distract from it. A good rule of thumb is to keep them subtle yet noticeable.
Setting Up Alerts
Alerts notify you and your viewers of important events like new followers, subscribers, or donations. They create moments of excitement and engagement in your stream.
Choose alert designs that match your overlays for a cohesive look. You can find many alert packages online, both free and paid. Customize them with your unique sounds and animations.
Test your alerts before going live. Make sure they’re not too loud or too quiet. Balance is key to keeping your viewers engaged without overwhelming them.
Have you ever watched a stream where the alerts were too frequent or too distracting? It can be off-putting. So, fine-tune your settings to avoid spamming alerts while still acknowledging your supporters.
What kind of overlays and alerts do you think would best represent your streaming style?

Credit: www.youtube.com
Network Settings
When streaming on Twitch, your network settings play a crucial role in delivering a smooth and high-quality broadcast. Ensuring you have the right configurations can make or break your viewer’s experience. Let’s dive into the essential network settings for Streamlabs that will help you achieve the best performance.
Bitrate Settings
Choosing the correct bitrate is essential for your stream quality. A higher bitrate means better video quality, but it also requires more bandwidth. If you set the bitrate too high for your internet connection, viewers might experience buffering.
Start with a bitrate of 2500 kbps if you have an average internet connection. This is usually a safe setting that balances quality and performance. If your internet speed allows, you can increase the bitrate gradually to 3500 kbps or higher.
Use tools like Speedtest.net to check your upload speed. Make sure to leave some headroom—don’t use all your available bandwidth. Keeping around 20% of your upload speed free can prevent unexpected issues.
Dealing With Lag
Lag can be a streamer’s worst enemy. It disrupts the flow of your broadcast and frustrates your viewers. To minimize lag, ensure your internet connection is stable and strong.
Consider using a wired Ethernet connection instead of Wi-Fi. Ethernet provides a more reliable and consistent connection, which is crucial for streaming. If you must use Wi-Fi, position your router close to your streaming setup.
Another tip is to limit other devices from using the internet while you stream. Bandwidth-intensive activities, like large downloads or other streaming services, can hog your connection. Prioritize your stream to avoid disruptions.
Have you ever had to troubleshoot lag during a crucial stream? What adjustments did you make to improve your connection? Share your experiences and tips in the comments below!
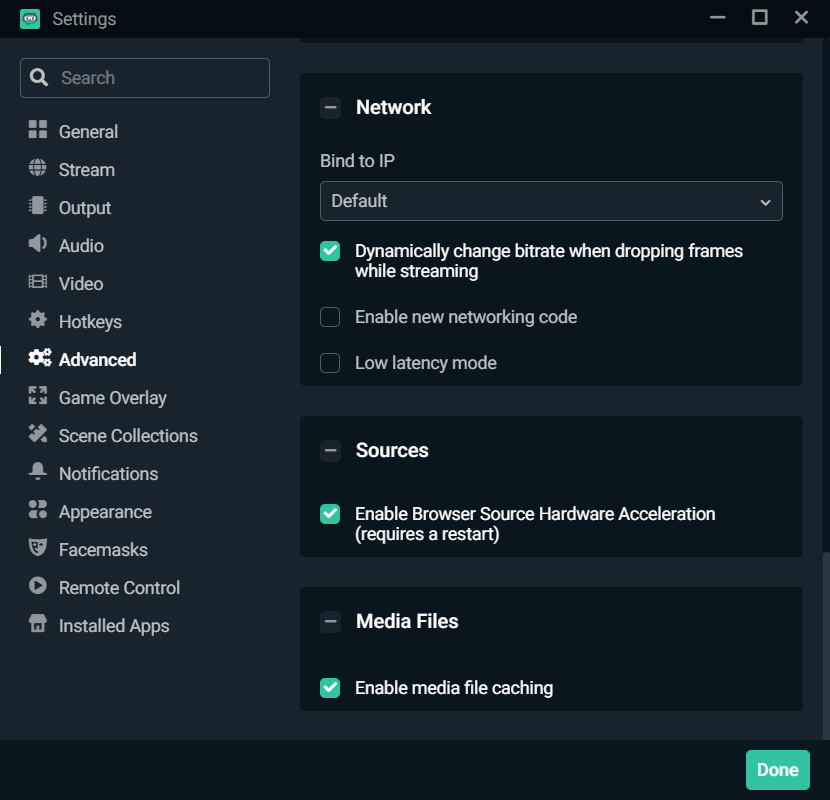
Advanced Settings
When diving into the world of Twitch streaming, advanced settings in Streamlabs can make a world of difference. These settings help enhance your stream’s quality, ensuring smooth performance and a professional feel. Let’s discuss some crucial advanced settings that can elevate your stream.
Encoder Selection
Choosing the right encoder is vital for stream quality. If you have a powerful NVIDIA graphics card, consider using NVENC. It offloads processing to the GPU, freeing up your CPU for other tasks.
For those with less powerful GPUs, x264 is a good choice. It uses your CPU to encode the stream. Adjusting the CPU usage preset can balance quality and performance.
Experiment with both to see what works best for your setup. What encoder do you prefer and why?
Stream Delay Adjustment
Stream delay can be a game-changer, especially if you’re into competitive gaming. By adding a delay, you prevent stream sniping, giving you a fair playing field.
In Streamlabs, you can easily adjust this. Go to settings, then the advanced tab, and set the delay to your desired duration.
A short delay is often enough for most streamers. How has stream sniping impacted your gameplay before?
Advanced settings can seem daunting, but they are essential for a high-quality stream. Take the time to tweak these settings. You’ll see the difference in no time!
Testing Your Stream
Testing your stream is a crucial step for any Twitch broadcaster. It ensures your Streamlabs settings work perfectly. By testing, you can spot and fix issues before going live. This helps provide the best viewing experience for your audience. Let’s dive into how to test your stream effectively.
Trial Runs
Conduct trial runs to see how your stream performs. Start by streaming for a short period. During this time, check how your settings affect the stream. Make sure your video and audio are clear. You can record your trial runs and watch them later. This helps you spot any problems you might miss during the live test.
Monitoring Performance
Monitoring performance is key. Pay attention to your stream’s quality. Look for any lag, buffering, or drops in quality. Check your CPU usage and network stability. High CPU usage can cause stream issues. A stable network ensures smooth streaming. Use Streamlabs’ performance metrics to keep an eye on these factors. Adjust your settings based on what you observe during the test.
Troubleshooting Common Issues
Troubleshooting common issues is essential to ensure a seamless streaming experience on Twitch. Whether you’re just starting or have been streaming for a while, encountering technical glitches can be frustrating. Here, we will tackle two frequent problems: audio issues and video lag.
Fixing Audio Issues
Audio problems can significantly impact your stream’s quality. If viewers can’t hear you or your game, they’ll quickly tune out. Here are some practical tips to address common audio issues:
- Check your microphone settings: Ensure your microphone is properly connected and selected in Streamlabs. You can do this in the audio settings panel.
- Adjust audio levels: Balance your microphone and game audio levels. This can prevent one sound from overpowering the other.
- Use noise suppression: If background noise is a problem, enable noise suppression in Streamlabs. This feature can filter out unwanted sounds and improve audio clarity.
I’ve faced audio issues myself. Once, my microphone wasn’t picking up my voice clearly. A simple adjustment in the settings fixed it. Don’t hesitate to experiment with different settings to find what works best for you.
Solving Video Lag
Video lag can be a dealbreaker for viewers. It disrupts the flow of your stream and can result in a loss of followers. Here are some steps to minimize video lag:
- Optimize bitrate settings: Setting an appropriate bitrate can balance stream quality and performance. Too high, and your stream may lag; too low, and the video quality suffers.
- Monitor your internet connection: A stable internet connection is crucial. Ensure you’re using a wired connection if possible. Wi-Fi can be unreliable.
- Adjust resolution and frame rate: Lowering your stream’s resolution and frame rate can reduce lag. Start with 720p at 30fps and adjust upwards if your setup can handle it.
Once, during a crucial stream, I encountered severe video lag. Lowering my resolution and tweaking bitrate settings solved the issue. It’s about finding the right balance for your setup.
Troubleshooting can be a trial-and-error process. What common issues have you faced while streaming? Share your experiences and solutions in the comments below!
Credit: streamlabs.com
Frequently Asked Questions
What Are The Best Twitch Settings For Streamlabs?
Use 720p resolution, 30fps, and a bitrate of 2500-4000 kbps for optimal Twitch streaming with Streamlabs. Ensure stable internet.
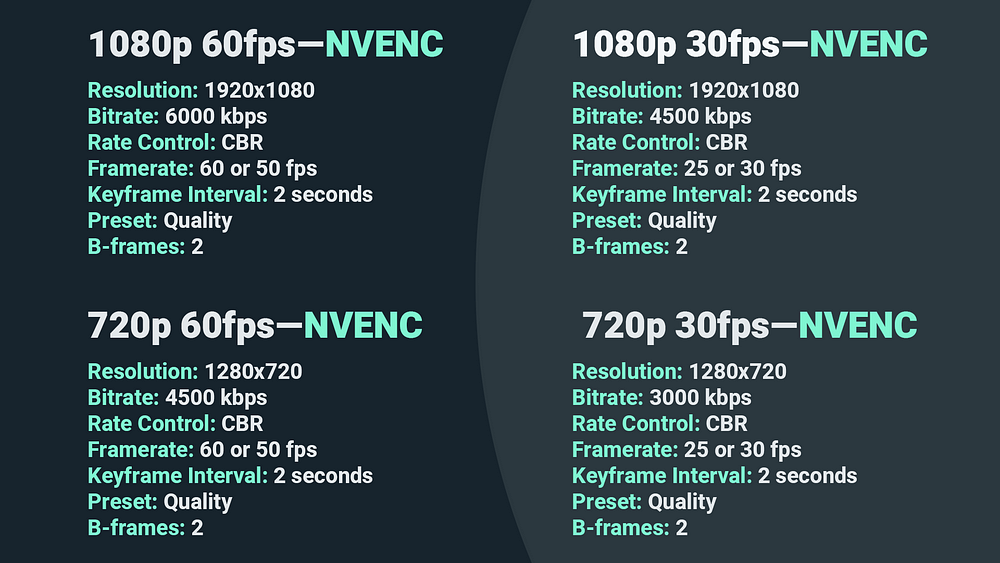
What Is The Best Bitrate For 1080p 60fps Streamlabs?
The best bitrate for 1080p 60fps on Streamlabs is between 4500 to 6000 Kbps. This ensures smooth streaming quality.
How To Make Your Stream Quality Better On Streamlabs?
Optimize your Streamlabs settings by adjusting resolution and bitrate. Use a wired internet connection. Ensure your computer meets Streamlabs requirements. Close unnecessary background applications. Update drivers and software regularly.
What Is The Best Quality Recording Settings For Streamlabs?
The best quality recording settings for Streamlabs are 1080p resolution at 60 FPS, using x264 encoder, CBR rate control, and a bitrate of 4500-6000 kbps.
Conclusion
Optimizing your Streamlabs settings enhances your Twitch streaming experience. Good settings improve video quality and reduce lag. Experiment with different options to find what works best. Remember to adjust bitrate, resolution, and frame rates. Keep your audience engaged by maintaining a smooth stream.
Regularly update your settings for the best performance. Happy streaming!