How Do I Stream on Twitch With OBS: Ultimate Beginner’s Guide
Streaming on Twitch with OBS is straightforward. You need to set up OBS and link it to your Twitch account.
Twitch is a popular platform where gamers and creators stream live content. Using OBS (Open Broadcaster Software) enhances your streaming experience with professional features. OBS is free and open-source, making it accessible to everyone. This guide will walk you through the steps needed to stream on Twitch using OBS.
You will learn how to install OBS, configure settings, and go live on Twitch. By the end, you’ll be ready to share your content with the world. Let’s dive into the setup process and get your stream up and running.
Credit: www.gumlet.com
Introduction To Streaming On Twitch
Streaming on Twitch is a popular way to share gameplay, hobbies, and creative content. Twitch offers a platform where you can connect with viewers from around the world. Whether you are a gamer, artist, or just love to chat, Twitch can be the perfect place to build your community.
What Is Twitch?
Twitch is a live streaming platform. It is mainly for gamers but also hosts other content. You can watch live streams of gameplay, music, art, and more. Viewers can interact with streamers through chat. This creates an engaging experience. Twitch also offers features like subscriptions and donations. These can help streamers earn money.
Why Use Obs For Streaming?
OBS stands for Open Broadcaster Software. It is a free and open-source tool. Many streamers use OBS for its powerful features. OBS allows you to capture your screen and webcam. You can also add overlays and alerts. This makes your stream look professional.
OBS is customizable. You can adjust settings to suit your needs. It supports plugins and extensions. These can enhance your streaming experience. OBS works with many platforms, not just Twitch. You can use it for YouTube, Facebook Live, and more.
Getting started with OBS is easy. The user-friendly interface helps new streamers. There are many tutorials available. These can guide you through the setup process. With OBS, you can start streaming in no time.
Setting Up Your Twitch Account
Create your Twitch account and download OBS Studio. Open OBS, add your Twitch stream key, and customize your settings.
### Setting Up Your Twitch Account Getting started on Twitch can be thrilling, but setting up your account correctly is crucial. You want to ensure everything is in place to give your audience the best experience. Let’s dive into the essentials.Creating A Twitch Account
First things first, you need a Twitch account. Go to the Twitch website and hit the “Sign Up” button at the top right corner. Fill in your details like username, password, and email. Make sure to choose a username that reflects your brand or personality. A catchy and easy-to-remember name can help you stand out. Verify your email to complete the registration. This step is crucial for security and accessing all of Twitch’s features.Customizing Your Twitch Profile
Now that your account is set up, it’s time to make it yours. Click on your profile icon and go to “Settings.” Upload a profile picture. Choose something that represents you well—whether it’s a logo or a fun selfie. This image will be your identity on Twitch. Fill in the bio section. Share a bit about yourself and what viewers can expect from your streams. Are you a gamer, an artist, or a talk show host? Be clear and engaging. Set up your social links. Connecting your Twitch to your other social media accounts can help you grow your audience. Remember, the first impression matters. A well-thought-out profile can attract more viewers and followers. ### Your Turn Ready to get started? Setting up your Twitch account properly lays the groundwork for your streaming success. What unique touch will you add to your Twitch profile?Downloading And Installing Obs
Streaming on Twitch is an exciting way to share your gaming experiences. One of the best tools for streaming is OBS (Open Broadcaster Software). This guide will help you download and install OBS with ease.
Where To Download Obs
To start, you need to download OBS from its official website. Open your browser and go to obsproject.com. This site is safe and the software is free. You will see download options for Windows, macOS, and Linux. Choose the correct version for your system.
Installation Guide For Obs
Once the download is complete, locate the installer file in your downloads folder. On Windows, double-click the .exe file. On macOS, open the .dmg file. Follow the on-screen instructions to start the installation.
During installation, you can choose the installation location. It’s usually best to keep the default settings. OBS will now install necessary files on your system. After installation, you might need to restart your computer.
After restarting, open OBS from your start menu or applications folder. You are now ready to set up and start streaming on Twitch with OBS.
Configuring Obs For Twitch Streaming
Configuring OBS for Twitch streaming can seem daunting. But with a few steps, you can set it up like a pro. This guide will walk you through the process. You’ll be streaming in no time!
Initial Obs Setup
First, download and install OBS from the official website. Open OBS and follow the on-screen instructions. The setup wizard will guide you. Choose the option optimized for streaming. It will configure OBS to the best settings for your system.
Next, navigate to the “Settings” menu. Click on the “Output” tab. Set the output mode to “Advanced”. Adjust the bitrate according to your internet speed. A higher bitrate provides better quality but requires a strong connection. For 1080p streaming, use a bitrate of 4500-6000 kbps.
In the “Video” tab, set the base and output resolution. Match them to your monitor’s resolution for the best results. Set the Common FPS values to 30 or 60, depending on your preference.
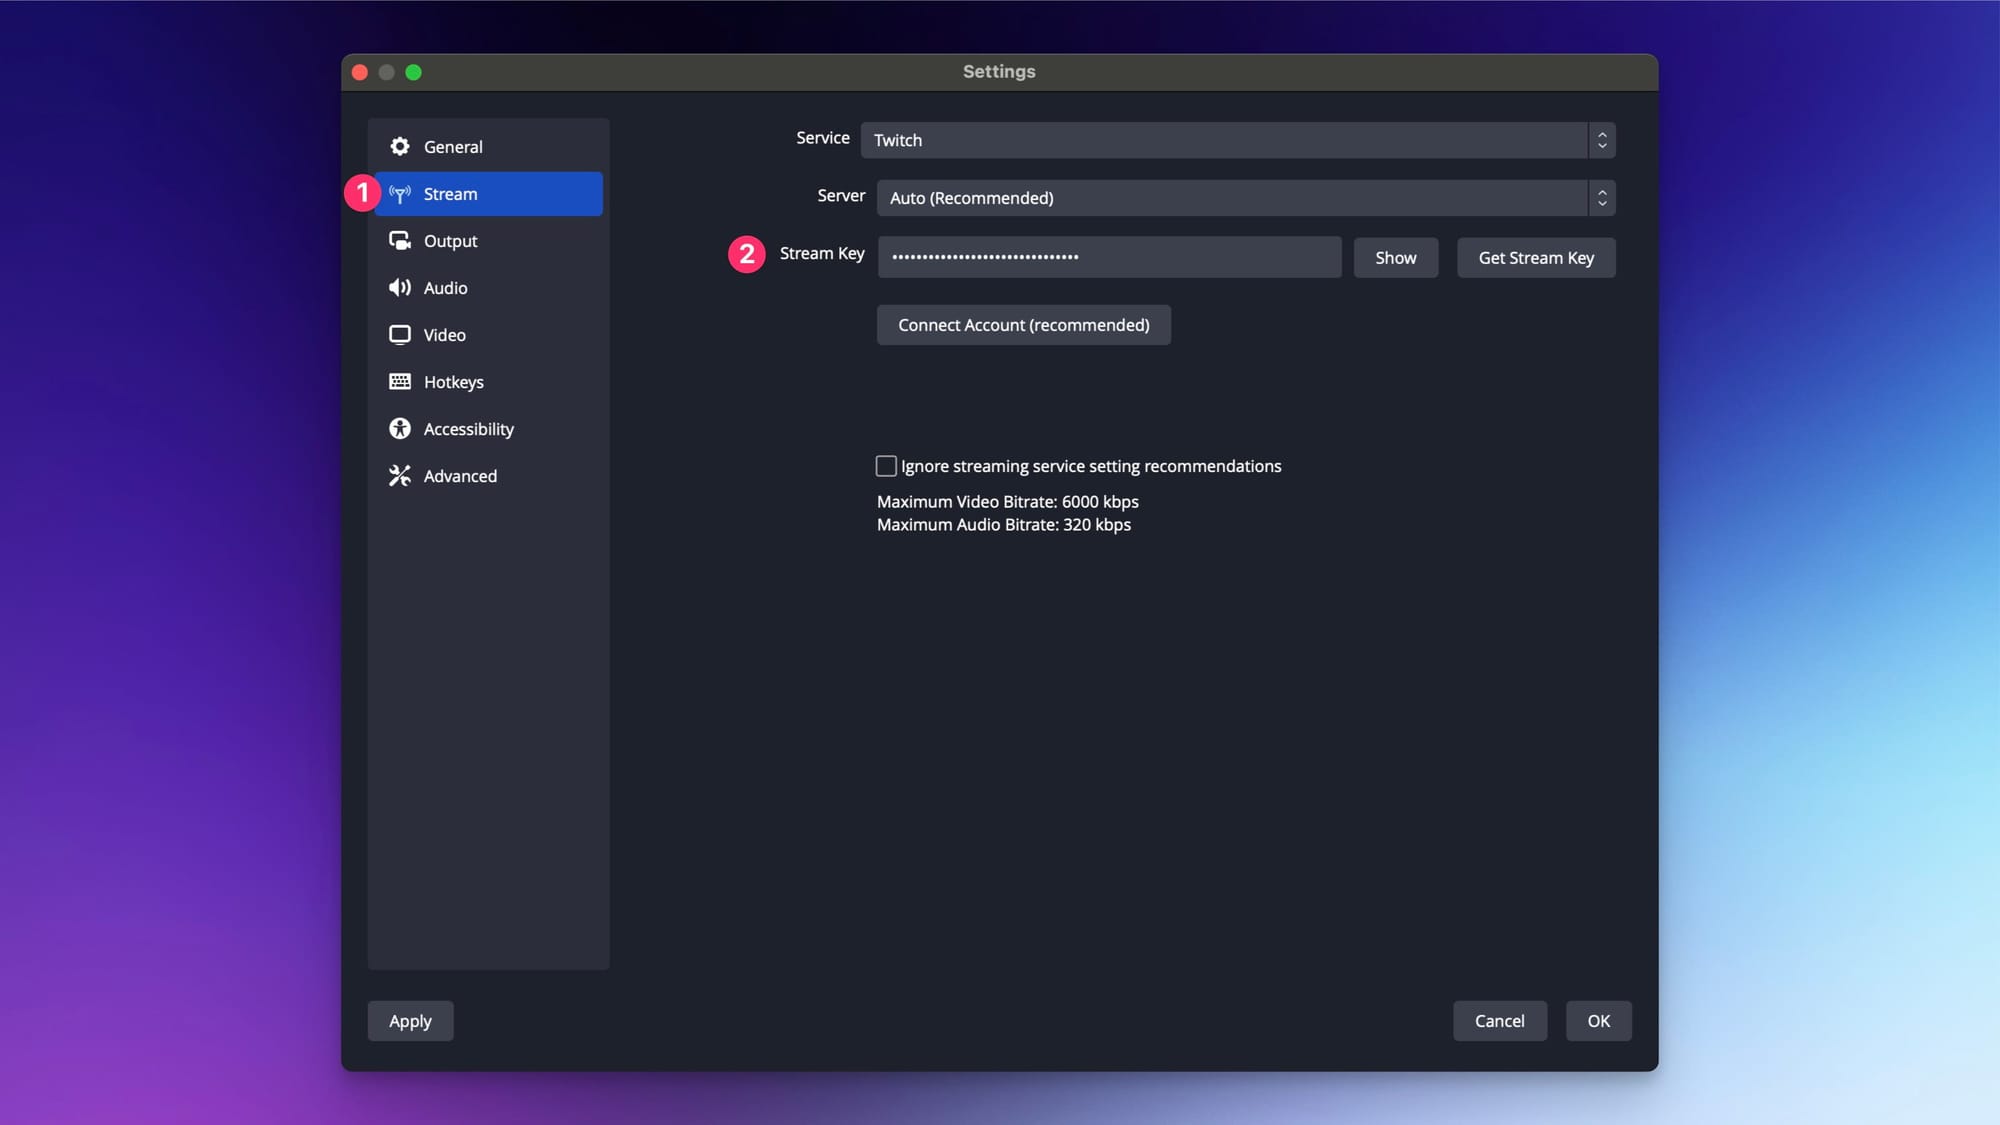
Connecting Obs To Twitch
To connect OBS to Twitch, you’ll need your Twitch stream key. Log in to your Twitch account. Go to your dashboard. Click on “Settings” and then “Stream”. You’ll see your stream key. Copy it.
Back in OBS, open the “Settings” menu. Click on the “Stream” tab. Set the service to “Twitch”. Paste your stream key in the “Stream Key” box. Click “Apply” and then “OK”. OBS is now connected to Twitch.
Test your connection by clicking “Start Streaming” in OBS. Check your Twitch channel. If everything is set up correctly, you’ll see your stream live. Adjust any settings if needed. Happy streaming!
Optimizing Obs Settings
Streaming on Twitch with OBS (Open Broadcaster Software) can be a game-changer for your content. However, getting the best quality involves tweaking the OBS settings just right. Let’s dive into optimizing OBS settings to ensure your stream looks and sounds top-notch.
Video Settings
Video quality is the first thing your viewers will notice. To start, head to the video settings section in OBS.
Adjust your base resolution to match your monitor’s resolution. If your screen is 1920×1080, set it to that. Then, set the output resolution slightly lower, like 1280×720, to ensure a smoother stream.
Next, set the FPS (frames per second). 30 FPS is usually sufficient, but if your hardware can handle it, bump it up to 60 FPS for a more fluid stream.
Finally, tweak the bitrate. A bitrate of 2500-3500 kbps is a good range for 720p streaming. Higher resolutions will need more. Always test your internet speed to ensure you can handle the chosen bitrate without lag.
Audio Settings
Clear audio can make or break your stream. Go to the audio settings tab in OBS to get started.
Ensure your microphone and desktop audio devices are selected correctly. Use the monitoring feature to listen to your audio levels in real-time.
Adjust the sample rate to 44.1 kHz or 48 kHz for high-quality audio. Remember to balance your audio levels. Your voice should be clear and not drowned out by game sounds or background music.
Use filters like noise suppression and gain to enhance audio quality. Test these settings while streaming to find the perfect balance.
Optimizing OBS settings can seem daunting, but it’s essential for a professional stream. Have you found any specific settings that work best for your setup? Share your experiences in the comments!
Credit: restream.io
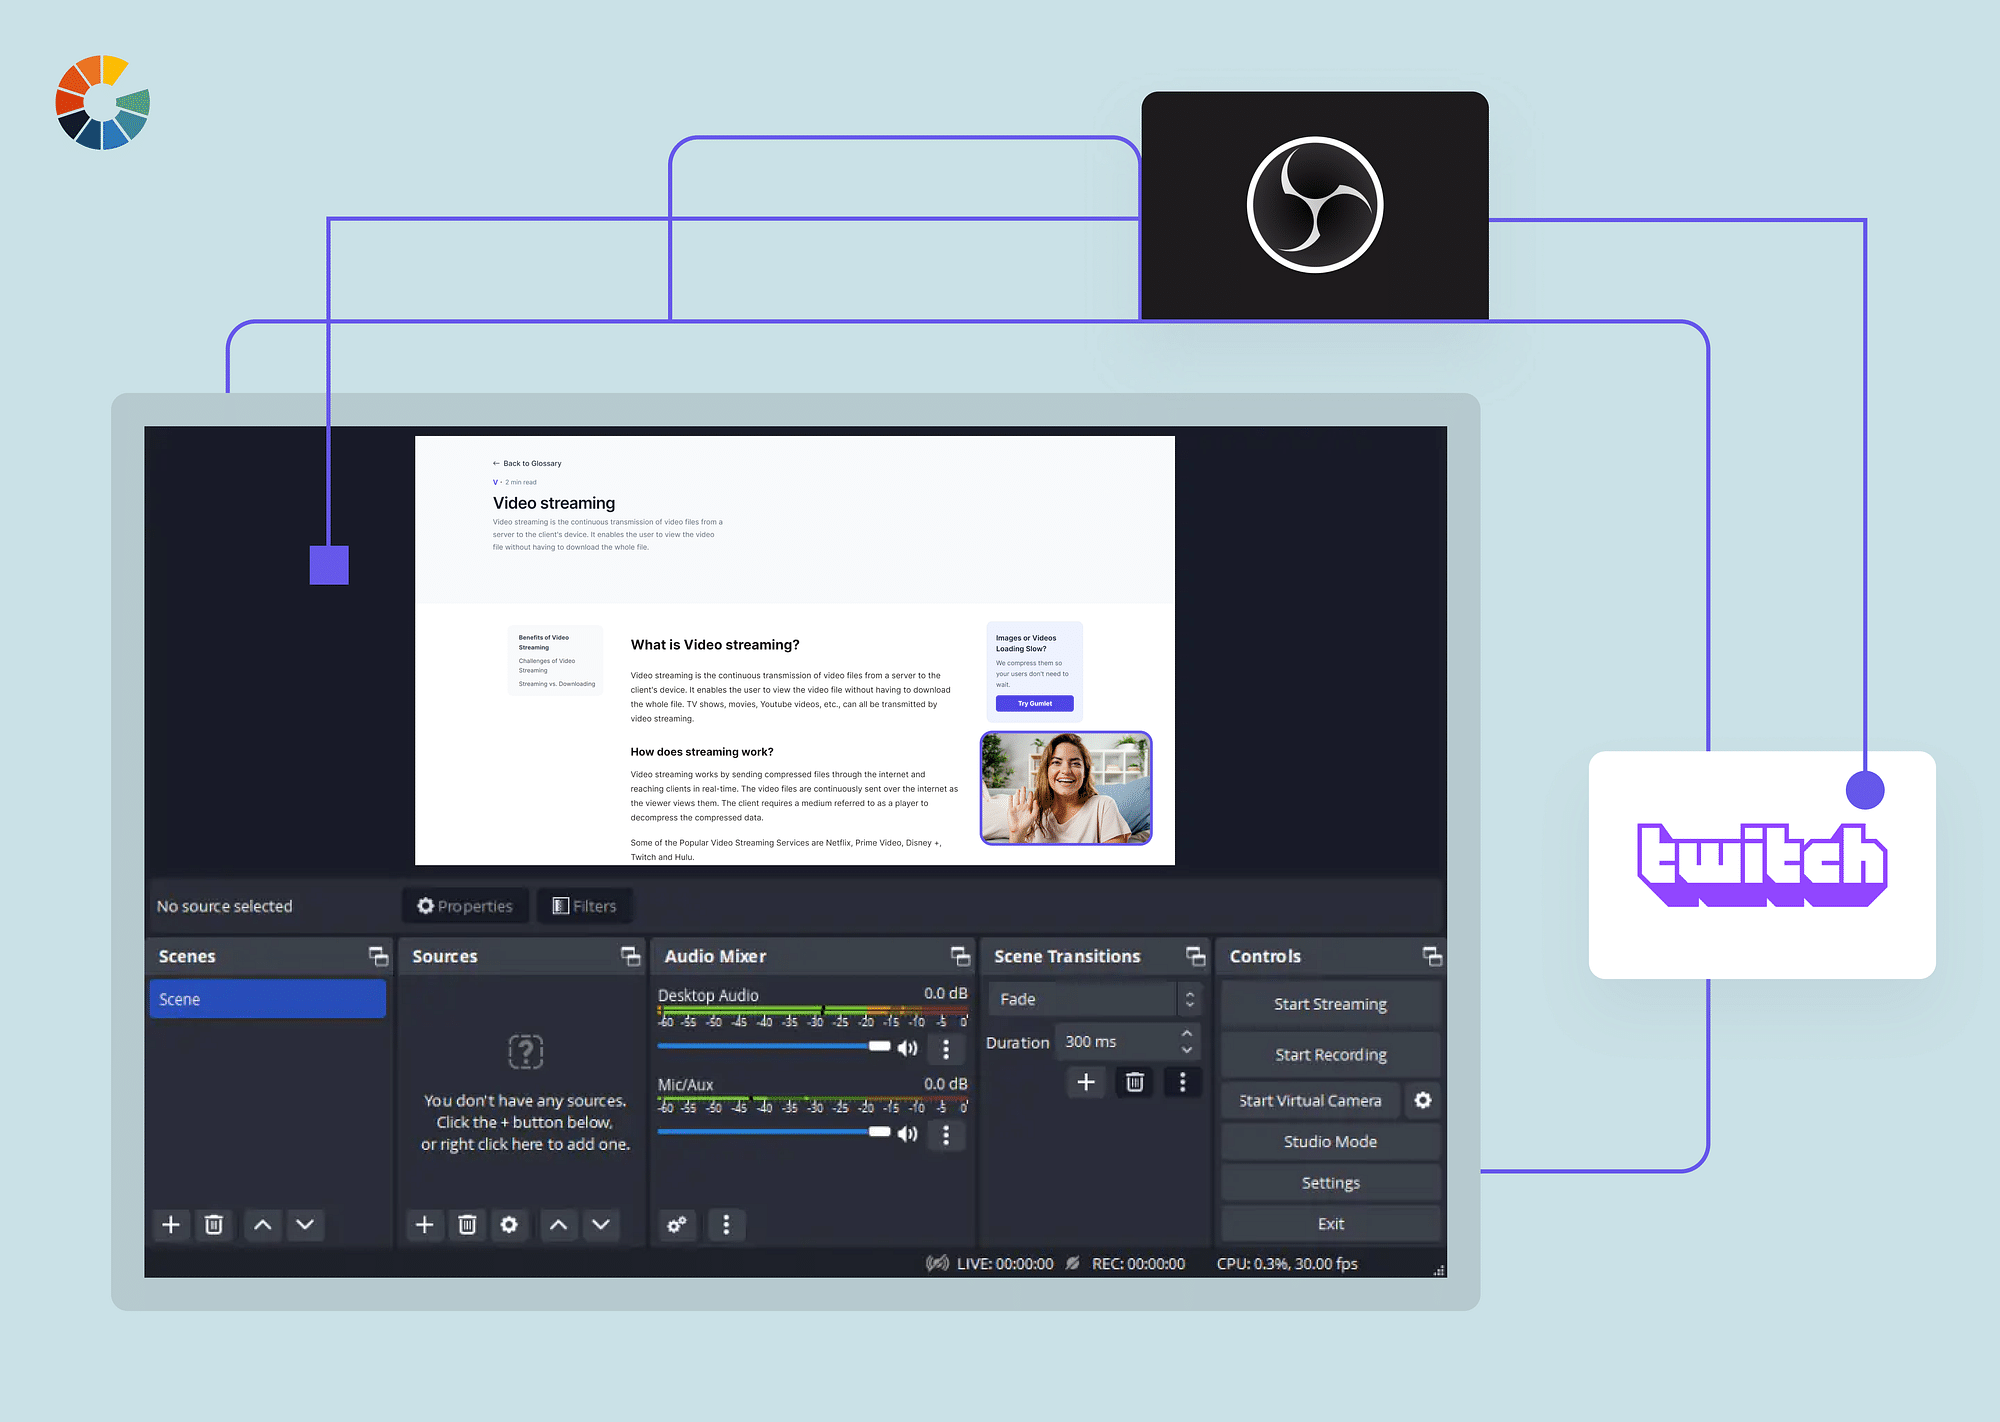
Creating And Managing Scenes
Creating and managing scenes in OBS is a key part of streaming on Twitch. Scenes are like different stages for your stream. You can switch between them to show different content. This makes your stream more engaging and professional.
Adding Sources
Sources are the building blocks of scenes. They can be your webcam, game capture, images, text, or even browser windows. To add a source, click the “+” button in the “Sources” box. Choose the type of source you want to add. For a webcam, select “Video Capture Device”. For game capture, select “Game Capture”. Customize the settings as needed. Click “OK” to add the source to your scene.
Organizing Scenes
Good organization of your scenes can improve your stream’s flow. Create different scenes for different parts of your stream. For example, have a “Starting Soon” scene, a “Live” scene, and a “Be Right Back” scene. To create a new scene, click the “+” button in the “Scenes” box. Name your scene and click “OK”. Add and arrange sources in each scene as needed. You can easily switch between scenes during your stream.
Enhancing Your Stream
Streaming on Twitch with OBS is straightforward. Download OBS, set up scenes, and connect Twitch. Start sharing your gameplay or content effortlessly.
Enhancing Your Stream Making your stream look and feel professional can attract more viewers and keep them coming back. With OBS (Open Broadcaster Software), you have a lot of tools at your disposal. Enhancing your stream isn’t as complicated as it sounds, and small changes can make a big difference. ### Using Overlays Overlays can make your stream visually appealing. They help frame your gameplay or facecam and give your stream a unique look. You can find free overlays online, or you might invest in custom designs that match your brand. Adding them to OBS is simple. Just go to the “Sources” section, click the “+” button, and add an “Image” source. Choose your overlay file, and you’re set! ### Adding Alerts Alerts keep your audience engaged and make them feel appreciated. When someone follows, subscribes, or donates, an alert can pop up on the screen. Use services like Streamlabs or StreamElements to create these alerts. They offer customization options so your alerts fit your style. In OBS, add a “Browser” source and paste the alert URL from your chosen service. Adjust the size and position, and your alerts will be live! Have you tried using overlays and alerts yet? They can transform your stream from good to great. Even small enhancements can make a big difference in viewer experience.Going Live On Twitch
Streaming on Twitch with OBS is simple. Download OBS, connect it to your Twitch account, and set up your scenes. Start streaming by clicking “Start Streaming” in OBS.
Going live on Twitch can be a thrilling experience. It’s the moment when all your preparation comes to life and you start sharing your content with the world. Whether you’re a gamer, a musician, or a just chatting streamer, knowing how to go live effectively is crucial for building a loyal audience.Starting Your Stream
Once you’ve set up OBS (Open Broadcaster Software) and linked it to your Twitch account, you’re ready to start streaming. Firstly, make sure all your settings are optimized. Double-check your video and audio sources. You don’t want any surprises once you’re live. When you’re ready, hit the ‘Start Streaming’ button in OBS. This will begin broadcasting your content to Twitch. Make sure to have a catchy stream title and appropriate category tags to attract viewers.Interacting With Viewers
Engaging with your audience is key to a successful stream. Interact with viewers through the chat. Respond to their comments and questions promptly. Use tools like chatbots to manage your chat effectively. They can help moderate and keep the conversation flowing. Consider incorporating viewer requests into your stream. This makes your audience feel valued and part of the experience. For example, if you’re playing a game, ask for their input on what to do next. Remember, the more you interact, the more likely viewers will stick around and come back for future streams. How do you plan to keep your audience engaged?Troubleshooting Common Issues
Struggling to stream on Twitch with OBS? Common issues include lag, audio sync problems, and dropped frames. Follow simple steps to troubleshoot and enhance your streaming experience.
Streaming on Twitch with OBS can be incredibly rewarding, but it’s not always smooth sailing. You might encounter issues that can disrupt your stream and frustrate your viewers. Let’s dive into some common problems and how you can troubleshoot them.Stream Lag
Stream lag is one of the most annoying issues you can face. It can be caused by several factors such as internet speed, hardware limitations, or software settings. First, check your internet connection. A stable and fast connection is crucial for smooth streaming. Use a wired connection instead of Wi-Fi if possible. Next, review your OBS settings. Lowering your bitrate can often help reduce lag. If your computer is struggling, adjusting the resolution and frame rate can make a big difference. Lastly, ensure your hardware is up to the task. Streaming can be demanding, so make sure your CPU and GPU are not being overworked.Audio Problems
Audio issues can be particularly frustrating because they’re not always immediately obvious. Viewers might stick around for a few minutes of laggy video, but bad audio will drive them away quickly. First, check your microphone settings. Ensure it’s selected as the default device in both your system settings and OBS. Next, monitor your audio levels in OBS. If the audio is peaking into the red, it will sound distorted. Adjust the gain until it stays within a good range. Don’t forget about background noise. Use noise suppression filters in OBS to minimize unwanted sounds. You can also consider using a dedicated microphone for better quality. Have you ever had an issue with echoing? This is often caused by multiple audio sources. Make sure only one source is active. By addressing these common issues, you can improve the quality of your streams significantly. Remember, a smooth and professional stream will keep your viewers engaged and coming back for more. What issues have you faced while streaming, and how did you resolve them?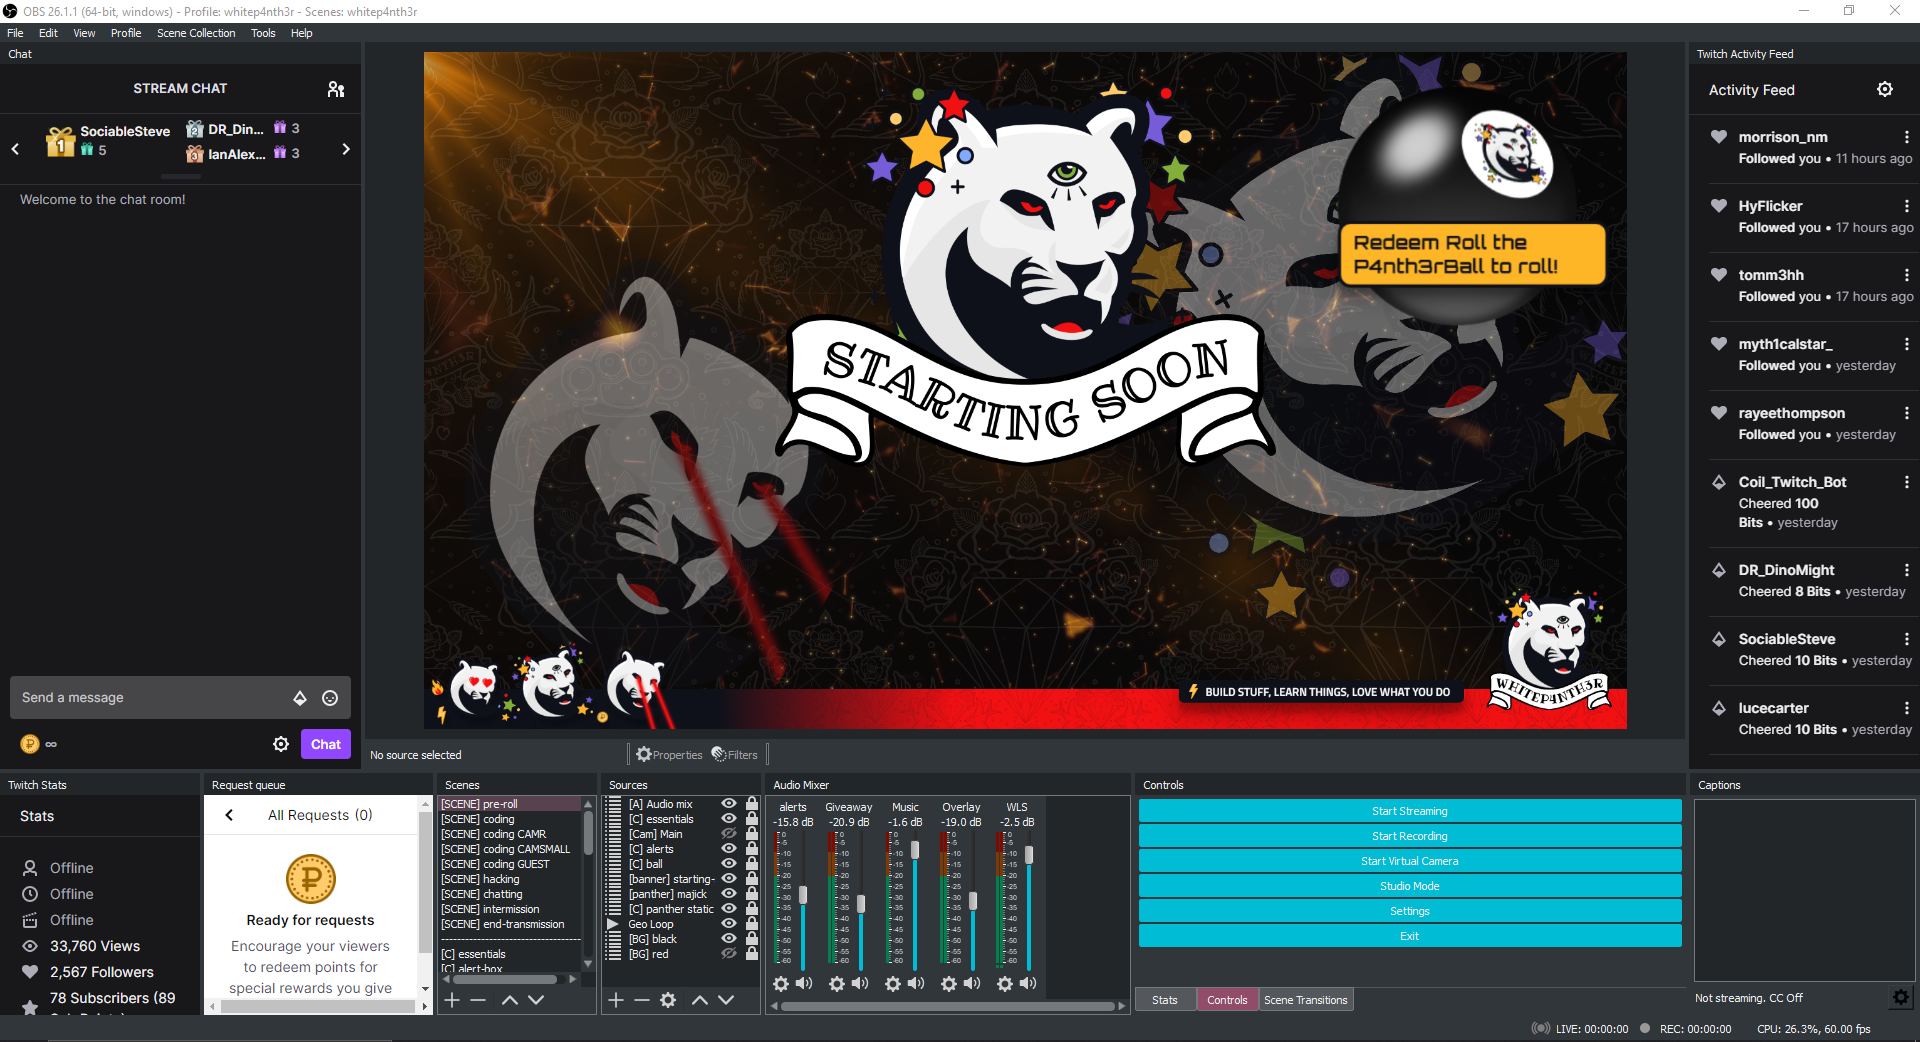
Credit: whitep4nth3r.com
Tips For Growing Your Twitch Channel
Streaming on Twitch with OBS can boost your channel. Start by installing OBS and linking it to your Twitch account. Adjust settings for optimal video quality and add engaging overlays.
Growing your Twitch channel can seem challenging, but with the right strategies, you can build a loyal audience. One of the key aspects of success on Twitch is not just streaming great content but also engaging with your audience and promoting your stream effectively. Here are some practical tips to help you grow your Twitch channel.Engaging With Your Audience
Interaction is crucial. Talk to your viewers during your stream. Ask them questions, respond to their comments, and acknowledge new followers. Use alerts for donations, follows, and subscriptions. This shows appreciation and encourages more interaction. When someone supports your channel, thank them by name. Remember, consistency is key. Stream regularly and stick to a schedule. This helps your audience know when to tune in. They’re more likely to return if they know when to expect you.Promoting Your Stream
Leverage social media. Share your streaming schedule on platforms like Twitter, Instagram, and Facebook. Short clips from your stream can also attract new viewers. Network with other streamers. Collaborate on streams or host each other’s channels. This can introduce your content to a broader audience. Consider joining Twitch communities and forums. Engage in discussions, share your stream, and offer support to others. This helps build your presence and attract viewers interested in your content. Growing a Twitch channel isn’t just about the number of followers. It’s about building a community. How will you start engaging more with your audience today?Frequently Asked Questions
How To Stream On Twitch With Obs?
To stream on Twitch with OBS, download and install OBS Studio. Create a Twitch account, and get your stream key. Open OBS, go to Settings, and select Stream. Choose Twitch, enter your stream key, and configure your scene. Click “Start Streaming” to go live.
How Do I Start Streaming On Obs?
To start streaming on OBS, download and install OBS Studio. Configure your settings, add sources, and input your stream key. Click “Start Streaming. “
Is Obs Good For Twitch Streaming?
Yes, OBS is excellent for Twitch streaming. It’s free, open-source, and offers powerful customization options. Many streamers use it for high-quality broadcasts.
What Obs Settings Are Needed For Twitch Streaming?
For Twitch streaming, set OBS video bitrate to 2500-4000 Kbps. Use x264 encoder, 1280×720 resolution, 30 FPS. Adjust audio bitrate to 160 Kbps.
Conclusion
Streaming on Twitch with OBS is simple and fun. Follow the steps, and you can start sharing your gameplay. Ensure your settings are optimized for the best quality. Practice makes perfect, so keep learning and improving. Engage with your audience regularly.
Consistency is key to growing your channel. Enjoy the process and happy streaming!