Best Amd Streaming Settings Obs: Ultimate Guide for Perfect Streams
Streaming on OBS with AMD settings can be tricky. You want the best quality and performance.
Getting the right AMD streaming settings on OBS can make a huge difference. Streaming has become a popular way to share gaming, tutorials, and other content. For those using AMD hardware, optimizing settings can be a game-changer. It ensures your streams run smoothly without compromising on quality.
This guide will help you find the best AMD streaming settings for OBS. Whether you’re a beginner or looking to tweak your setup, these tips will enhance your streaming experience. Let’s dive into the world of streaming and make your content shine!

Credit: www.youtube.com
Introduction To Amd Streaming
Streaming has become a popular way to share content. Gamers, vloggers, and professionals use it daily. AMD provides powerful tools for efficient streaming. Let’s explore the benefits and basics.
Why Choose Amd For Streaming
AMD processors are known for their performance. They offer high-quality video output. This ensures smooth streams without lag. AMD’s technology supports high frame rates. This is crucial for streaming fast-paced games.
AMD’s GPUs handle graphics well. They enhance the visual experience for viewers. AMD hardware is also cost-effective. It provides good value for its price. Many streamers prefer AMD for its reliability.
Basics Of Obs
OBS stands for Open Broadcaster Software. It is a free tool for streaming. OBS is versatile and user-friendly. It supports various platforms like Twitch and YouTube.
OBS allows customization of stream settings. Users can adjust video quality and audio. OBS supports plugins to extend its functionality. It offers scenes and sources for organizing content.
OBS is compatible with AMD hardware. This ensures optimal performance. Users can benefit from AMD’s encoding features. OBS and AMD together make streaming easier.
System Requirements
Optimize your AMD streaming with OBS by meeting system requirements. Ensure your CPU, GPU, and RAM are up to date. Adjust settings for smooth, high-quality streaming.
When it comes to streaming on OBS (Open Broadcaster Software) with an AMD setup, knowing the right system requirements can make all the difference. You want to provide your viewers with a smooth, high-quality stream without your computer lagging or crashing. Let’s break down what you need for a seamless streaming experience.Minimum Specs For Smooth Streaming
To begin with, you need to ensure your system meets the minimum specifications. These are the baseline requirements to stream without significant issues: – CPU: AMD Ryzen 5 1600 or equivalent. A 6-core processor can handle the basic demands of streaming. – GPU: AMD Radeon RX 570 or equivalent. A decent graphics card is crucial for encoding video. – RAM: 8GB. Enough to handle OBS and other background processes. – Storage: SSD with at least 250GB. Faster storage speeds up loading times and reduces lag. Meeting these minimum specs will get you started, but if you want a better experience, consider some upgrades.Recommended Hardware Upgrades
For a more robust streaming setup, upgrading your hardware will significantly improve performance: – CPU: AMD Ryzen 7 3700X. An 8-core processor provides smoother multitasking and better performance. – GPU: AMD Radeon RX 5700 XT. A powerful GPU can handle more demanding tasks and higher resolutions. – RAM: 16GB or more. More memory allows for better multitasking and ensures OBS runs smoothly. – Storage: NVMe SSD with at least 500GB. Faster read/write speeds enhance overall system responsiveness. Consider your streaming goals. If you’re aiming for 1080p at 60fps, these upgrades are worth the investment. Ever tried streaming a high-action game only to see your frame rate drop? Upgrading your GPU might solve that problem. It’s all about balancing performance and budget. What are your streaming ambitions? Investing in better hardware not only improves your stream quality but also makes the streaming process more enjoyable for you. By understanding and meeting these system requirements, you can ensure a smooth and professional streaming experience. Ready to upgrade your setup?Installing And Setting Up Obs
Installing and setting up OBS for AMD streaming ensures optimal performance. Adjust settings like encoder, bitrate, and resolution for smooth streaming. Enhance your experience with AMD’s advanced features.
Installing and Setting Up OBS If you’re diving into the world of streaming, OBS Studio is an essential tool you need. Setting it up correctly can make a huge difference in your streaming quality. Let’s break down the process step-by-step so you can get started smoothly.Downloading Obs Studio
First things first, you need to download OBS Studio. Head over to the official OBS Studio website. Choose the version compatible with your operating system—Windows, Mac, or Linux. Click the download button and wait for the file to download. It’s usually a quick process, depending on your internet speed. Once downloaded, open the file to start the installation.Initial Configuration Steps
After installing, launch OBS Studio. You will be greeted with an auto-configuration wizard. This wizard helps optimize the settings based on your hardware. Select “Optimize for streaming” if you plan to stream. The wizard will test your network and hardware to suggest the best settings. Accept these suggestions to get started quickly. Next, you’ll want to add your streaming service. Go to “Settings” and then “Stream”. Choose your platform—Twitch, YouTube, or another service. Enter your stream key, which you can find in your streaming platform’s settings. Take a moment to adjust your video settings under the “Video” tab. Set the base (canvas) resolution to your monitor’s resolution. Adjust the output (scaled) resolution based on your streaming platform’s recommendations. Finally, set your FPS (frames per second). A good starting point is 30 FPS, but if your hardware can handle it, 60 FPS offers smoother motion. Remember, getting your OBS settings right is crucial for delivering a high-quality stream. It might take some trial and error, but it’s worth the effort. Have you ever struggled with OBS settings? What tips helped you? Share in the comments below!Optimal Obs Settings For Amd
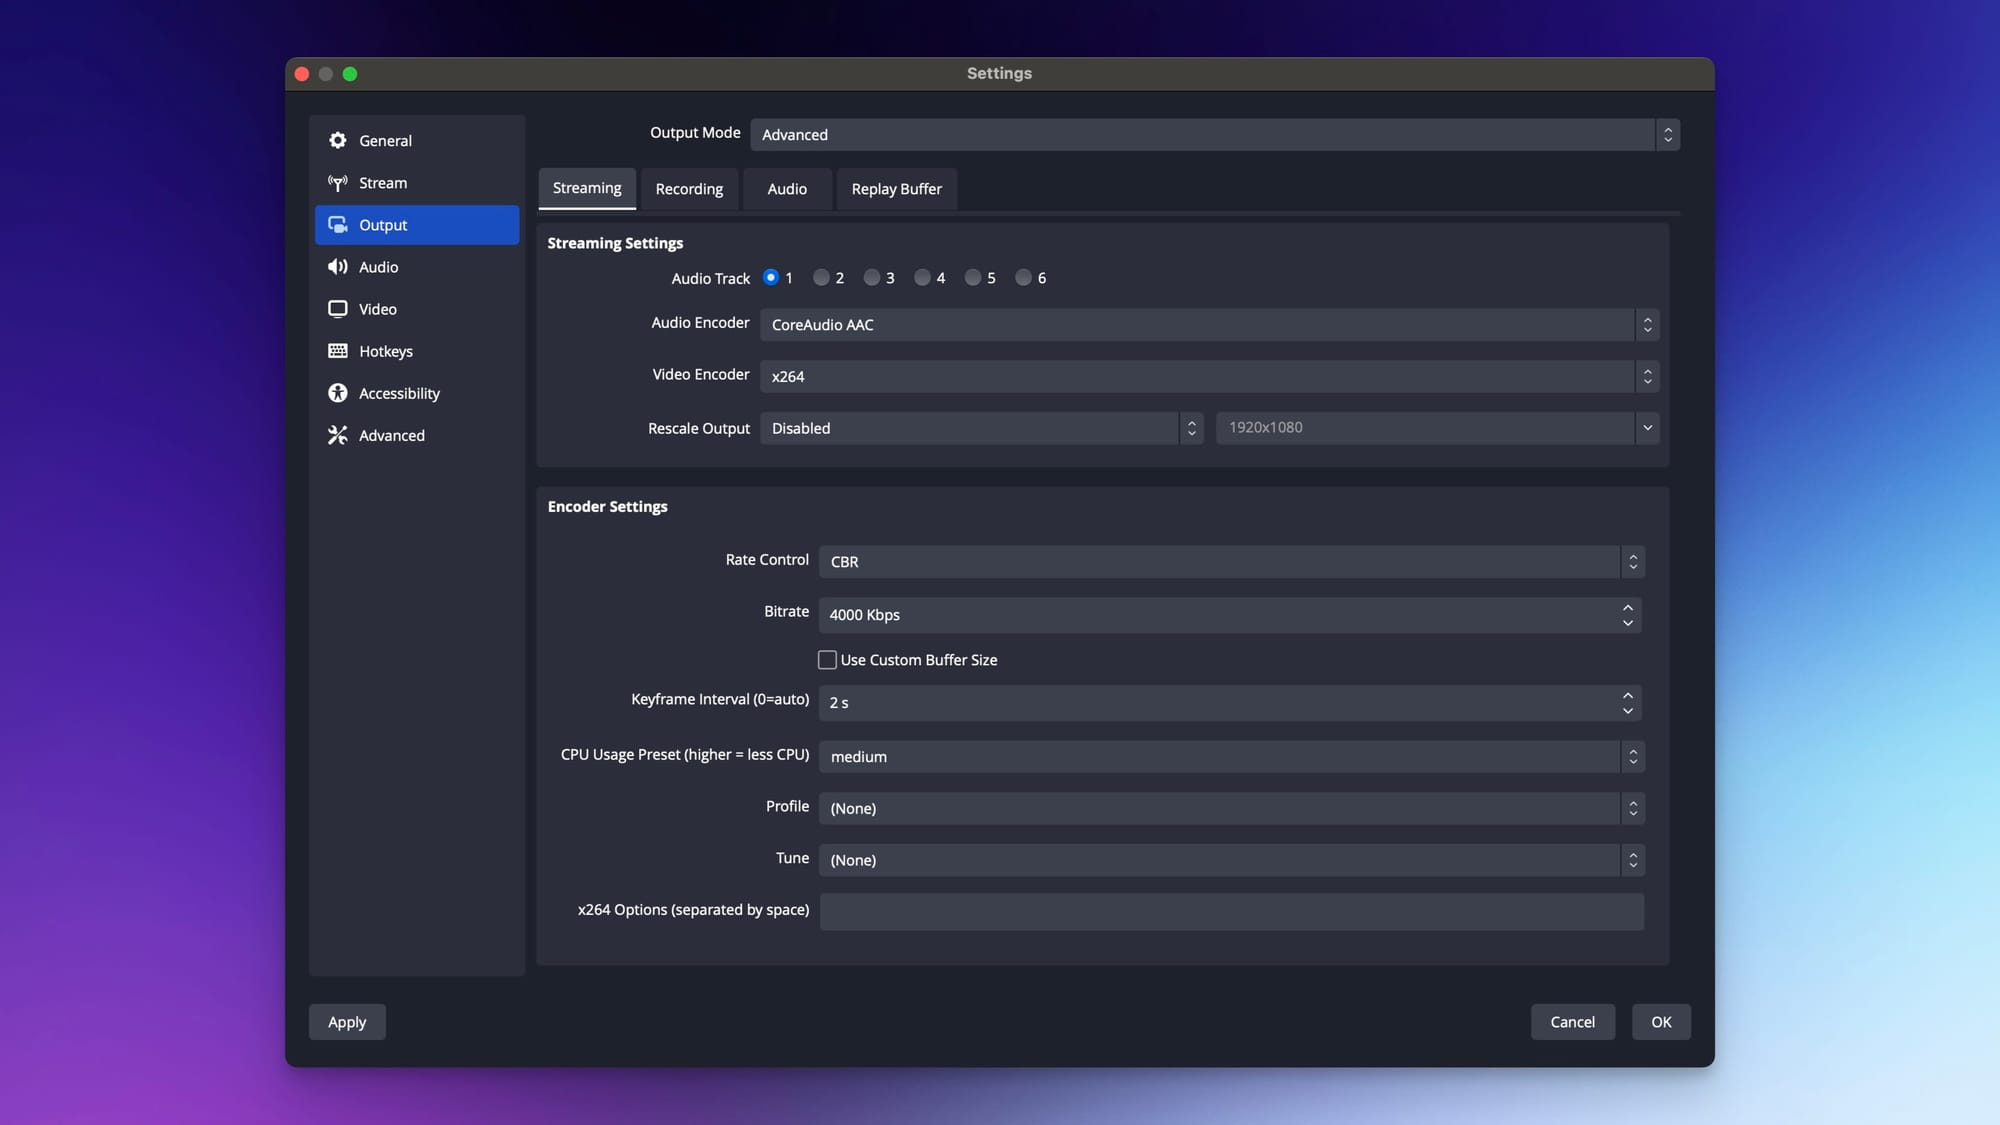
When setting up OBS for streaming with your AMD hardware, you want to ensure everything runs smoothly. Optimal settings can make a big difference in your streaming quality. These settings will help you get the best performance and visual quality without overloading your system.
Video Settings
To start, let’s focus on the video settings. Choose the right resolution and frame rate for your stream. A common choice is 1920×1080 at 60fps for smooth and sharp video. Lower resolutions like 1280×720 can help if you face performance issues.
Next, adjust the bitrate. A good starting point is 4500 Kbps for 1080p at 60fps. Higher bitrates improve quality but need more bandwidth. Keep an eye on your internet upload speed. You can test different bitrates to find a balance between quality and stability.
Use the AMD Hardware Encoder (AMF) for encoding. It offloads the work from your CPU to your GPU. This is particularly useful if you’re gaming and streaming on the same machine. Set the preset to “Balanced” for a good mix of quality and performance.
Audio Settings
Audio quality is just as important as video. Set your audio bitrate to 160 Kbps for clear sound. Higher bitrates can improve quality but may use more bandwidth. For most streams, 160 Kbps is enough.
Choose the right sample rate, usually 44.1 kHz or 48 kHz. These are standard and ensure good audio fidelity. Match this setting with your audio interface for the best results.
Don’t forget to balance your audio sources. OBS lets you adjust volume levels for different inputs. Make sure your microphone and game audio are balanced. Viewers should hear you clearly without the game audio overpowering your voice.
Have you ever wondered why your stream doesn’t sound as good as others? Check if you have noise suppression and gain filters applied. These can help clean up your audio.
Getting the right OBS settings for your AMD hardware might take some tweaking. But once you find the sweet spot, your stream quality will improve significantly. So, what are you waiting for? Dive in and start adjusting those settings!
Advanced Encoder Settings
Streaming quality can make or break your audience’s experience. To ensure your stream is smooth and looks great, it’s crucial to get your advanced encoder settings right in OBS (Open Broadcaster Software). If you’re using an AMD GPU, there are specific settings you should tweak to get the best performance. Let’s dive into these settings.
Choosing The Right Encoder
When setting up OBS, one of the first decisions you’ll make is selecting the right encoder. For AMD users, the two main options are AMF (Advanced Media Framework) and x264. AMF uses your AMD GPU to handle the encoding, freeing up your CPU for other tasks. This is particularly useful if you have a high-end GPU but a mid-range CPU.
On the other hand, x264 relies on your CPU. If you have a powerful CPU and prefer not to use your GPU for encoding, x264 could be the better choice. Personally, I find that AMF provides a good balance, especially if you’re gaming and streaming on the same machine. What works best for you might depend on your specific setup and preferences. Have you tried both options to see which one gives you better performance?
Bitrate And Resolution Settings
Bitrate and resolution are critical factors in determining the quality of your stream. Higher bitrates and resolutions result in better quality but require more bandwidth. A good starting point for 1080p streaming is a bitrate of 4500-6000 kbps. If your internet connection can handle it, you might push this higher.
For resolutions, 1080p at 60 frames per second (fps) is ideal for a high-quality stream. However, if you’re facing bandwidth limitations, consider dropping to 720p at 60 fps or even 30 fps. Keep in mind that lowering the resolution and frame rate can help maintain a stable stream if your internet or hardware is struggling.
To illustrate, I once tried streaming a new game at 1080p 60 fps with a 3500 kbps bitrate. My viewers complained about buffering and poor quality. After tweaking my settings to 720p 60 fps and increasing the bitrate to 5000 kbps, the quality improved significantly. Have you found a bitrate and resolution that work best for your setup?
Getting your OBS settings just right can be a game-changer for your streaming experience. Experiment with these settings to find what works best for you and your audience. Happy streaming!
Customizing Your Stream
Customizing your stream can make it unique and engaging. With OBS and AMD settings, you can add a personal touch. This guide will help you add overlays and alerts, and set up scenes and sources.
Adding Overlays And Alerts
Overlays and alerts are great for grabbing viewers’ attention. Overlays can display recent followers, subscribers, or donations. Alerts notify you and your audience of new activities. To add these, you can use sources like images or browser sources.
Start by clicking the “+” icon in the sources box. Choose “Image” for static overlays or “Browser” for dynamic alerts. Set the URL for your alerts in the browser source settings. Adjust the size and position to fit your stream layout.
Setting Up Scenes And Sources
Scenes and sources are the building blocks of your stream. A scene can include different sources like your webcam, game, and overlays. To create a new scene, click the “+” icon in the scenes box. Give it a name that helps you remember its purpose.
Next, add sources to your scene by clicking the “+” icon in the sources box. Choose the type of source, like “Video Capture Device” for your webcam or “Game Capture” for your game. Arrange the sources in the order you want them to appear. You can drag and resize them to fit your layout.
Switching between scenes can keep your stream dynamic. You can set hotkeys for quick scene changes. This helps in maintaining a smooth viewer experience. OBS with AMD settings ensures high-quality streaming with low latency. Experiment with different settings to find what works best for you.
Testing And Monitoring Your Stream
Testing and monitoring your stream is crucial to ensure your viewers have a smooth and enjoyable experience. This involves running test streams and closely monitoring performance and quality. Let’s dive into how you can make this process efficient and effective.
Running Test Streams
Before going live, it’s essential to run test streams. These help you spot any issues with your settings and make necessary adjustments. A test stream allows you to see how your stream performs without an audience, reducing pressure.
Start by setting your stream to “Private” or “Unlisted” on your chosen platform. This way, only you can see it. Stream for at least 15-20 minutes to get a good feel of your settings in action. Pay attention to any lags, buffering, or quality drops.
Consider testing at different times of the day. Network traffic can vary, affecting your stream’s performance. This practice helps you find the best times to go live. Have you ever noticed your evening streams lag more than morning ones?
Monitoring Performance And Quality
Once your test stream is up and running, it’s time to monitor its performance and quality. OBS provides several tools to help you with this. Keep an eye on your CPU usage, as high usage can lead to dropped frames and poor stream quality.
Use the OBS stats window to track your frame rate, bitrate, and dropped frames. Ideally, your frame rate should remain stable, and the bitrate should match what you’ve set. Dropped frames should be minimal. Aim for less than 1% dropped frames for a smooth experience.
Watch your test stream on a second device. This gives you the viewer’s perspective. Check for issues like pixelation, audio sync problems, or buffering. Are there any areas that need improvement?
Engage with your audience once you’re live. Ask them for feedback on stream quality. They can provide insights you might miss. Have you ever asked your viewers for feedback during a stream?
Remember, continuous monitoring and tweaking are key to maintaining high-quality streams. Happy streaming!
Troubleshooting Common Issues
Optimize AMD streaming settings in OBS by adjusting bitrate and resolution. Ensure drivers are up-to-date for smooth performance. Tweak encoder settings for better quality.
### Troubleshooting Common Issues Streaming with OBS using AMD settings can be a smooth experience, but sometimes you might run into common issues. Fixing these problems can greatly improve your stream quality. Let’s dive into some solutions for the most frequent issues.Fixing Lag And Dropped Frames
One of the most frustrating problems is lag and dropped frames. It’s annoying for both you and your viewers. First, check your internet connection. A stable and fast connection is crucial. Use a wired connection instead of Wi-Fi whenever possible. Reduce your output resolution. Streaming at a lower resolution can ease the strain on your system and internet. Adjust your bitrate settings. Lowering the bitrate can help if your internet speed isn’t the best. However, don’t go too low, or your stream will look pixelated. Close unnecessary programs. Other applications can consume your system resources and bandwidth. Make sure OBS is the primary focus of your system.Audio Sync Problems
Audio sync issues can be just as annoying as video lag. Here’s how to tackle them. Check your audio devices. Make sure your microphone and desktop audio are set correctly in OBS. Adjust the sync offset. OBS allows you to add a delay to your audio to match your video. Experiment with small adjustments to find the right balance. Update your drivers. Sometimes, outdated drivers can cause sync problems. Keep your audio and video drivers up to date. Enable the “Force desktop audio to use video timestamps” setting. This can help align your audio with your video. These troubleshooting tips can make a significant difference. Have you faced any of these issues? What solutions worked for you? Share your experiences in the comments!Tips For Engaging Streams
Creating engaging streams is essential for growing your audience on platforms like Twitch or YouTube. Using the best AMD streaming settings in OBS can significantly improve the quality of your streams. But technical settings alone won’t keep viewers glued to your channel. Here are some tips to make your streams more engaging and interactive.
Interacting With Your Audience
Engagement is key to building a loyal audience. Talk to your viewers often. Ask questions and respond to comments. Make them feel involved. Use their names when you can. This makes the interaction personal. Polls and surveys are great tools. They give viewers a voice in your stream. Keep an eye on the chat. Acknowledge new followers and subscribers. Thank them for their support. Engaged viewers are more likely to return.
Growing Your Channel
Consistency is crucial for growth. Stream on a regular schedule. Let your audience know when to expect you. Promote your streams on social media. Share clips and highlights. This attracts new viewers. Collaborate with other streamers. This exposes your channel to their audience. Use high-quality graphics and overlays. They make your stream look professional. A good first impression is important. Join online communities related to your content. Participate in discussions. This increases your visibility.

Credit: www.reddit.com
Credit: restream.io
Frequently Asked Questions
What Should My Obs Stream Settings Be For Best Quality?
Set video bitrate to 4500-6000 kbps for 1080p at 60 fps. Use x264 encoder with veryfast preset. Choose 128-160 kbps for audio. Adjust output resolution to 1920×1080. Ensure stable internet connection.
How To Use Amd Gpu For Obs?
To use an AMD GPU for OBS, install the latest AMD drivers. In OBS settings, select AMD GPU for hardware encoding. Adjust settings for optimal performance.
What Is The Best Bitrate For Amd Video?
The best bitrate for AMD video typically ranges from 8,000 to 12,000 kbps for 1080p resolution. Adjust based on quality needs.
Can Amd Stream On Twitch?
Yes, AMD hardware can stream on Twitch. Use a powerful AMD CPU and GPU for smooth streaming. Ensure stable internet.
Conclusion
Choosing the best AMD streaming settings for OBS can enhance your stream. With these tips, you can achieve smooth and high-quality streams. Always experiment with settings to find what suits your setup. Keep your audience engaged with clear visuals and sound.
Happy streaming!