Best Streaming Settings for Obs: Optimize Your Live Broadcast
Streaming with OBS can be tricky. Perfect settings enhance your experience.
Finding the best streaming settings for OBS can make a huge difference. It can improve stream quality and reduce lag. Whether you’re new or experienced, the right settings are crucial. OBS, or Open Broadcaster Software, is popular for its flexibility.
But it can be overwhelming to configure. This guide will help you navigate the best settings. You’ll learn what works best for your setup. No more guessing or endless tweaking. Let’s dive in and make your streams shine.
Credit: www.dacast.com
Hardware Requirements
Choosing the best streaming settings for OBS starts with understanding the hardware requirements. Your computer’s specs play a crucial role in ensuring smooth, high-quality streams. Let’s dive into the minimum and recommended specifications for optimal performance.
Minimum Specs
To run OBS, your computer must meet certain minimum specifications. You need at least an Intel Core i5 CPU. Your system should have 8GB of RAM. A GPU like NVIDIA GTX 1050 or AMD RX 560 is necessary. A stable internet connection is also vital. These specs will help you stream basic content.
Recommended Specs
For better performance, consider upgrading to recommended specs. An Intel Core i7 CPU is ideal. Your system should boast 16GB of RAM. A powerful GPU such as NVIDIA GTX 1660 or AMD RX 580 enhances video quality. A high-speed internet connection ensures smooth streaming. These settings provide a superior streaming experience.
Internet Connection
When you’re setting up OBS for streaming, your internet connection plays a crucial role. A reliable connection ensures your stream runs smoothly without buffering or lag. But what exactly should you look for in your internet connection?
Upload Speed
Your upload speed is vital for streaming. This is the rate at which data is sent from your computer to the internet. If your upload speed is too low, your viewers may experience buffering or low-quality video.
A good benchmark is to have an upload speed of at least 5 Mbps for 720p streaming. For 1080p, aim for at least 10 Mbps. Use an online speed test to check your upload speed and ensure it meets these requirements.
I once tried streaming with an upload speed of just 3 Mbps. It was a disaster. My viewers complained about constant buffering, and the video quality was poor. I quickly upgraded my internet plan, and the difference was night and day.
Stability
Stability is just as important as speed. An unstable connection can cause your stream to drop unexpectedly or produce a choppy video. This can be frustrating for both you and your viewers.
Consider using a wired Ethernet connection instead of Wi-Fi. Ethernet is more stable and less prone to interference. If you must use Wi-Fi, make sure your signal is strong and your router is up-to-date.
During one of my live streams, my Wi-Fi connection dropped repeatedly. It was embarrassing and disruptive. Switching to a wired connection solved the problem instantly.
How stable is your internet connection? Do you experience frequent drops or slowdowns? If so, it might be time to make some changes.
By focusing on your upload speed and stability, you can significantly improve the quality of your OBS streams. A solid internet connection is the foundation of a great streaming experience. What adjustments will you make to ensure your connection is up to par?
Video Settings
Optimize your OBS streaming with the best video settings for smoother and clearer broadcasts. Adjust bitrate, resolution, and frame rate for an ideal viewer experience. Ensure your stream runs seamlessly and maintains high quality.
If you’ve ever struggled with laggy streams or blurry videos on OBS (Open Broadcaster Software), you know how frustrating it can be. The key to a smooth, crisp streaming experience starts with getting your video settings just right. This section will guide you through the essential video settings to optimize your OBS streams, focusing specifically on resolution and frame rate.Resolution
Resolution is the foundation of your video quality. It dictates how clear and sharp your stream will appear to viewers. The most common resolutions for streaming are 720p and 1080p. If you’re just starting out, 720p is a solid choice. It strikes a good balance between quality and performance, especially if your internet speed isn’t the fastest. Most viewers won’t notice a huge difference between 720p and 1080p, but they will notice if your stream is constantly buffering. Personally, I started with 720p. It allowed me to stream without hiccups while I was still figuring things out. Over time, as I upgraded my internet and hardware, I moved to 1080p for a crisper look.Frame Rate
Frame rate determines how many frames per second (fps) your stream displays. Common choices are 30fps and 60fps. 30fps is the standard for most streams. It offers a smooth experience and is less demanding on your system and internet connection. If you’re streaming casual content, like talk shows or simple gameplay, 30fps is usually sufficient. However, if you’re streaming fast-paced games, 60fps can make a significant difference. It delivers a smoother, more fluid viewing experience. When I upgraded to 60fps for my action game streams, the improvement was noticeable and appreciated by my viewers. Remember, higher frame rates require more bandwidth and better hardware. Test different settings to see what works best for you and your audience. What resolution and frame rate do you currently use, and how does it impact your streaming experience? Feel free to share your thoughts or ask questions in the comments. Your feedback helps us all improve our streaming setups!Bitrate Settings
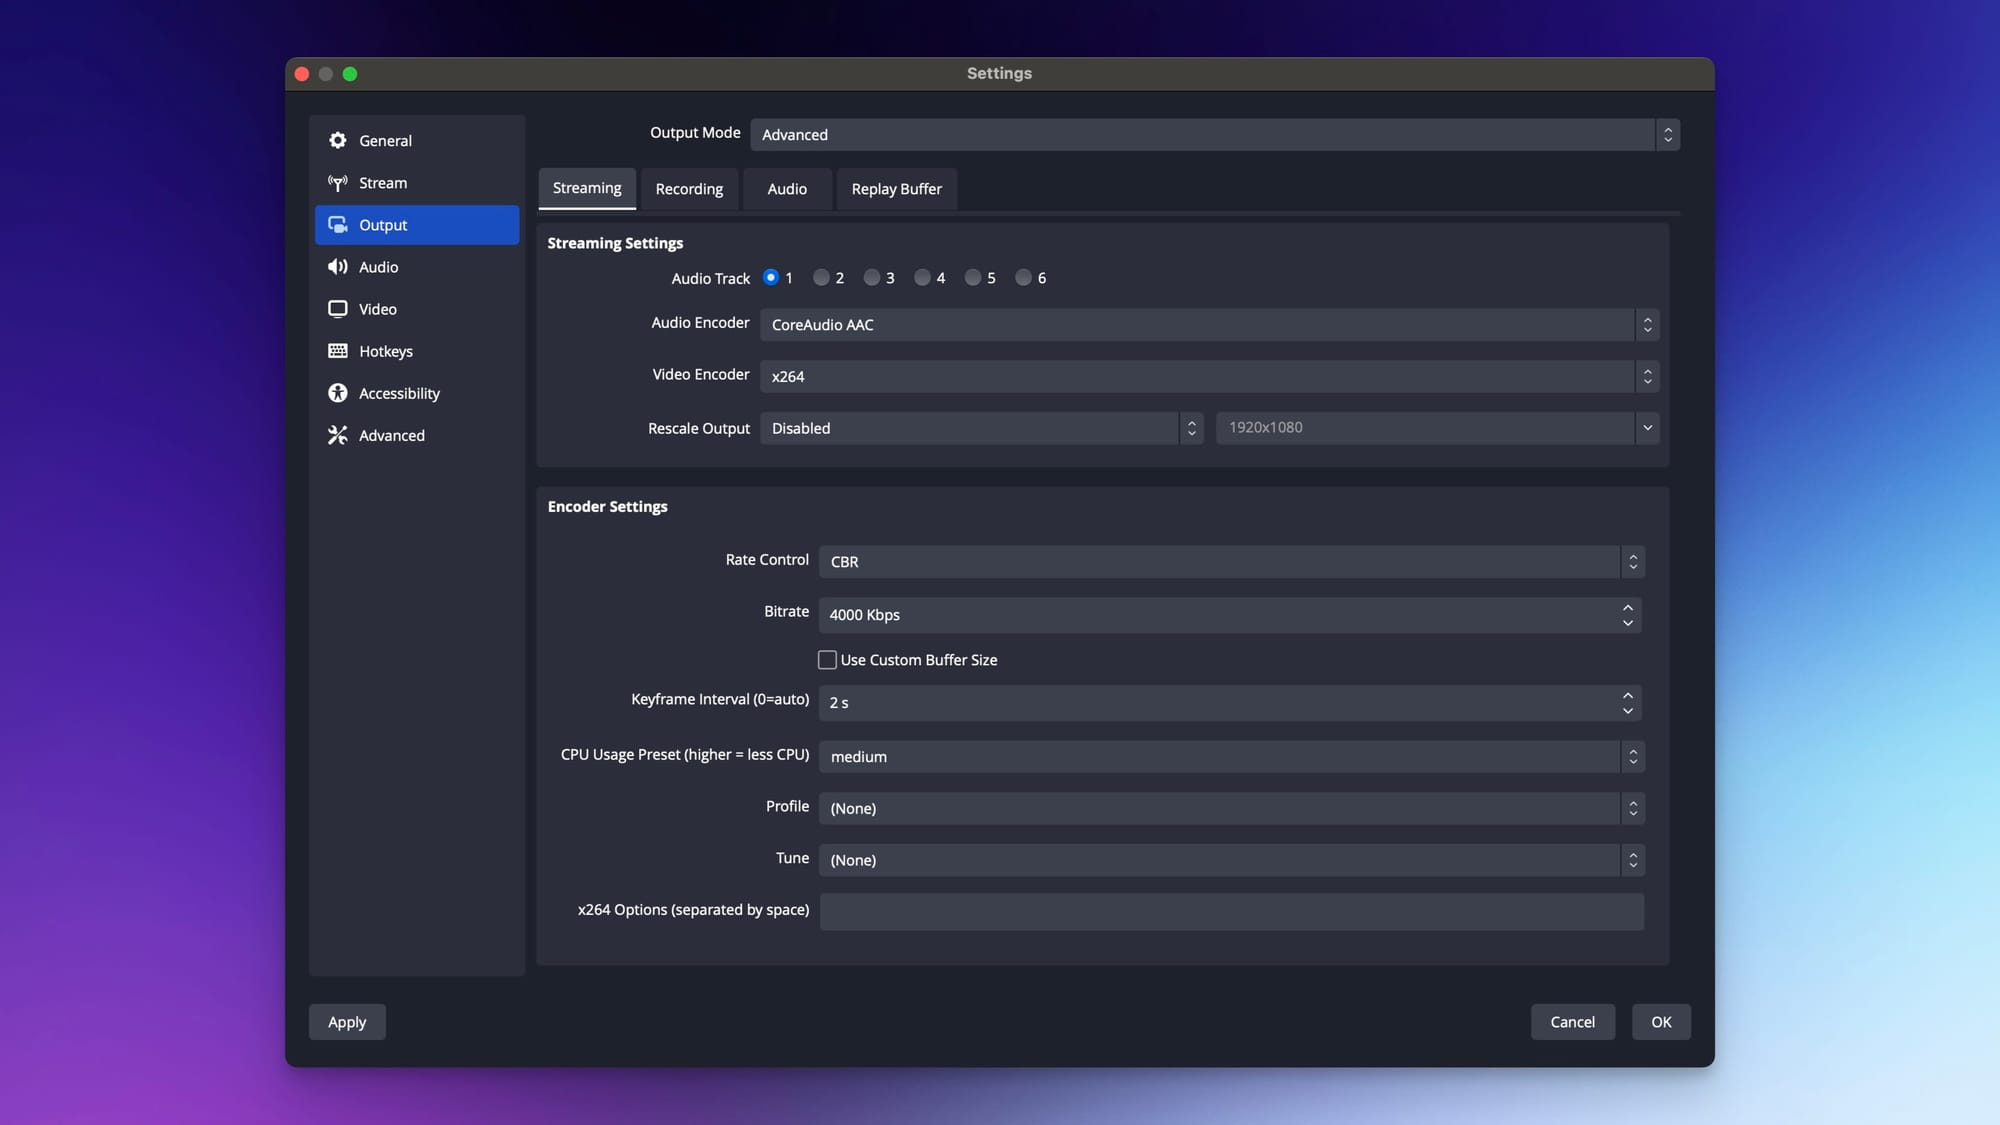
Bitrate settings are crucial for achieving a smooth and high-quality stream in OBS (Open Broadcaster Software). The bitrate determines the amount of data transmitted per second during your stream. It directly impacts video and audio quality, as well as the overall viewing experience for your audience. Let’s break down the ideal bitrate settings for both video and audio to help you create the best possible stream.
Video Bitrate
Video bitrate is the amount of data used to encode your video stream. Higher bitrates result in better video quality but require more bandwidth. If your internet connection can’t handle the chosen bitrate, viewers will experience buffering and poor quality.
For a resolution of 720p at 30 frames per second (fps), a video bitrate of 2,500 to 4,000 kbps is recommended. For 1080p at 60 fps, aim for 4,500 to 6,000 kbps. If you’re unsure, start with a mid-range value and adjust based on feedback from your viewers.
Remember, your upload speed should be at least double your video bitrate to avoid any streaming issues. Tools like Speedtest.net can help you check your internet speed. Have you ever had to lower your bitrate during a live stream due to unexpected internet issues? It can be frustrating, but adjusting settings on the fly is a valuable skill for any streamer.
Audio Bitrate
While video quality grabs attention, audio quality keeps viewers engaged. Poor audio can drive viewers away faster than mediocre video. Audio bitrate determines the clarity and fidelity of your stream’s sound.
A standard audio bitrate setting is 128 kbps for most streams. This provides a good balance between quality and bandwidth usage. If you prioritize audio quality, consider increasing the bitrate to 192 kbps or even 320 kbps. Just ensure your internet can handle it without compromising video quality.
Have you ever listened to a stream with crackling or muffled audio? It’s a quick turn-off. Ensuring your audio bitrate is set correctly can make a huge difference in viewer retention. How do you balance your audio and video settings to provide the best experience for your audience?
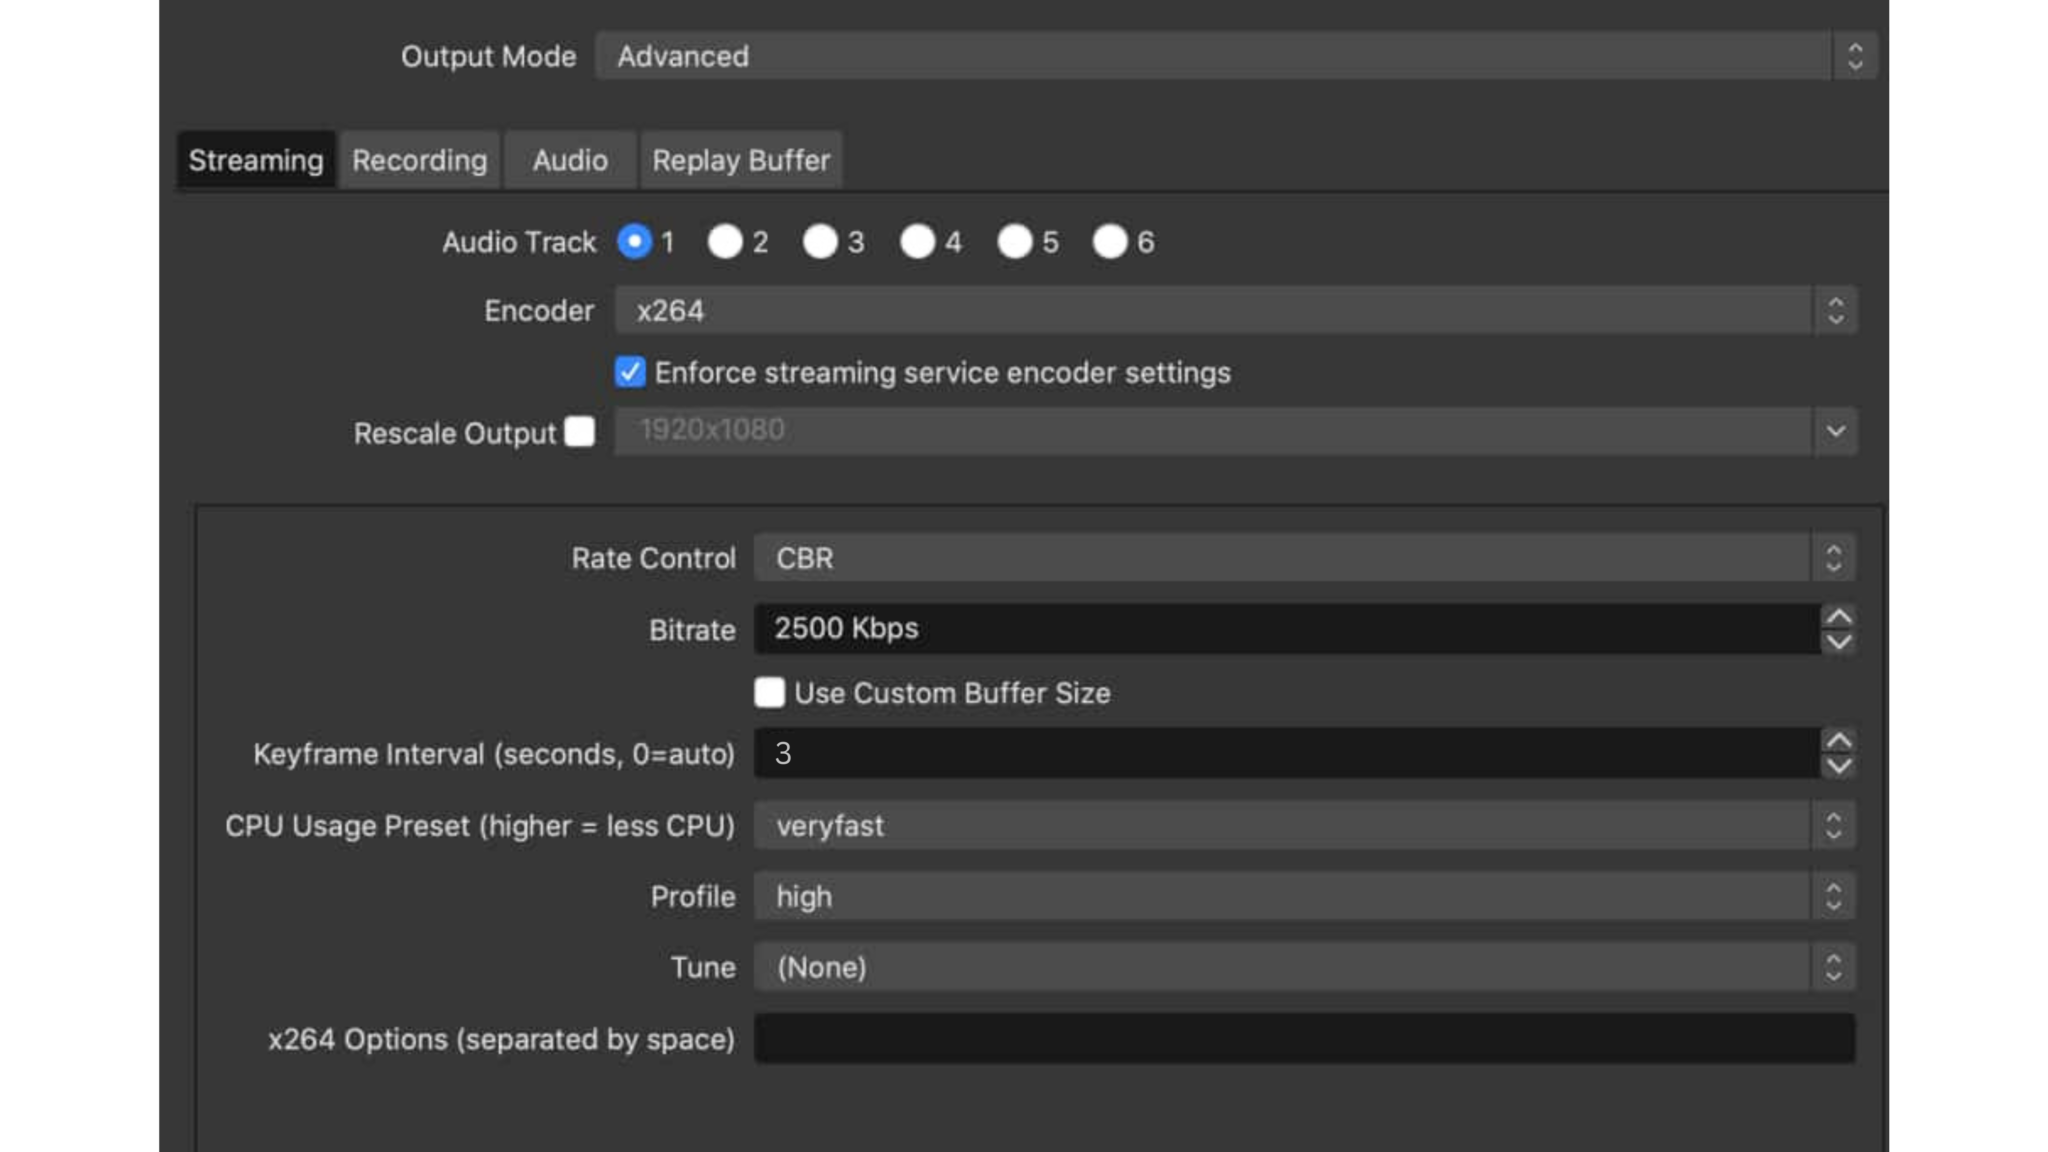
Encoder Settings
Choosing the right encoder settings in OBS (Open Broadcaster Software) can greatly impact the quality of your stream. Whether you use software or hardware encoding, understanding these settings helps improve your streaming experience. Each type has its advantages and drawbacks. Let’s dive deeper.
Software Encoding
Software encoding uses your computer’s CPU to encode video. This method can provide high-quality streams but may stress your CPU. If your CPU is powerful, software encoding might be a good choice. OBS offers x264 as the main software encoder. This encoder allows for detailed settings, giving you control over quality and performance. Adjust the bitrate to balance quality and bandwidth use. A higher bitrate means better quality but more data usage.
Hardware Encoding
Hardware encoding leverages your GPU for video encoding. This method reduces the load on your CPU. If you have a strong GPU, hardware encoding can be very efficient. OBS supports encoders like NVENC for NVIDIA GPUs and AMF for AMD GPUs. These encoders are optimized for gaming and streaming. Adjusting settings like preset and profile can enhance performance. Generally, hardware encoding is easier on your system, making it a popular choice for many streamers.
Audio Settings
When setting up your OBS (Open Broadcaster Software) for streaming, audio settings play a crucial role in delivering a high-quality experience to your viewers. Clear and crisp audio can keep your audience engaged and coming back for more. Let’s dive into the best audio settings for OBS, focusing on sample rate and audio tracks.
Sample Rate
The sample rate determines the quality of your audio. Higher sample rates capture more details, which can make your stream sound more professional. However, higher sample rates also use more CPU power.
A common choice is 44.1 kHz, the standard for CD-quality audio. If you want even better quality and your system can handle it, you might opt for 48 kHz. This is often used in professional video production.
Experiment with these settings to see what works best for you. Remember, your viewers may not notice a huge difference between 44.1 kHz and 48 kHz, but they will definitely notice if your stream lags or your CPU is overloaded.
Audio Tracks
OBS allows you to use multiple audio tracks. This can be incredibly useful for managing different audio sources. For instance, you can have one track for your microphone, another for game audio, and yet another for background music.
Why is this useful? It gives you the flexibility to adjust volumes separately. If your game audio is too loud, you can lower it without affecting your microphone level.
To set this up, go to the “Output” settings in OBS. Under the “Streaming” tab, you’ll see options for audio tracks. Select which tracks you want to use. Then, in the mixer, assign your audio sources to different tracks. This makes your stream sound more balanced and professional.
Investing time in fine-tuning your audio settings can significantly improve your streaming quality. What are your current audio settings in OBS? Have you noticed a difference after making adjustments? Share your thoughts and experiences in the comments below!
Advanced Settings
Optimize your streaming with OBS by adjusting advanced settings. Fine-tune bitrate, resolution, and frame rate for smooth, high-quality broadcasts.
When diving into the world of streaming with OBS, the Advanced Settings can truly enhance the quality and stability of your stream. These settings are crucial for optimizing performance and ensuring a smooth viewer experience. Let’s break down some of the most important advanced settings.Process Priority
Setting the Process Priority in OBS is like telling your computer how important OBS is compared to other running programs. You can access this option in the Advanced Settings menu. By setting the priority to “Above Normal” or “High,” you ensure that OBS gets more of your computer’s processing power. This can be particularly useful if you are running multiple applications simultaneously. However, be cautious. Setting it too high might affect other essential applications. Test different levels to find the right balance for your setup.Network Settings
Network Settings in OBS are essential for maintaining a stable stream, especially if you have an inconsistent internet connection. Start by adjusting the Network Buffering setting. This can help absorb temporary drops in your internet speed. Another valuable setting is the Bind to IP option. If you have multiple network adapters, you can choose which one OBS should use. This is handy if you want to ensure that your streaming data takes the fastest route available. Additionally, enabling Dynamic Bitrate can save your stream from dropping out. OBS will automatically adjust your stream’s bitrate based on your current network conditions. This ensures that your viewers experience fewer buffering interruptions. Optimizing these settings can make a noticeable difference. Have you ever noticed sudden drops in stream quality? Adjusting these network settings could be your solution. Experiment with them and see what works best for you. Remember, the goal is to create an enjoyable viewing experience for your audience. Don’t be afraid to tweak settings and test different configurations. Your stream will be better for it.Testing Your Stream
Testing your stream is a crucial step to ensure the best viewer experience. It allows you to fine-tune your settings, so your stream runs smoothly. This process involves running a few test streams and making adjustments as needed. Let’s dive into the steps you need to follow.
Trial Runs
Start with a few trial runs. Stream to a private channel or create a test account. Observe how your stream performs. Check for any lag, buffering, or audio issues. Note any problems you encounter. This will help you identify what needs fixing.
Adjusting Settings
Based on your trial runs, tweak your OBS settings. Adjust your bitrate, resolution, and frame rate. Lower settings if you experience lag or buffering. Increase them if your stream quality is poor. Make one change at a time. Test your stream again after each adjustment. This will help you find the best settings for your setup.
Troubleshooting
Streaming can be a smooth ride with the right OBS settings. However, you might run into some bumps along the way. This section will guide you through troubleshooting common issues and using helpful tools to get you back on track.
Common Issues
One common problem streamers face is lag. This can be frustrating, especially when you’re trying to engage your audience. Make sure your internet connection is stable and strong. Lowering the bitrate can also help.
Audio issues are another frequent hurdle. You might notice your voice cutting out or a delay between your video and audio. Check your microphone settings and ensure it’s properly configured in OBS. Sync your audio and video by adjusting the sync offset in the audio settings.
Sometimes, OBS might crash unexpectedly. This can disrupt your stream and frustrate your viewers. Update OBS and your graphics drivers regularly. This can prevent crashes and improve performance.
Helpful Tools
Several tools can make troubleshooting easier. OBS has a built-in log feature. This can help you identify errors and warnings. Access the logs by going to the Help menu and selecting “Log Files.”
Another useful tool is the OBS Auto-Configuration Wizard. This tool can optimize your settings based on your system’s capabilities. Run the wizard from the Tools menu and follow the prompts.
If you’re still having trouble, consider using external tools like Speedtest.net. This can help you check your internet speed. A stable and fast connection is crucial for a smooth stream.
Have you ever faced an issue that seemed impossible to fix? Share your experiences and solutions with the community. Your insights could help someone else overcome similar challenges.
Remember, troubleshooting is part of the streaming journey. Don’t get discouraged. With the right approach and tools, you can resolve most issues and enjoy a seamless streaming experience.
Credit: www.streamingvideoprovider.com
Credit: restream.io
Frequently Asked Questions
What Are The Best Settings For Obs Streaming?
Use 1080p resolution, 60 FPS, 4000-6000 bitrate, and NVENC encoder for smooth streaming. Set audio bitrate to 128 kbps. Optimize network settings.
What Should Obs Streaming Settings Be For 1080p 60fps?
Set OBS to 1080p 60FPS by choosing 6000 Kbps bitrate, x264 encoder, and veryfast CPU preset. Use 1920×1080 base resolution and 60 FPS.
What Is The Best Bitrate For Obs Streaming?
The best bitrate for OBS streaming depends on your upload speed and resolution. For 1080p at 60fps, use 4500-6000 Kbps. For 720p at 60fps, use 3500-5000 Kbps.
How To Make Obs Performance Better?
Optimize OBS settings by lowering resolution and bitrate. Close unnecessary applications. Update graphics drivers. Use hardware encoding. Adjust encoder settings for better performance.
Conclusion
Mastering OBS settings can enhance your streaming experience significantly. With the right configurations, you can achieve clear, smooth, and engaging streams. Always test and tweak settings to match your hardware and internet capabilities. Remember, practice makes perfect. Keep experimenting to find what works best for you.
Happy streaming!