How to Add Custom Transitions to Streamlabs: Step-by-Step Guide
Adding custom transitions to Streamlabs can enhance the look of your streams. It creates a unique, professional touch that engages viewers.
Transitions are the animations that occur when you switch scenes in Streamlabs. Custom transitions can match your stream’s theme, making it more cohesive and appealing. This guide will show you how to add these transitions step-by-step. Whether you’re new to streaming or looking to up your game, custom transitions can make a big difference.
They help keep your audience entertained and give your stream a polished, professional feel. Ready to make your streams stand out? Let’s dive in!
Preparing Your Files
Organize your media files carefully before adding custom transitions to Streamlabs. Ensure each file is correctly labeled and in the proper format. This makes the process smoother and more efficient.
Adding custom transitions to Streamlabs can significantly enhance the visual appeal of your live streams. The first step in this process is preparing your files correctly. This involves choosing the right transition styles and creating the transition files. Let’s dive in and explore how you can do this effectively.Choosing Transition Styles
Choosing the right transition style is crucial. Think about the mood and theme of your stream. Are you aiming for a professional look or something more playful? For example, a smooth fade might work well for a corporate stream, while a swipe or flip could add excitement to a gaming stream. Consider your audience. What kind of transitions would they enjoy? Think about how these transitions will complement your overall stream design.Creating Transition Files
Once you’ve decided on the transition style, it’s time to create the transition files. You can use software like Adobe After Effects or Final Cut Pro for this purpose. Ensure your transitions are high-quality. Poorly created transitions can look unprofessional and distract your viewers. Save your transition files in a format that Streamlabs supports, such as .webm or .mp4. This ensures smooth integration into your stream. Have you ever thought about how a simple transition can keep your audience engaged? Try experimenting with different styles and see which ones resonate most with your viewers. By carefully preparing your files, you set the foundation for a visually appealing stream. This attention to detail can make a significant difference in how your content is perceived.
Credit: www.youtube.com
Installing Streamlabs
Installing Streamlabs is the first step towards customizing your live streams with unique transitions. This process is simple, and I’ll guide you through it step-by-step. From downloading the software to setting up your account, you’ll be ready to add those custom transitions in no time.
Downloading The Software
To get started, you’ll need to download Streamlabs. Head over to the Streamlabs website. Click on the download button for your operating system—Windows or macOS.
The download should start automatically. If it doesn’t, click the link provided on the download page. Once the file is downloaded, open it to begin the installation process. Follow the on-screen instructions, and you’ll have Streamlabs installed in a few minutes.
Setting Up Your Account
Once Streamlabs is installed, open the application. You’ll be prompted to log in or create a new account. Use your preferred streaming platform account—like Twitch, YouTube, or Facebook—to log in.
After logging in, Streamlabs will guide you through the initial setup. You’ll be asked to grant permissions, which is necessary for the software to access your streaming account. Follow the prompts, and your account setup will be complete.
Have you ever felt stuck during the setup process? Don’t worry; Streamlabs offers a user-friendly interface that makes the process straightforward. However, if you ever feel lost, Streamlabs’ support center is just a click away.
With your account set up, you are now ready to dive into customizing your streams. Custom transitions can make a world of difference in your streaming quality. Ready to take your streams to the next level?
Accessing The Transition Menu
Find the Transition Menu in Streamlabs to add custom transitions. Click on “Settings,” then “Scene Transitions. ” Select “Add Transition” and choose your desired effects.
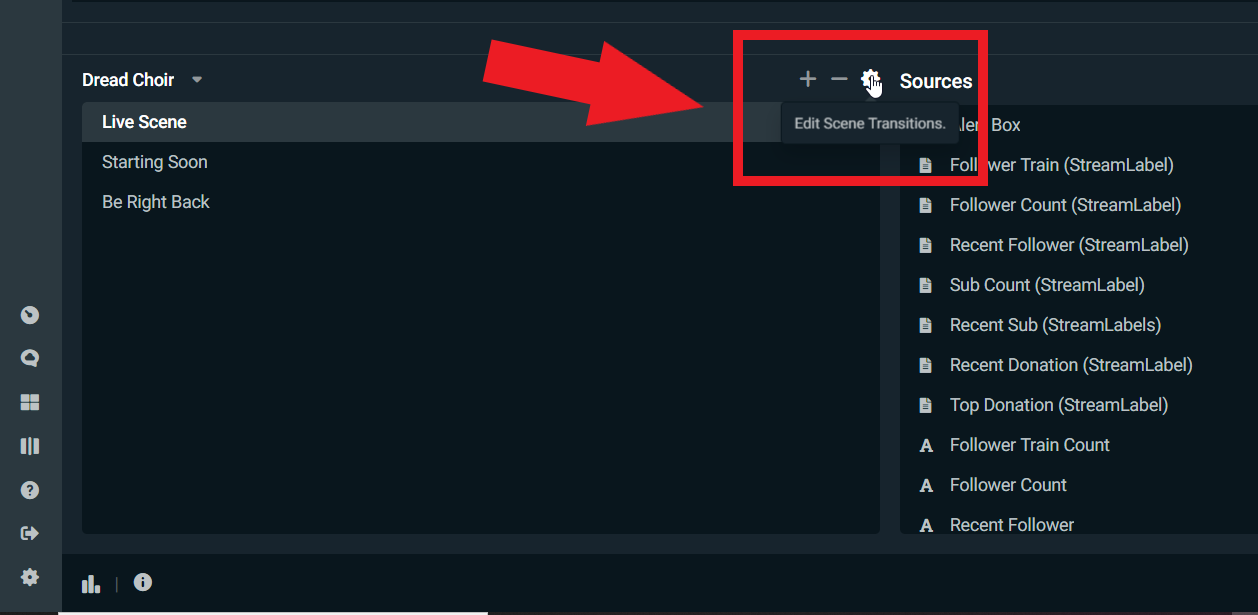
Accessing the Transition Menu is a crucial step in customizing your Streamlabs experience. Adding unique transitions can make your stream more professional and engaging. But how do you get started? Let’s dive into the process.Navigating The Interface
First, open your Streamlabs application. If you’re new to Streamlabs, it might seem overwhelming. But don’t worry, it’s easier than it looks. Once you have Streamlabs open, you’ll see the main dashboard. This is your command center where you can manage everything from your scenes to your audio settings. Look to the left sidebar. This is where you will find all the tools you need.Finding The Transition Options
Now, let’s find those transition options. On the left sidebar, you’ll see a gear icon labeled “Settings.” Click on it. In the Settings menu, you’ll see several tabs. Look for the one labeled “Scene Transitions.” Click on it. Here, you can add, edit, and manage your transitions. You’ll see a default transition already in place, but you can customize this to fit your style. — Adding custom transitions can really elevate your stream. Have you ever watched a stream with slick transitions and thought, “I want that”? Now you know how to start. What kinds of transitions are you planning to add?Adding Custom Transitions
Adding custom transitions to Streamlabs can elevate the quality of your live streams, making them more engaging and professional. Whether you’re a seasoned streamer or just starting out, customizing transitions can help keep your content fresh and visually appealing. Let’s break down the steps to add these custom transitions seamlessly.
Importing Your Files
First, you need to have your custom transition files ready. These can be downloaded from various online resources or created using software like Adobe After Effects.
Open Streamlabs and go to the ‘Settings’ tab located at the bottom left of your screen.
Under ‘Settings’, select ‘Scene Transitions’ from the menu on the left.
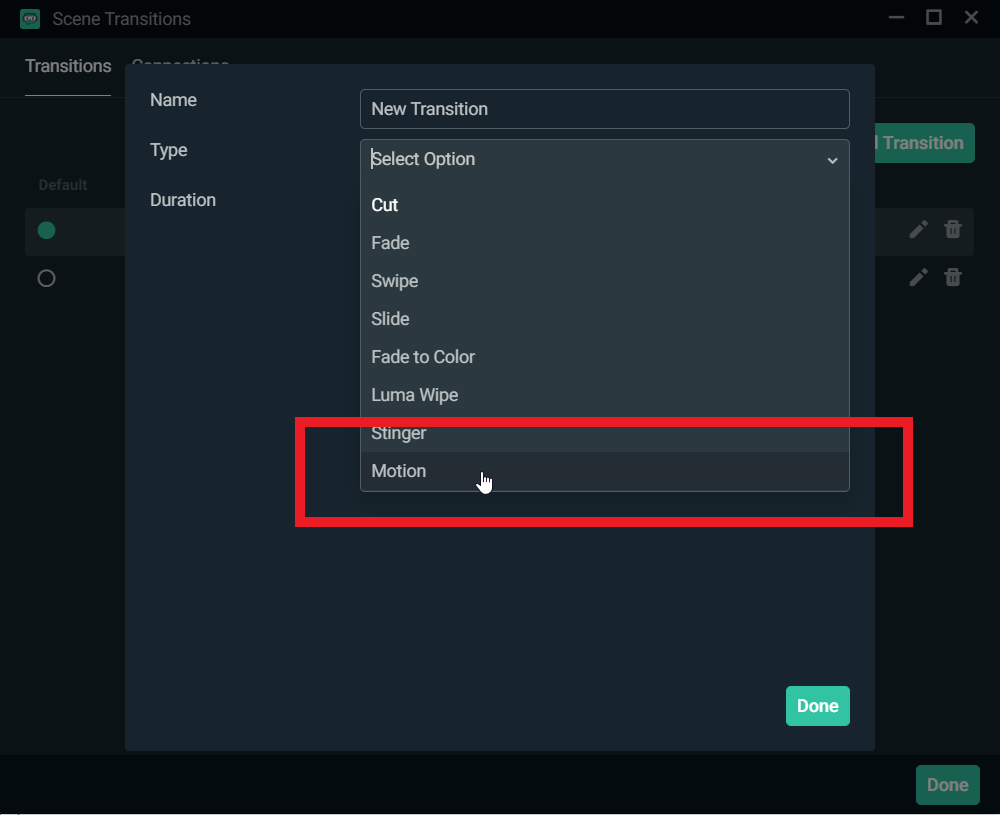
Click on the ‘+’ button to add a new transition. Choose ‘Stinger Transition’ from the options provided.
Now, you’ll need to import your custom file. Click ‘Browse’ and navigate to the folder where your transition file is saved. Select the file and click ‘Open’.
Once imported, you can customize the transition settings, such as the duration and the point at which the transition should cut to the next scene. Play around with these settings until you find the perfect fit for your stream.
Applying Transitions To Scenes
With your custom transition imported, it’s time to apply it to your scenes.
Go back to the main Streamlabs interface. On the left side, you’ll see your list of scenes.
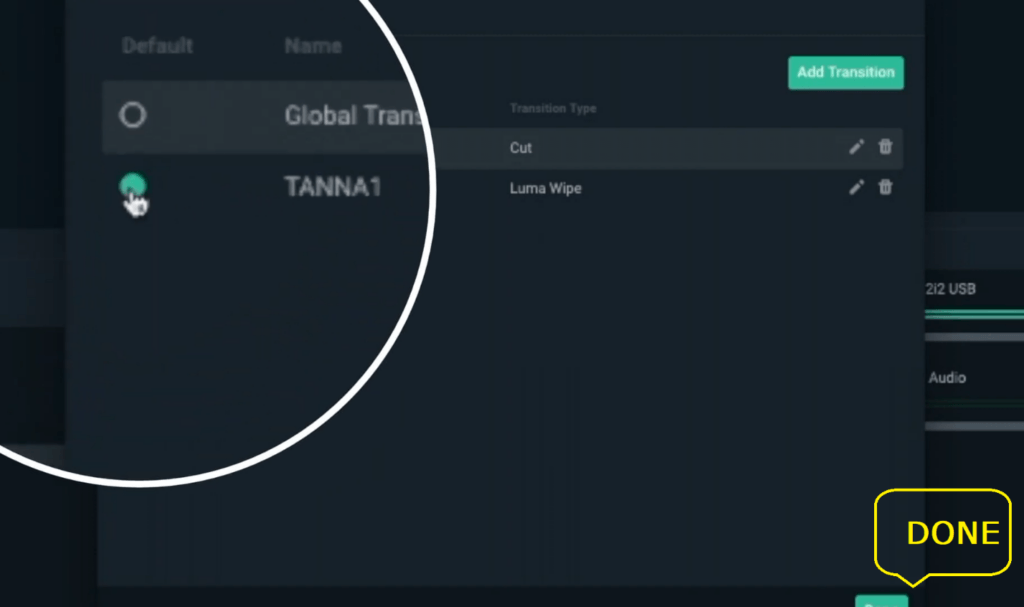
Click on the scene you want to apply the custom transition to. Then, go to the ‘Scene Transitions’ dropdown menu found at the top of the scenes list.
Select your newly imported custom transition from the dropdown menu. Your chosen transition will now be applied whenever you switch to that scene.
Repeat this process for each scene you want to enhance with the custom transition. This will ensure a consistent and polished look across your entire stream.
Custom transitions can make your streams stand out. Have you tried using them yet? If not, give it a shot and watch how your audience reacts. A smooth transition can make all the difference in maintaining a professional appearance.
Adjusting Transition Settings
Adjusting transition settings in Streamlabs can greatly enhance your stream’s visual appeal. Fine-tuning these settings allows for smooth and professional-looking transitions between scenes. This guide will help you set up and customize your transitions to suit your unique style. Let’s dive in!
Setting Transition Duration
The duration of your transition determines how long it takes to switch between scenes. To adjust this, go to your Streamlabs settings. Find the ‘Transition’ section. Here, you can set the duration in milliseconds. A shorter duration creates quick transitions. A longer duration provides a more dramatic effect. Experiment to see what works best for your stream’s pace.
Customizing Transition Effects
Streamlabs offers various transition effects to choose from. Each effect adds a different visual style to your scene changes. To customize these effects, go back to the ‘Transition’ section in settings. Click on the dropdown menu to see the available options. You can choose effects like fade, slide, or wipe. Each effect can be customized further. This includes adjusting the direction or angle. Play around with these settings. Find the perfect fit for your stream’s aesthetic.
Credit: streamlabs.com
Testing Your Transitions
After adding custom transitions to Streamlabs, testing is essential. This step ensures your transitions look smooth and professional. You will see how they perform in real-time and make necessary tweaks.
Previewing Transitions
Start by opening Streamlabs. Navigate to the “Scene Transitions” section. Select the transition you want to preview.
Click the “Test Transition” button. Watch the transition between scenes. Observe the timing and effects. Ensure it matches your vision.
Making Necessary Adjustments
If the transition needs tweaks, go back to the transition settings. Adjust the duration and effects. Test again to see the changes.
Keep adjusting until the transition looks perfect. Ensure it is smooth and visually appealing. Your stream will benefit from seamless transitions.
Troubleshooting Common Issues
Having trouble with custom transitions in Streamlabs? You’re not alone. Many users face common issues when adding custom transitions. Let’s dive into some solutions to keep your stream looking smooth.
Fixing Import Errors
Sometimes, you might encounter errors while importing transitions. This can be frustrating. First, ensure that your file format is supported by Streamlabs. Common formats include .webm and .mov.
Next, check your file size. Large files can cause import issues. Try compressing the file or using a smaller resolution.
Finally, make sure your Streamlabs software is up to date. Outdated software can cause compatibility issues. Updating may solve the problem instantly.
Handling Performance Problems
Adding custom transitions can sometimes slow down your stream. This can lead to a poor viewer experience. One way to handle this is by optimizing your transition files.
Reduce the resolution or frame rate of your transitions. This can significantly improve performance. You don’t have to sacrifice quality completely. Aim for a balance that maintains visual appeal without taxing your system.
Another tip is to check your system resources. Close unnecessary applications running in the background. This frees up memory and processing power for Streamlabs.
Have you ever faced these issues before? How did you solve them? Feel free to share your experiences in the comments. Your insights could help others improve their streams too.
Credit: www.hollyland.com
Frequently Asked Questions
How Do I Add A Custom Transition On Streamlabs?
To add a custom transition on Streamlabs, go to “Settings” > “Scene Transitions” > “Add Transition. ” Choose your custom file, then save.
How Do I Add Custom Scenes To Streamlabs?
To add custom scenes to Streamlabs, open the app and click the “+” icon in the “Scenes” section. Name your scene, then click “Add Source” to customize. Save changes when done.
How Do I Import Custom Overlays Into Streamlabs?
To import custom overlays into Streamlabs, open Streamlabs and navigate to the “Editor” tab. Click “Import Overlay File” and select your overlay file.
How To Add Custom Scene Transitions In Obs?
To add custom scene transitions in OBS, go to “Scene Transitions” under “Settings. ” Click the “+” button, choose “Stinger” or “Custom,” and configure the settings. Save and apply your new transition.
Conclusion
Creating custom transitions in Streamlabs is simple and fun. Follow the steps carefully. Your stream will look more professional. Practice and experiment with different styles. Engage your audience with seamless transitions. Remember, the key is consistency. Keep your viewers entertained.
Happy streaming!