How to Add Delay on Streamlabs: Step-by-Step Guide
Adding a delay on Streamlabs can enhance your streaming experience. It helps manage live content more effectively, giving you more control over your stream.
Streamlabs is a popular tool among streamers. It offers many features to improve your broadcasts. One such feature is adding a delay. This can be useful in various situations. For example, it helps prevent stream sniping during live gaming. Or, it allows you to handle unexpected issues smoothly.
In this guide, you will learn how to set up a delay on Streamlabs. This will ensure a better, more controlled streaming experience. Whether you are new to streaming or an experienced broadcaster, understanding this feature can be beneficial. Let’s dive into the details.
Introduction To Streamlabs Delay
Streamlabs is a popular tool for live streaming. It helps streamers manage their broadcasts. One useful feature is adding a delay. This delay can help improve the quality of the stream. It can also protect the streamer from certain risks. Let’s explore why and how you can add delay on Streamlabs.
Purpose Of Adding Delay
Adding delay on Streamlabs serves several purposes. It helps maintain the quality of the stream. Delays can reduce buffering and lag. They give the streamer more control over the broadcast. Delays also protect against stream sniping. This is when viewers use the live feed to gain an unfair advantage in a game. A delay can prevent this by ensuring the stream is not real-time.
Common Scenarios For Delay
Several scenarios call for adding a delay. Competitive gaming is a key example. Stream sniping is a big issue in these games. Adding a delay can help maintain fairness. It ensures that opponents cannot use the stream to cheat.
Another scenario is live events. These can include Q&A sessions or live performances. Adding a delay ensures that any unexpected issues can be managed. It allows the streamer to address problems before the audience sees them. This can prevent any potential embarrassment or confusion.
Credit: www.youtube.com
Setting Up Your Streamlabs Account
Setting up your Streamlabs account is the first step towards enhancing your streaming experience. Whether you’re a new streamer or looking to improve your stream’s quality, Streamlabs offers a user-friendly platform to help you achieve your goals. Let’s dive into the essentials of creating and navigating your Streamlabs account.
Creating An Account
To get started, visit the Streamlabs website. Click on the “Login” button at the top right corner of the page. If you don’t have an account yet, select “Sign Up” and follow the on-screen instructions.
You’ll need to link your Streamlabs account with your streaming platform, such as Twitch, YouTube, or Facebook. This ensures seamless integration and a smoother streaming experience.
Once linked, fill in the necessary details like your username, email, and password. Make sure to choose a strong password to keep your account secure.
Navigating The Dashboard
After creating your account, you’ll be greeted by the Streamlabs dashboard. It might seem overwhelming at first, but don’t worry. The dashboard is designed to be intuitive and user-friendly.
The left-hand sidebar is where you will find all the essential tools and settings. From here, you can customize alerts, overlays, and widgets to enhance your stream.
One of the key features to explore is the “Settings” tab. Here, you can adjust your streaming preferences, such as video resolution and bitrate. You can also set up a delay for your stream, which is useful for competitive gaming or managing live interactions.
Remember, the more you explore, the more comfortable you will become with the platform. Don’t hesitate to click around and familiarize yourself with the different options available.
Are you ready to take your stream to the next level? Setting up your Streamlabs account is your gateway to a more professional and engaging streaming experience. Happy streaming!
Accessing Stream Settings
Adjusting stream settings allows you to add a delay on Streamlabs. This feature helps manage live content better. To set up, navigate to the Stream Settings and configure the delay duration.
Adding delay to your Streamlabs OBS stream can help you manage live interactions and avoid potential issues. This guide will show you how to access the stream settings in Streamlabs OBS effectively.Opening Streamlabs Obs
First, launch Streamlabs OBS on your computer. If you’re unfamiliar, Streamlabs OBS is a popular streaming software used by many content creators. Ensure you are logged in to your account. This gives you access to all the features and settings.Locating Stream Settings
Once Streamlabs OBS is open, navigate to the settings menu. You can find this by clicking on the gear icon located at the bottom-left corner of the interface. In the settings menu, you will see various tabs. Click on the “Stream” tab to access the stream settings. This is where you can add a delay to your stream. Adding a delay can help manage live interactions better. It gives you a buffer to handle unexpected events during your live broadcast. Have you ever experienced a situation where you needed a few extra seconds to react? Adding a delay can be your solution. Make sure to set a reasonable delay time. Too much delay can make interactions feel less genuine, while too little may not provide the buffer you need. Have fun experimenting with different delay times to see what works best for your content!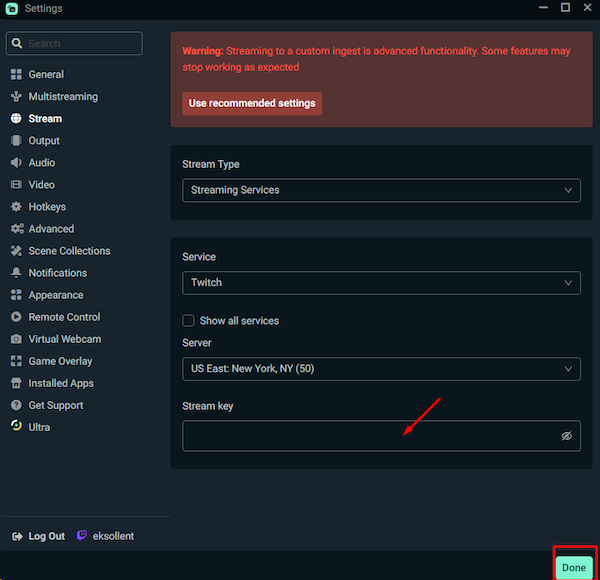
Credit: streamlabs.com
Configuring Delay In Streamlabs
Adding a delay to your Streamlabs stream can help prevent stream sniping. It also ensures viewers do not see sensitive information immediately. Configuring delay settings is straightforward. This guide will walk you through the steps.
Finding Delay Option
First, open Streamlabs and go to settings. Look for the ‘Output’ tab. Under this tab, you will find various streaming settings. Search for the ‘Stream Delay’ option.
Adjusting Delay Duration
Once you find the ‘Stream Delay’ option, click on it. You will see a box where you can set the delay duration. Enter the number of seconds you want for your delay. Click ‘Apply Settings’ to save your changes.
Test your stream to ensure the delay works as expected. Adjust the duration if needed. A short delay might be enough for some streams. Longer delays can provide more security.
Testing Your Stream Delay
Adding delay on Streamlabs helps to manage stream timings better. Adjust settings in Streamlabs to create a delay for smoother streaming experience. Test the delay to ensure it meets your needs.
Testing your stream delay is crucial to ensure it aligns with your expectations. It helps you understand how the delay affects your interaction with viewers. Testing also gives you a chance to tweak settings for the best streaming experience.Initiating A Test Stream
First, start a test stream on Streamlabs. This allows you to monitor your delay without a live audience. Head to your Streamlabs dashboard and select the “Go Live” button. Choose a private or unlisted stream to keep it accessible only to you. This approach ensures you can make necessary adjustments without your viewers seeing any technical hiccups.Verifying Delay Effectiveness
Once your test stream is live, note the exact time you perform an action. Use a second device to view your stream. Check the delay by comparing the time you performed the action to the time it appears on the stream. Is the delay too short or too long? Adjust it accordingly in your Streamlabs settings. Conduct a few more tests to confirm everything works as expected. Remember, a well-calibrated delay can improve the viewer experience. Have you tried adjusting your stream delay before? What challenges did you face? Testing and tweaking might seem tedious but it pays off by ensuring a smooth streaming session.Optimizing Stream Performance
Ensuring optimal stream performance is vital for a smooth and enjoyable viewer experience. One way to enhance your stream’s performance is by adding a delay on Streamlabs. This can help manage bandwidth, reduce lag, and improve overall quality.
Balancing Quality And Delay
Adding a delay to your stream can significantly impact its quality. However, it’s essential to find the right balance.
A small delay can help manage unexpected issues without compromising on real-time interaction with your audience. You might start with a 10-15 second delay and adjust based on your streaming needs.
Too much delay can make your stream less engaging, while too little can lead to buffering and lag. Experiment with different settings to find what works best for you and your viewers.
Troubleshooting Common Issues
Encountering problems after adding a delay is common. The key is to identify and fix these issues quickly.
If your stream is buffering frequently, check your internet connection first. A stable and fast connection is crucial for smooth streaming.
Another common issue is desynchronization between audio and video. Ensure your Streamlabs settings are correctly configured and try restarting the software if the problem persists.
Have you faced any specific issues while adding a delay? Share your experiences in the comments below. Your insights could help other streamers facing similar challenges!
Advanced Delay Techniques
Implementing advanced delay techniques in Streamlabs can improve your streaming experience. These techniques help manage potential issues and enhance viewer experience. Let’s explore some of these methods.
Using Custom Delay Settings
Custom delay settings provide control over your stream timing. Open Streamlabs and navigate to the settings menu. Look for the “Advanced” tab. Here, you can adjust the delay slider to your preferred duration. Set a delay that suits your streaming needs. Remember, too much delay might frustrate your viewers. Balance is key. Test different settings to find the best fit for your stream.
Combining Delay With Other Tools
Combining delay with other tools can enhance your stream management. Use Streamlabs’ built-in features like alerts and overlays. Sync these with your custom delay settings. This can create a more seamless viewer experience. Another tool is chat moderation. Delays can help moderators manage chat more effectively. It gives them time to handle inappropriate messages. Experiment with different tools to see what works best for your stream.

Credit: www.youtube.com
Conclusion And Best Practices
Adding a delay on Streamlabs can improve your streaming experience by reducing disruptions. Follow best practices for optimal settings and smoother broadcasts.
Adding a delay on Streamlabs can significantly enhance your streaming experience by preventing stream sniping and ensuring smooth content delivery. After understanding the steps to add a delay, it’s crucial to focus on best practices to maintain a high-quality stream. This section will summarize the steps and provide some essential tips for successful streaming.Summary Of Steps
To add a delay on Streamlabs: 1. Open Streamlabs: Launch the Streamlabs application on your computer. 2. Go to Settings: Click on the gear icon to open the settings menu. 3. Select Advanced: Navigate to the ‘Advanced’ tab. 4. Enable Stream Delay: Scroll down to ‘Stream Delay’ and toggle it on. 5. Set Delay Duration: Enter the desired delay time (in seconds). 6. Apply Changes: Click ‘Done’ to save your settings and restart Streamlabs. These steps are simple and can be completed in a few minutes.Tips For Successful Streaming
Test Your Delay: Before going live, test the delay to ensure it meets your needs. Adjust if necessary. Inform Your Audience: Let your viewers know there’s a delay. This helps manage their expectations and enhances their viewing experience. Monitor Feedback: Keep an eye on chat and comments. Audience feedback can highlight if the delay is too long or too short. Use High-Quality Equipment: A good camera, microphone, and stable internet connection can make a big difference. High-quality equipment can minimize technical issues. Engage with Your Audience: Even with a delay, engaging with your audience in real-time is crucial. Respond to comments and questions to keep them involved. Stay Consistent: Regular streaming schedules help build a loyal audience. Consistency is key to growing your channel. Adding a delay is just one aspect of a successful streaming strategy. What other techniques have you found helpful in improving your stream quality?Frequently Asked Questions
How Do You Put A Delay On Streamlabs?
To add a delay in Streamlabs, go to Settings, then click on Advanced. Under Stream Delay, enable and set your desired delay time. Save changes.
Can You Add Stream Delay While Streaming?
Yes, you can add a stream delay while streaming. Most platforms and software offer this feature in their settings.
How To Add Delay On Stream Obs?
To add a delay on OBS, go to Settings > Advanced. Under the “Stream Delay” section, enable “Enable Delay” and set the desired time.
How Do I Add A Timer To Streamlabs?
To add a timer to Streamlabs, open Streamlabs, go to “Sources”, click the “+” button, select “Countdown”, and customize it.
Conclusion
Adding a delay on Streamlabs can help improve your streaming experience. It’s easy and can make a big difference. Follow the steps we discussed, and you’ll see the benefits. Your viewers will have a smoother experience. Try it out today and notice the change.
Happy streaming!