How to Connect Camera to Computer for Live Streaming: Step-by-Step Guide
Connecting your camera to a computer for live streaming is easier than you think. You can do it in a few simple steps.
Live streaming has become popular with gamers, teachers, and influencers. Whether you’re hosting a webinar or streaming a game, connecting your camera to your computer can improve your video quality. This setup allows you to use a better camera instead of a basic webcam.
It gives your viewers a clear and professional look. Follow these easy steps to make your live streaming experience better. Get ready to impress your audience with high-quality video.

Credit: www.youtube.com
Choosing The Right Camera
Choosing the right camera is essential for successful live streaming. With many options available, selecting the best one can be challenging. The camera you choose impacts video quality, ease of use, and your overall experience. Let’s explore the types of cameras and key features to consider.
Types Of Cameras
Different types of cameras offer various benefits. Here are the most common ones:
Webcams: Affordable and easy to use. Webcams are ideal for beginners.
DSLR Cameras: Offer high-quality video. They are versatile but more expensive.
Mirrorless Cameras: Lightweight and compact. They provide excellent video quality.
Camcorders: Designed for video recording. They are user-friendly and reliable.
Camera Features To Consider
Several features determine the best camera for your needs. Focus on these key aspects:
Resolution: Higher resolution provides clearer video. Aim for at least 1080p.
Frame Rate: Smooth video requires a higher frame rate. 30 fps is a good start.
Connectivity: Ensure the camera connects easily to your computer. USB or HDMI are common options.
Battery Life: Longer battery life means uninterrupted streaming. Consider cameras with external power options.
Auto-Focus: Keeps you in sharp focus during movement. Essential for dynamic streams.
Low-Light Performance: Good low-light performance ensures clear video in dim conditions.
Portability: Lightweight cameras are easier to handle. Important for travel or on-the-go streaming.
Gathering Necessary Equipment
Getting your camera ready for live streaming can seem challenging. You need the right equipment to ensure a smooth setup and high-quality stream. This guide will help you gather the necessary tools.
Cables And Adapters
Start with the right cables and adapters. Your camera will likely need a USB or HDMI cable. USB cables are common and easy to use. HDMI cables provide better video quality but may need an adapter. Check your camera’s ports to choose the right cable.
Some cameras need a capture card. This device converts the camera’s video feed into a format your computer can read. Most capture cards connect via USB. Make sure the capture card matches your camera’s output.
Software Requirements
Next, install the right software. Streaming software helps you broadcast your video feed. OBS Studio is a popular choice and free. It works on most computers and supports many camera types.
Some cameras come with their own software. This can make setup easier. Read your camera’s manual to see if it includes any software. If so, download and install it as instructed.
Check for any drivers needed. Drivers help your computer communicate with the camera. They are usually available on the camera manufacturer’s website. Download and install the latest drivers for the best performance.
Setting Up The Camera
Setting up your camera for live streaming can be both exciting and daunting. But with the right steps, you’ll be ready to stream like a pro in no time. In this section, we will guide you through the essentials of mounting your camera and adjusting its settings.
Mounting The Camera
First, consider where you want your camera to be positioned. Do you want a close-up view or a wider shot? Decide on the angle that best suits your streaming needs.
Using a tripod is a great option for stability. You can adjust the height and angle easily. If you’re streaming from a desk, a clamp mount might be more convenient.
Ensure the camera is securely mounted. You don’t want it tipping over mid-stream. A solid setup can make a significant difference in your video quality.
Adjusting Camera Settings
Now that your camera is mounted, it’s time to tweak the settings. Start by checking the resolution. Higher resolution means better video quality. Aim for at least 1080p for a clear picture.
Next, adjust the frame rate. A frame rate of 30fps is standard for live streaming. It ensures smooth motion and avoids choppy video.
Don’t forget about the lighting. Proper lighting can enhance your video quality significantly. Experiment with different light sources and angles to find the best setup.
Have you ever had a frustrating experience with setting up your camera? Share your tips below to help others avoid common pitfalls.
Connecting Camera To Computer
Easily connect your camera to a computer for live streaming by using a USB or HDMI cable. Ensure proper software is installed for seamless streaming. Enjoy high-quality video directly from your camera.
Connecting Camera to Computer Whether you’re starting a new live streaming journey or looking to upgrade your setup, connecting your camera to your computer is a crucial step. It might seem technical, but once you understand the basics, it’s quite straightforward. Let’s explore two common methods: using a USB connection and using an HDMI connection.Using Usb Connection
Connecting your camera to your computer via USB is often the simplest method. Most modern cameras come with a USB port. You simply need to plug one end of the USB cable into your camera and the other end into your computer. Your computer should recognize the camera automatically. You might need to install specific drivers or software provided by the camera manufacturer. I remember the first time I tried this method; I was surprised by how quickly my computer detected the camera. If your camera supports it, this method can even provide power to the camera, keeping it charged during your live stream.Using Hdmi Connection
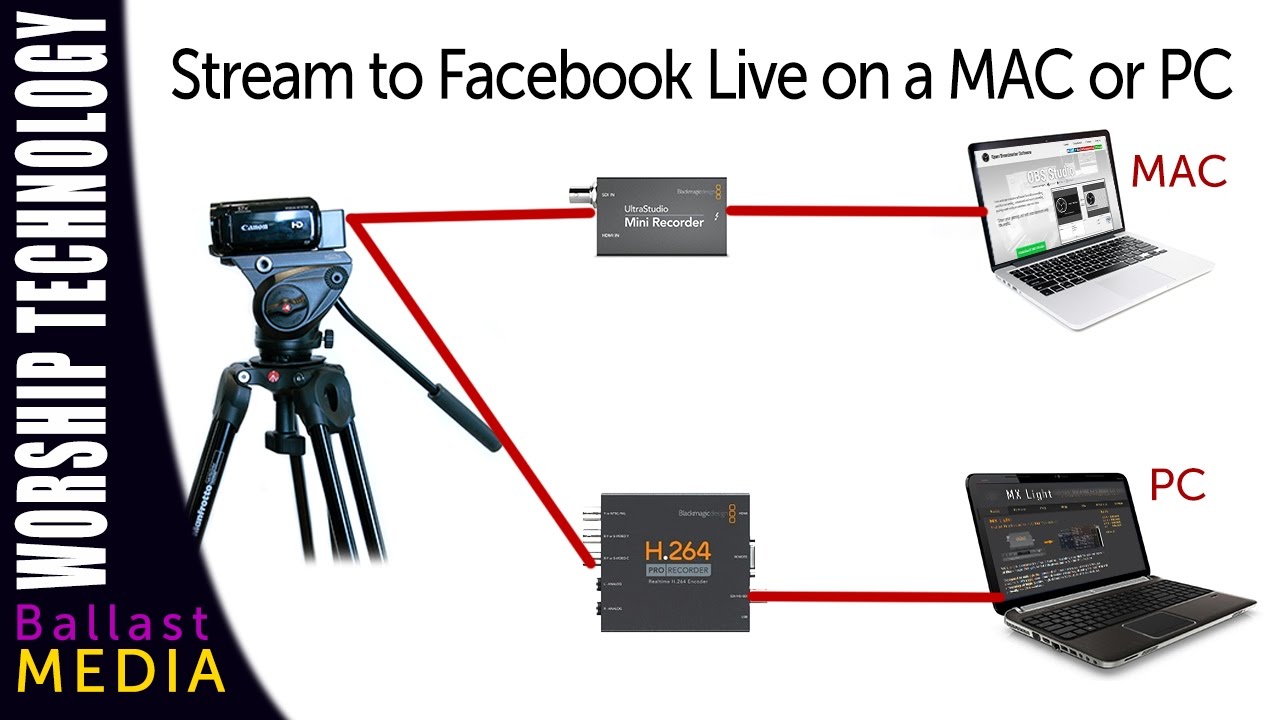
For higher quality video, an HDMI connection is a great choice. This method requires an HDMI cable and a capture card. The HDMI cable connects your camera to the capture card, which then connects to your computer via USB. This setup might sound complicated, but it’s worth it for the quality boost. I once helped a friend set this up for his gaming channel, and the difference was noticeable. The video was sharper, with better color accuracy. You may need to adjust your camera settings to ensure it outputs video correctly through the HDMI port. Additionally, you’ll need streaming software like OBS Studio to capture and broadcast the HDMI signal. So, which method will you choose? It depends on your needs and equipment. Both methods are effective and can help you create engaging live streams.Installing Streaming Software
Connecting a camera to a computer for live streaming requires installing the right streaming software. Select software compatible with your camera. Follow the setup instructions for a smooth streaming experience.
Connecting your camera to a computer for live streaming is a fantastic way to level up your online presence. However, it’s not just about the hardware; the software you use plays a crucial role. Installing streaming software is the next step, and it’s pretty straightforward once you know what to look for. Let’s dive into some of the most popular options and how to get them up and running.Popular Streaming Software
There are several streaming software options available, each with its own unique features. OBS Studio is a favorite among many due to its open-source nature and extensive customization options. Streamlabs OBS offers a more user-friendly interface, ideal for beginners. XSplit is another strong contender, known for its professional-grade tools and ease of use. Consider what you need. Are you looking for a simple setup, or do you want advanced features? Your choice will impact your streaming experience.Installation Process
Installing streaming software is generally a straightforward process, but it’s essential to follow the steps carefully. 1. Download the Software: Go to the official website of the streaming software you’ve chosen. For instance, if you opt for OBS Studio, you’ll find a download button right on their homepage. 2. Run the Installer: Once the download is complete, open the installer file. Follow the on-screen instructions to install the software on your computer. 3. Initial Setup: After installation, open the software. Most streaming software will guide you through an initial setup process. This usually involves choosing your streaming platform (like YouTube or Twitch) and entering your stream key. 4. Configure Settings: Take some time to explore the settings. Adjust the video and audio settings to suit your needs. Make sure to test your setup before going live. I’ve found that taking a few extra minutes to fine-tune the settings can make a huge difference in your stream quality. You don’t want to discover an audio issue while you’re live! Are you ready to start streaming? What challenges are you facing with your current setup? Your feedback could help others in the same boat. — Remember, installing streaming software is just one piece of the puzzle. Combining it with good hardware and a reliable internet connection will set you up for streaming success.Configuring Streaming Software
Configuring streaming software can be the trickiest part of setting up a live stream. But it’s also the most rewarding. Once you get the hang of it, you’ll have full control over your live broadcast’s quality and settings. Let’s break it down step-by-step to make it easier for you.
Setting Up Video Input
The first step is to set up your video input. This is where you connect your camera to the streaming software. Most streaming software, like OBS Studio or Streamlabs, have straightforward options for this.
Open your streaming software and go to the settings menu. Look for the ‘Video Input’ or ‘Source’ option. Click on ‘Add Source’ and select your camera from the list. Make sure your camera is properly connected to your computer and turned on.
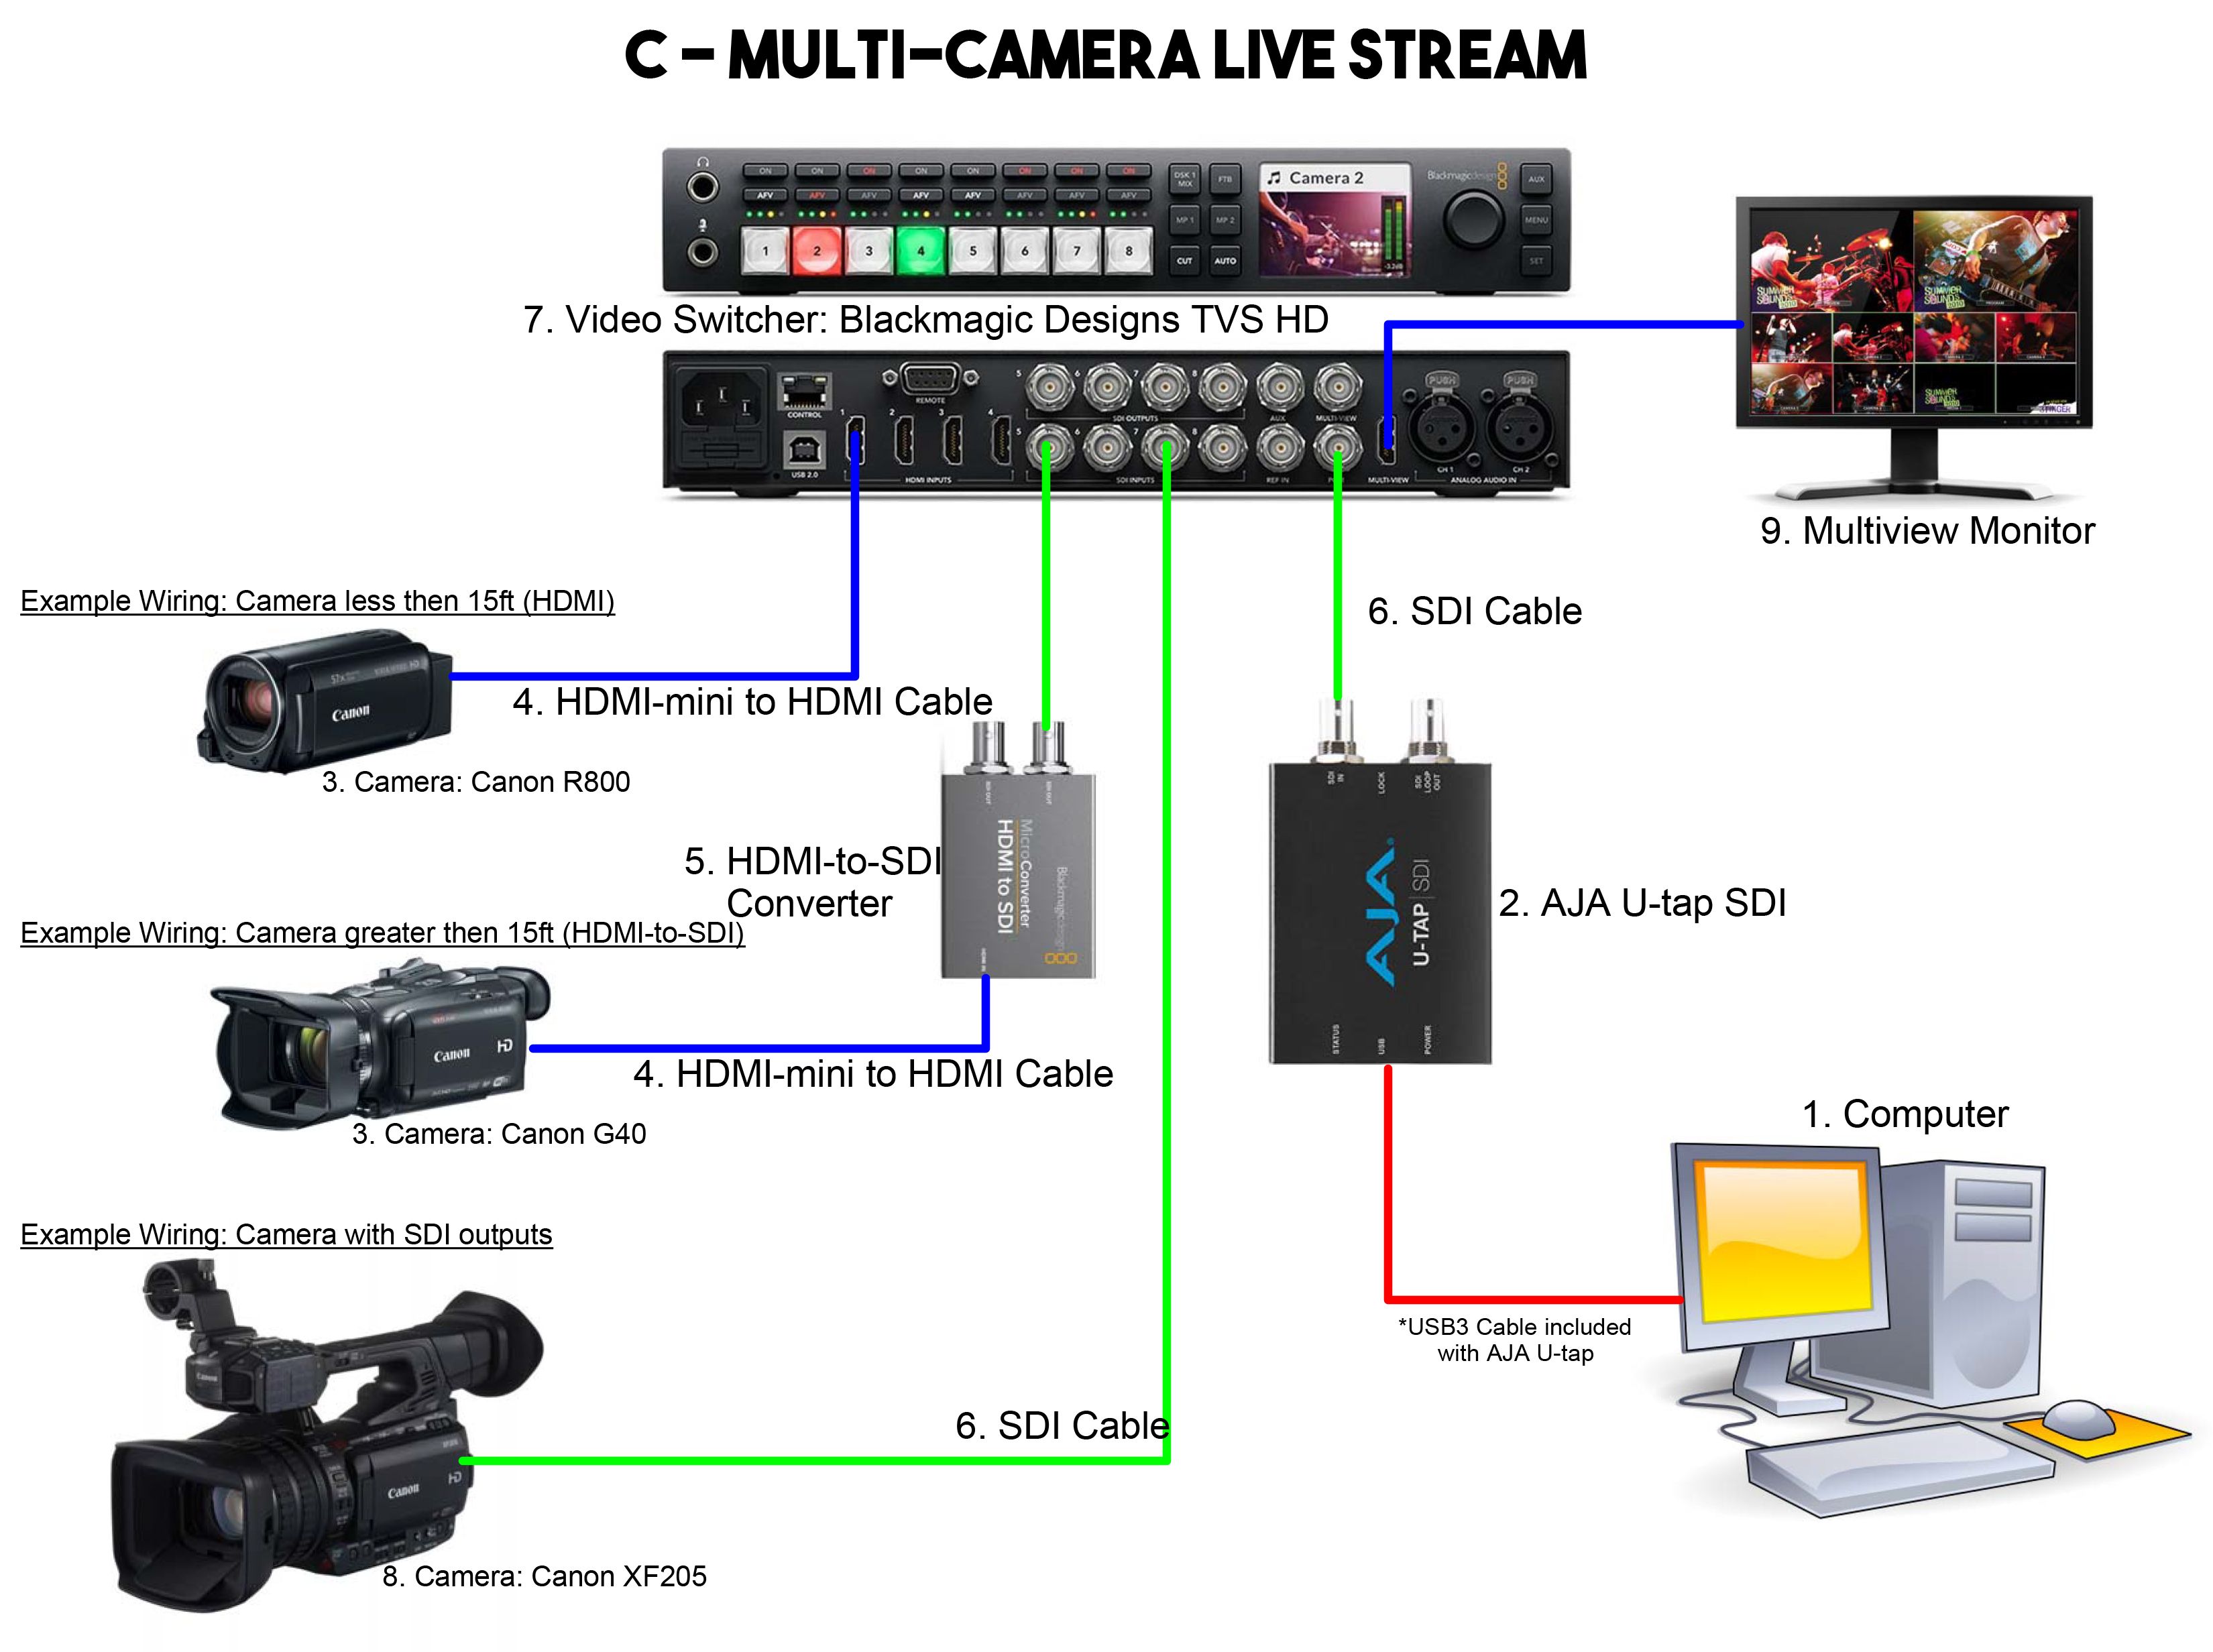
If you’re using a DSLR or mirrorless camera, you might need a capture card. This device converts your camera’s feed into a format that your computer can read. Plug the camera into the capture card, and then connect the capture card to your computer. Select the capture card as your video source in the streaming software.
Adjusting Streaming Settings
Next, you need to adjust your streaming settings. This ensures your stream looks good and runs smoothly. Go back to the settings menu and find the ‘Output’ or ‘Stream’ tab.
Set your bitrate to match your internet speed. A higher bitrate means better quality, but it also requires a faster internet connection. Aim for a bitrate that balances quality and performance. For instance, if your internet upload speed is 10 Mbps, a bitrate of 3,500 kbps is a good starting point.
Choose your resolution and frame rate. Most streamers use 1080p at 30fps or 60fps. Higher resolution and frame rate require more processing power and bandwidth. If your computer or internet can’t handle it, lower the settings to avoid lag and buffering.
Lastly, test your settings. Do a private stream or record a short video to see how it looks. Adjust as needed until you’re happy with the quality. Remember, it’s better to have a smooth stream at lower quality than a laggy stream at high quality.
Configuring streaming software might seem daunting at first, but practice makes perfect. What challenges have you faced while setting up your stream? Share your experiences and tips in the comments below!
Testing The Live Stream
Testing the live stream is a crucial step in the setup process. Ensuring everything works smoothly prevents unexpected issues during the actual broadcast. This section will guide you through the essential steps of testing your live stream setup.
Checking Video Quality
First, check the video quality of your stream. Ensure the camera is capturing clear and sharp images. Adjust the camera settings, such as resolution and frame rate, to match your streaming requirements. Make sure the lighting is adequate to avoid dark or overexposed footage. Test different settings to see what works best for your setup.
Resolving Common Issues
Common issues can disrupt your live stream. Here are some troubleshooting tips. If the video is lagging, check your internet connection. A stable connection is crucial for smooth streaming. If the audio is not in sync, adjust the audio settings in your streaming software. Ensure the camera drivers are up to date to avoid compatibility problems. Testing these elements helps ensure a seamless live stream experience.
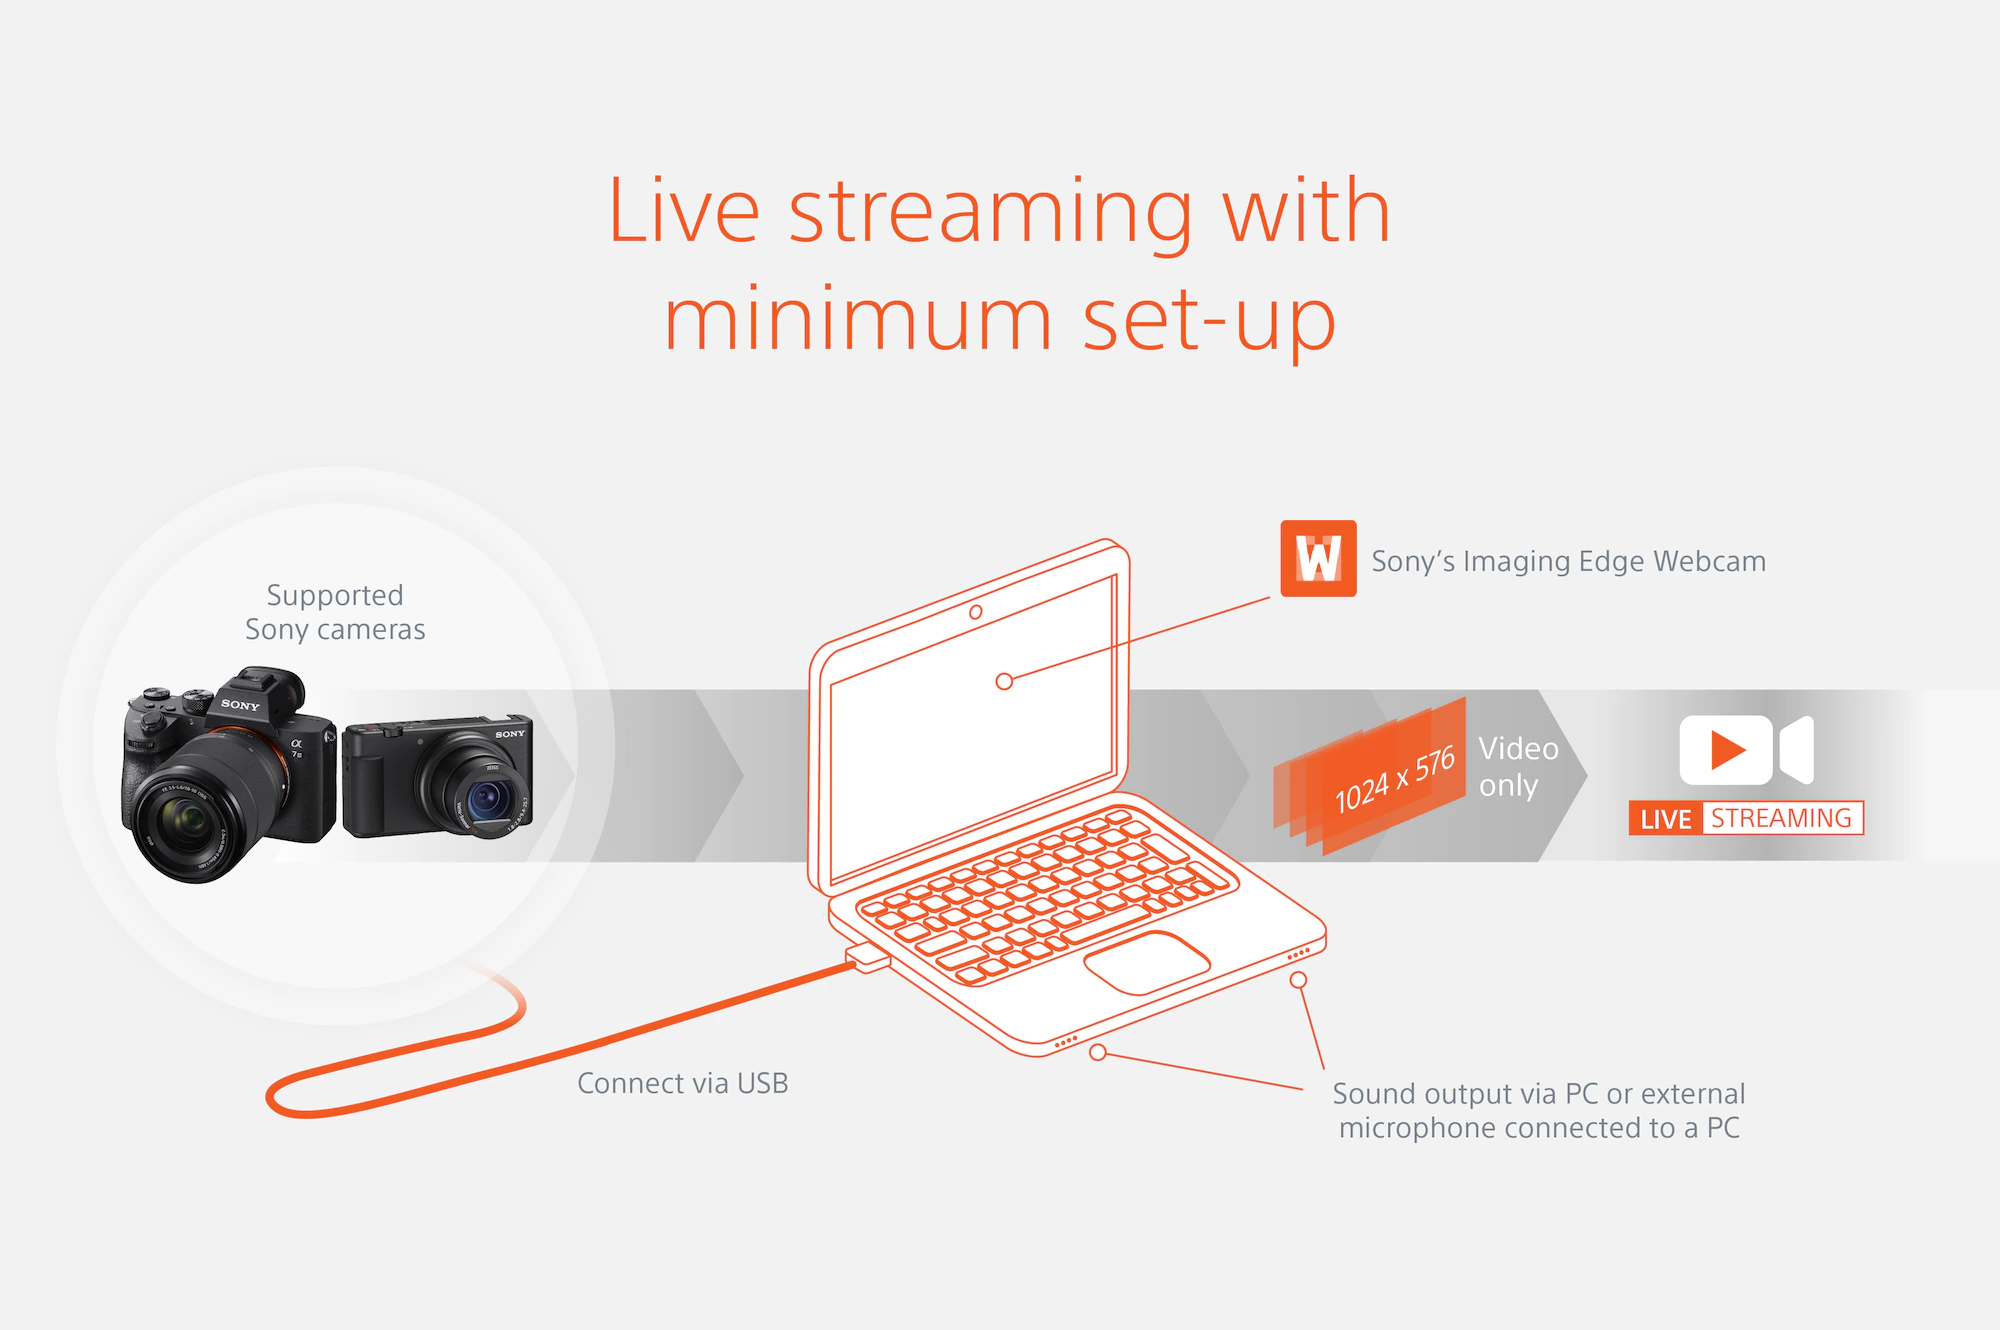
Credit: alphauniverse.sony-asia.com
Going Live
Connecting your camera to your computer for live streaming is just the start. The real excitement begins when you go live. This is where you engage with your audience in real-time. Let’s break it down into simple steps.
Starting Your Live Stream
First, ensure your camera is connected and recognized by your computer. Open your chosen live streaming software. This could be OBS, Streamlabs, or another tool. Check your camera feed in the preview window. Adjust the frame and lighting if necessary.
Next, set up your stream settings. Choose the right resolution and bitrate. Higher settings offer better quality but need more bandwidth. Ensure your internet connection is stable. A wired connection is often more reliable than Wi-Fi.
Now, select your streaming platform. This could be YouTube, Twitch, or Facebook Live. Each platform has its own setup process. Follow the platform’s instructions to link your streaming software. Finally, click the “Start Streaming” button. You’re now live!
Engaging With Your Audience
Interaction is key to a successful live stream. Greet new viewers as they join. Use their names if possible. This makes them feel welcome. Answer questions from the chat. Keep your answers short and to the point.
Encourage viewers to interact. Ask them questions. Poll their opinions. This keeps the chat lively. Respond to comments in real-time. This shows you value their input. Maintain eye contact with the camera. This helps create a personal connection.
Don’t forget to monitor the chat. Use moderators if needed. They can help keep the chat friendly and on-topic. Thank your viewers regularly. Show appreciation for their time and support. This builds a loyal community.
Credit: www.ballastmedia.com
Frequently Asked Questions
How To Connect Camera To Computer For Livestream?
Connect your camera to the computer using a USB or HDMI cable. Install necessary drivers. Select the camera in your livestreaming software.
How Do I Connect My Camera Directly To My Computer?
Connect your camera to your computer using a USB cable. Turn on the camera. The computer should recognize it automatically. Install any required drivers if prompted. Use software like iPhoto, Windows Photos, or the camera’s own software to access and manage your photos.
How Do You Connect A Webcam To Your Computer?
To connect a webcam, plug the USB cable into your computer. Install any necessary drivers or software. Then, open your preferred video application and select the webcam as the video source.
How To View Live Camera On Pc?
Install webcam software on your PC. Connect the camera via USB or network. Open the software to view live feed.
Conclusion
Connecting your camera to a computer for live streaming is straightforward. Follow the steps outlined. Ensure you have the right cables and software. Adjust your camera settings for optimal quality. Test your setup before going live. With practice, your streams will look professional.
Happy streaming!