
How to End Facebook Live Stream: Simple Steps to Follow
To end a Facebook Live stream, tap the “Finish” button. Confirm to end the broadcast.
It’s that simple. Facebook Live is a great way to connect with your audience. But knowing how to properly end the stream is just as important. Ending your stream the right way ensures your broadcast saves correctly. It also helps your viewers know the session is over.
This guide will show you how to end your Facebook Live stream step-by-step. We’ll cover the basics and give you tips for a smooth finish. Whether you are new to Facebook Live or just need a refresher, this guide will help you out. Let’s dive in and learn how to end your Facebook Live stream effectively.
Preparation Before Ending
Ending a Facebook Live stream smoothly is essential. Preparation before ending helps ensure your audience leaves satisfied. Take the time to check viewer engagement and wrap up your content effectively.
Check Viewer Engagement
Engagement is key. Review comments and reactions. Address questions or concerns your audience might have. Acknowledge regular viewers and new ones. Show appreciation for their time. This strengthens community and encourages future participation.
Wrap Up Your Content
Summarize your main points. Reinforce key messages. Provide a clear call-to-action. Encourage viewers to follow, share, or visit your page. Thank everyone for joining. Leave them with a positive impression. This helps build lasting connections.
Credit: www.socialmediaexaminer.com
Inform Your Audience
When wrapping up your Facebook Live stream, it’s crucial to inform your audience about the end of the session. This helps to maintain engagement and provides a smooth transition. Clear communication can leave a positive, lasting impression on your viewers.
Announce The End
Give your audience a heads-up before ending the stream. This can be done by saying something like, “We’re approaching the end of our live session.” This prepares your viewers and prevents abrupt endings.
Share any final thoughts or key takeaways. Summarize the main points discussed during the stream. This reinforces your message and ensures your audience leaves with valuable information.
Use a countdown to signal the last moments of your live stream. For instance, you might say, “We’ll be wrapping up in 5 minutes.” This creates a sense of urgency and encourages viewers to stay until the end.
Encourage Final Interactions
Invite your audience to ask any last-minute questions. This can foster engagement and make viewers feel valued. You can say, “If you have any final questions, now is the time to ask!”
Encourage viewers to share their thoughts or feedback. Ask them, “What did you think of today’s session?” or “What would you like to see next time?” This helps you understand your audience better and improves future streams.
Remind them to follow your page and turn on notifications. This keeps them informed about your upcoming live streams and other content. You could say, “Don’t forget to follow us and hit the notification bell so you don’t miss our next live session!”
Informing your audience properly at the end of a Facebook Live stream can enhance their experience and keep them coming back for more. How do you usually wrap up your live sessions? Share your tips in the comments below!
Access The Live Controls
Going live on Facebook is an exciting way to connect with your audience in real-time. However, knowing how to properly end your live stream is just as important as starting it. Understanding how to access the live controls can make the process smooth and professional. Let’s dive into the steps you need to take.
Locate The Finish Button
Once you’re ready to end your live stream, the first thing you need to do is locate the finish button. This button is your gateway to wrapping up your session. Typically, you can find it at the bottom of your live broadcast screen.
If you’re using a mobile device, it’s often a red button labeled “Finish” or “End.” On desktop, it might be a bit different, but it’s usually clearly marked. Make sure you know its location before you start your stream to avoid fumbling around when it’s time to end.
Review Stream Settings
Before you hit that finish button, take a moment to review your stream settings. This quick review can help you catch any last-minute details you might want to address. For instance, check if your stream is still set to the right privacy settings.
Are you streaming to your intended audience? Double-check the title and description of your video. Small details matter and can impact the overall impression you leave with your viewers.
Have you ever ended a stream only to realize you forgot to say something important? Reviewing your stream settings can help you avoid this. Take a breath, review, and then proceed to end your stream.
Ending your Facebook Live the right way shows your audience that you are professional and considerate. What steps do you take to ensure a smooth ending to your live streams? Share your tips in the comments below!
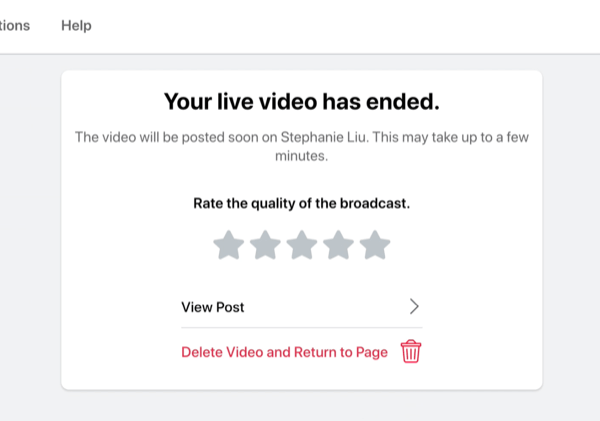
Ending The Stream
To end a Facebook Live stream, tap the “Finish” button at the bottom of the screen. Confirm by tapping “End Now”. Your live video will then stop and save to your timeline.
### Ending the Stream Wrapping up your Facebook Live stream can be as important as the content you share. A smooth conclusion leaves your audience with a positive impression and ensures your message is fully delivered. Here’s how you can effectively end your stream. ### Click Finish When you’re ready to end your broadcast, look for the Finish button. It’s usually located at the bottom right corner of your screen. Clicking this button initiates the process to end your live session. To make it easier, think of it as the final step after saying your goodbyes or summarizing your key points. I once forgot to click Finish and ended up streaming an extra minute of awkward silence. Don’t make that mistake! ### Confirm End of Stream After clicking Finish, Facebook prompts you to confirm that you really want to end the stream. You’ll see a pop-up asking, “Are you sure you want to end your live video?” Confirm by clicking End Live Video. This step ensures that you don’t accidentally cut off your stream prematurely. Once, during a cooking demo, I clicked without confirming and ended mid-recipe. Double-checking helps avoid such mishaps. Ending your stream properly not only maintains your professionalism but also keeps your audience engaged till the very last moment. Have you ever watched a live stream that ended abruptly? How did it make you feel? By following these steps, you can ensure a smooth and memorable conclusion to your broadcast.Post-stream Actions
Stop your Facebook Live stream by tapping the “Finish” button. Confirm by clicking “End” to save or share.
After your Facebook Live Stream ends, your job isn’t quite finished. There are important steps you should take to maximize the impact of your video. These post-stream actions can help you reach a broader audience and keep the conversation going.Save Your Video
The first thing you need to do is save your video. Facebook gives you an option to download the video once the live stream ends. Click the “Options” button on your video post. Select “Download Video” to save it to your computer. Why save your video? It gives you a backup in case you need to re-upload it elsewhere. You can also edit the video to create highlight reels or promotional clips.Share The Replay
Sharing the replay is crucial for reaching people who missed the live stream. Post the video on your timeline and encourage your followers to watch it. You can create a short post summarizing the key points of the stream. Add a call to action, like “Share this with friends who need to see it.” You can also share the replay in relevant groups or pages. This spreads your content to a broader audience and keeps the engagement high. So, how do you usually engage your audience after a live stream? Do you have other post-stream rituals that work well for you?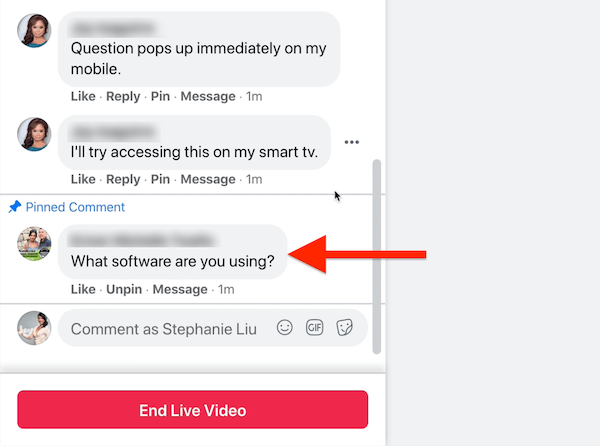
Credit: www.socialmediaexaminer.com
Engage With Comments
Engaging with comments is crucial for building a connection with your audience during a Facebook Live stream. It shows that you value their input and helps you understand their needs better. Actively engaging with viewers keeps the energy high and the conversation flowing.
Respond To Viewers
Responding to viewers is essential for a successful Facebook Live stream. Acknowledge their presence by mentioning their names. This makes them feel seen and appreciated. It also encourages others to participate. Keep your responses brief and on topic to maintain the flow of the stream.
Address Questions
Addressing questions live can create a more interactive experience. Encourage viewers to ask questions throughout the stream. Take a moment to read and understand each question before answering. This shows that you care about providing thoughtful responses. If you don’t know the answer, it’s okay to say so. You can always follow up later.
Analyze Stream Performance
Analyze stream performance by checking viewer engagement and feedback. Learning how to end Facebook Live streams smoothly ensures a professional finish.
Ending a Facebook Live stream is just the beginning of understanding its impact. Once the broadcast is over, it’s crucial to analyze the stream’s performance. Doing so provides valuable insights and helps you improve future live streams. Let’s dive into how you can effectively analyze your stream performance.Review Analytics
After ending your Facebook Live stream, head to your Facebook Page Insights to review analytics. Look at the total views, peak live viewers, and average watch time. These metrics give you a clear picture of your audience’s engagement. Identify which moments had the highest engagement. Did you notice a spike when you introduced a guest or shared a special offer?Gather Feedback
Ask your viewers for feedback to understand their experience. You can create a quick poll or survey on your Facebook page. Ask specific questions such as what they enjoyed most and what they would like to see in future streams. Encourage viewers to leave comments or send direct messages. This direct feedback is invaluable for improving your content. Taking the time to analyze and gather feedback will greatly enhance your future live streams. What insights have you discovered from your analytics?Plan For Future Streams
Ending a Facebook Live stream involves clicking the “Finish” button located at the bottom of your screen. Confirm ending by selecting “End Live Video” in the pop-up prompt. Save or delete the video as needed.
Planning for future streams is crucial to maintaining and growing your audience on Facebook Live. Once you end a live stream, it’s important to reflect on what went well and what can be improved. This will help ensure that your next stream is even more successful and engaging.Note Improvements
After ending your stream, take a few minutes to jot down what worked and what didn’t. Did you experience any technical issues? Was there a particular moment that got a lot of engagement? Make a list of these points. This simple exercise will help you identify areas for improvement. For instance, if viewers dropped off at a certain point, consider what might have caused that. Reflect on your presentation style. Were you engaging enough? Did you interact with your audience effectively? These notes will be invaluable when planning your next stream.Schedule The Next Stream
Once you have your list of improvements, it’s time to think about your next stream. Consistency is key to building a loyal audience, so schedule your next live session soon. You might want to use Facebook’s scheduling tools to create an event. This will give your audience a heads-up and help build anticipation. Consider the best time to go live. Analyze your previous streams to see when you had the most viewers. This can help you pick a time that works best for your audience. Make sure to promote your upcoming stream. Use your other social media channels, your email list, or even a quick post on your Facebook page to let people know when you’ll be live again. Planning for future streams may seem like extra work, but it pays off. It helps you stay organized and keeps your content fresh and engaging. What are some of the challenges you’ve faced with your live streams? Share your experiences and let’s learn from each other.Credit: support.quicklink.tv
Frequently Asked Questions
How Do I Stop A Live Stream?
To stop a live stream, click the “End Stream” button on your streaming platform. Confirm to end the session.
How Do I Stop Showing Live On Facebook?
To stop showing live on Facebook, tap “Finish” in the bottom right corner of the screen. Confirm by tapping “End Live Video. “
How Do I Go Live Off Facebook?
To go live off Facebook, use third-party platforms like YouTube, Instagram, or Twitch. Create an account, then start live streaming.
How Do You Delete A Facebook Live?
To delete a Facebook live, go to your profile, find the live video, click on the three dots, and select “Delete. “
Conclusion
Ending your Facebook Live stream is simple with these steps. Always check your audience’s comments. Ensure you wrap up with a clear message. Click the “Finish” button to stop streaming. Review the saved video for any edits. Share your final thoughts with your viewers.
Practicing these steps helps create better live streams. Happy streaming!


