How to Find Facebook Stream Key: Step-by-Step Guide
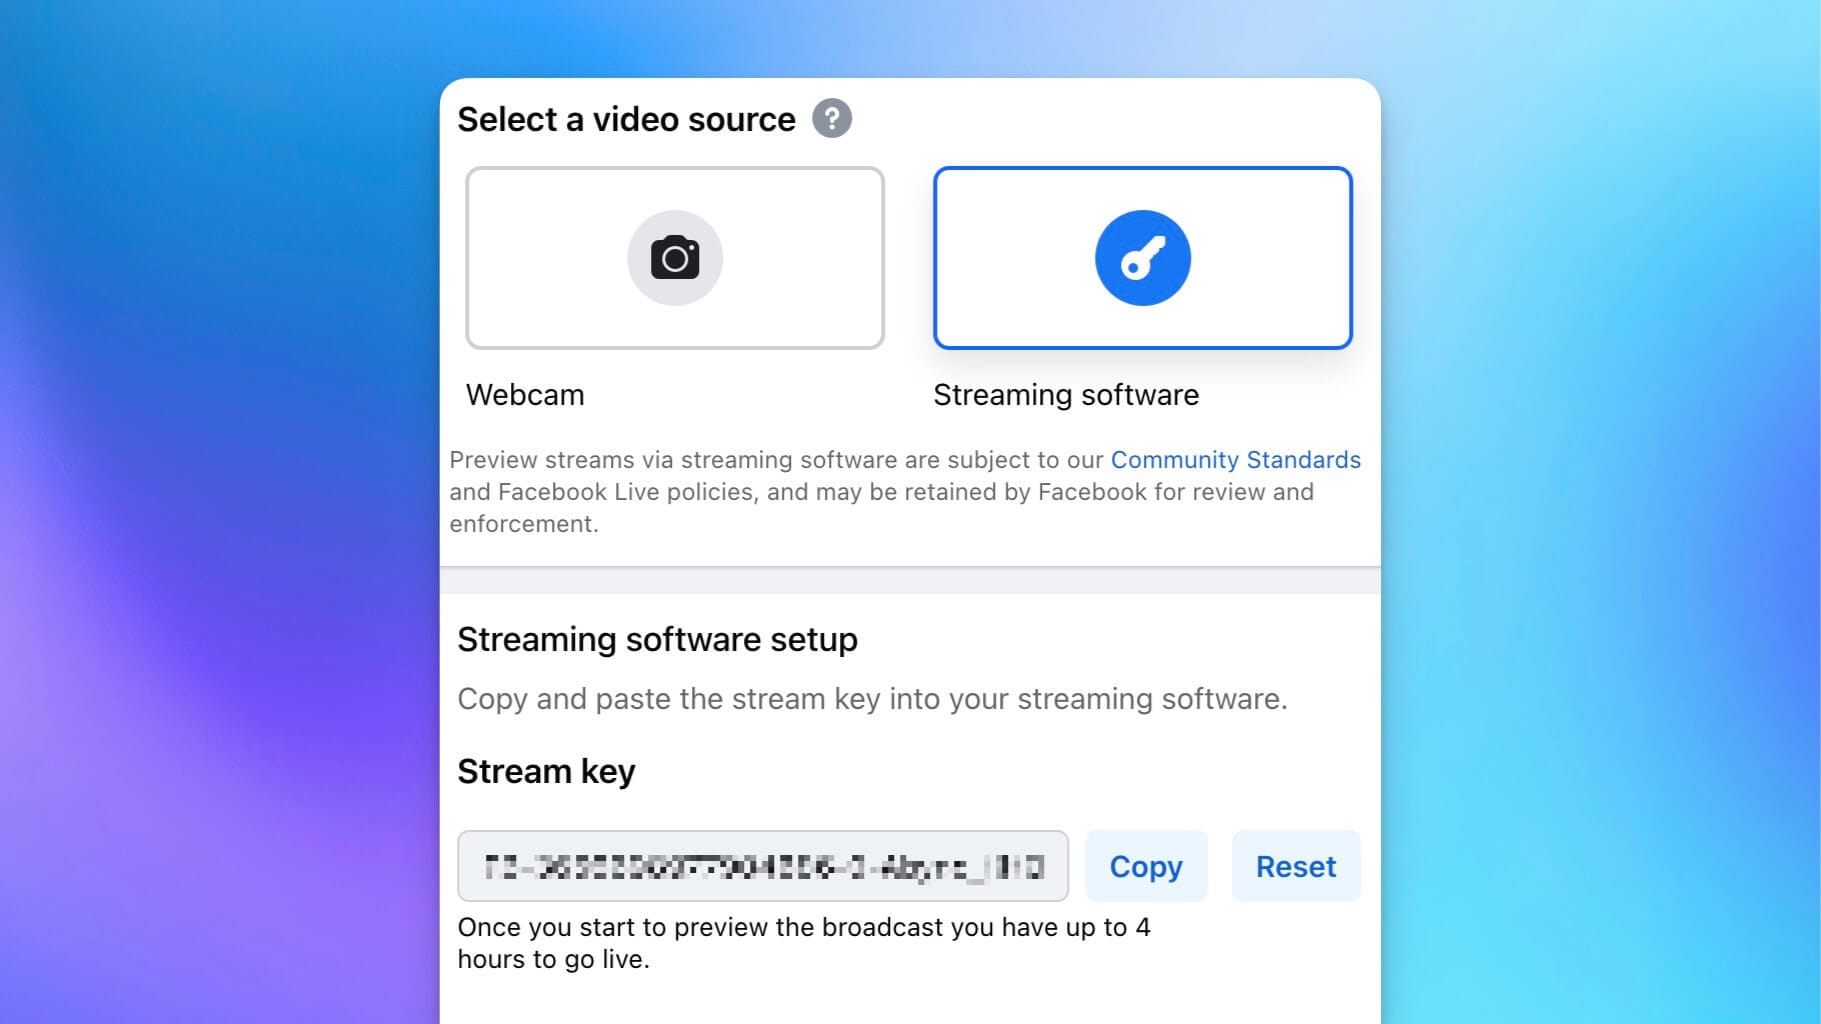
To find your Facebook stream key, go to Facebook Live Producer. Once there, you’ll see the stream key listed under the “Stream Setup” section.
Streaming on Facebook Live is an exciting way to connect with your audience. But before you go live, you need your stream key. This unique code allows your streaming software to connect with Facebook. Without it, your broadcast won’t reach your followers.
Getting your stream key is simple but crucial. This guide will walk you through the steps. Whether you’re new to streaming or just need a refresher, you’ll find everything you need here. Let’s get started on finding your Facebook stream key!
Credit: restream.io
Preparing Your Facebook Account
Before you can find your Facebook stream key, you need to prepare your Facebook account. This involves logging into your account and checking your page permissions. Ensuring these steps are completed will make the process smooth and hassle-free.
Log Into Facebook
Start by logging into your Facebook account. Use your email or phone number and password. Ensure you have access to the account linked to your Facebook page. If you have forgotten your password, use the “Forgot Password” link to reset it. Once logged in, navigate to your Facebook page where you plan to stream.
Check Page Permissions
Make sure you have the right permissions on your Facebook page. Only admins or editors can access the stream key. To check your permissions, go to your Facebook page. Click on “Settings” in the top right corner. Select “Page Roles” from the menu on the left. Verify your role under “Existing Page Roles”. If you need higher permissions, ask an admin to update your role.
Navigating To Creator Studio
Finding your Facebook Stream Key might seem complicated, but once you know how to navigate Creator Studio, it becomes much simpler. The process involves a few straightforward steps, so let’s dive in and get you streaming in no time.
Access Creator Studio
First, log into your Facebook account. Once you’re in, head over to the top right corner of your screen. Click on the menu button (the nine-dot icon) and scroll down to find Creator Studio.
Creator Studio is a hub for managing all your Facebook content. You can monitor your posts, check analytics, and, most importantly, get your stream key. If you have multiple pages, make sure you select the correct one before proceeding.
Locate Live Dashboard
After entering Creator Studio, you need to find the Live Dashboard. Look at the left-hand menu and click on the Live Dashboard option. This will take you to the live streaming section.
In the Live Dashboard, you’ll see various options for setting up a live stream. Here, you can customize your stream settings, add titles, and descriptions. Most importantly, you can locate your Stream Key.
Why is the Stream Key important? It’s the unique code you need to connect your streaming software to Facebook. Without it, you can’t go live. So, jot it down or copy it for use in your streaming software.
Have you ever struggled to find your Stream Key? What challenges did you face? Share your experience in the comments below!
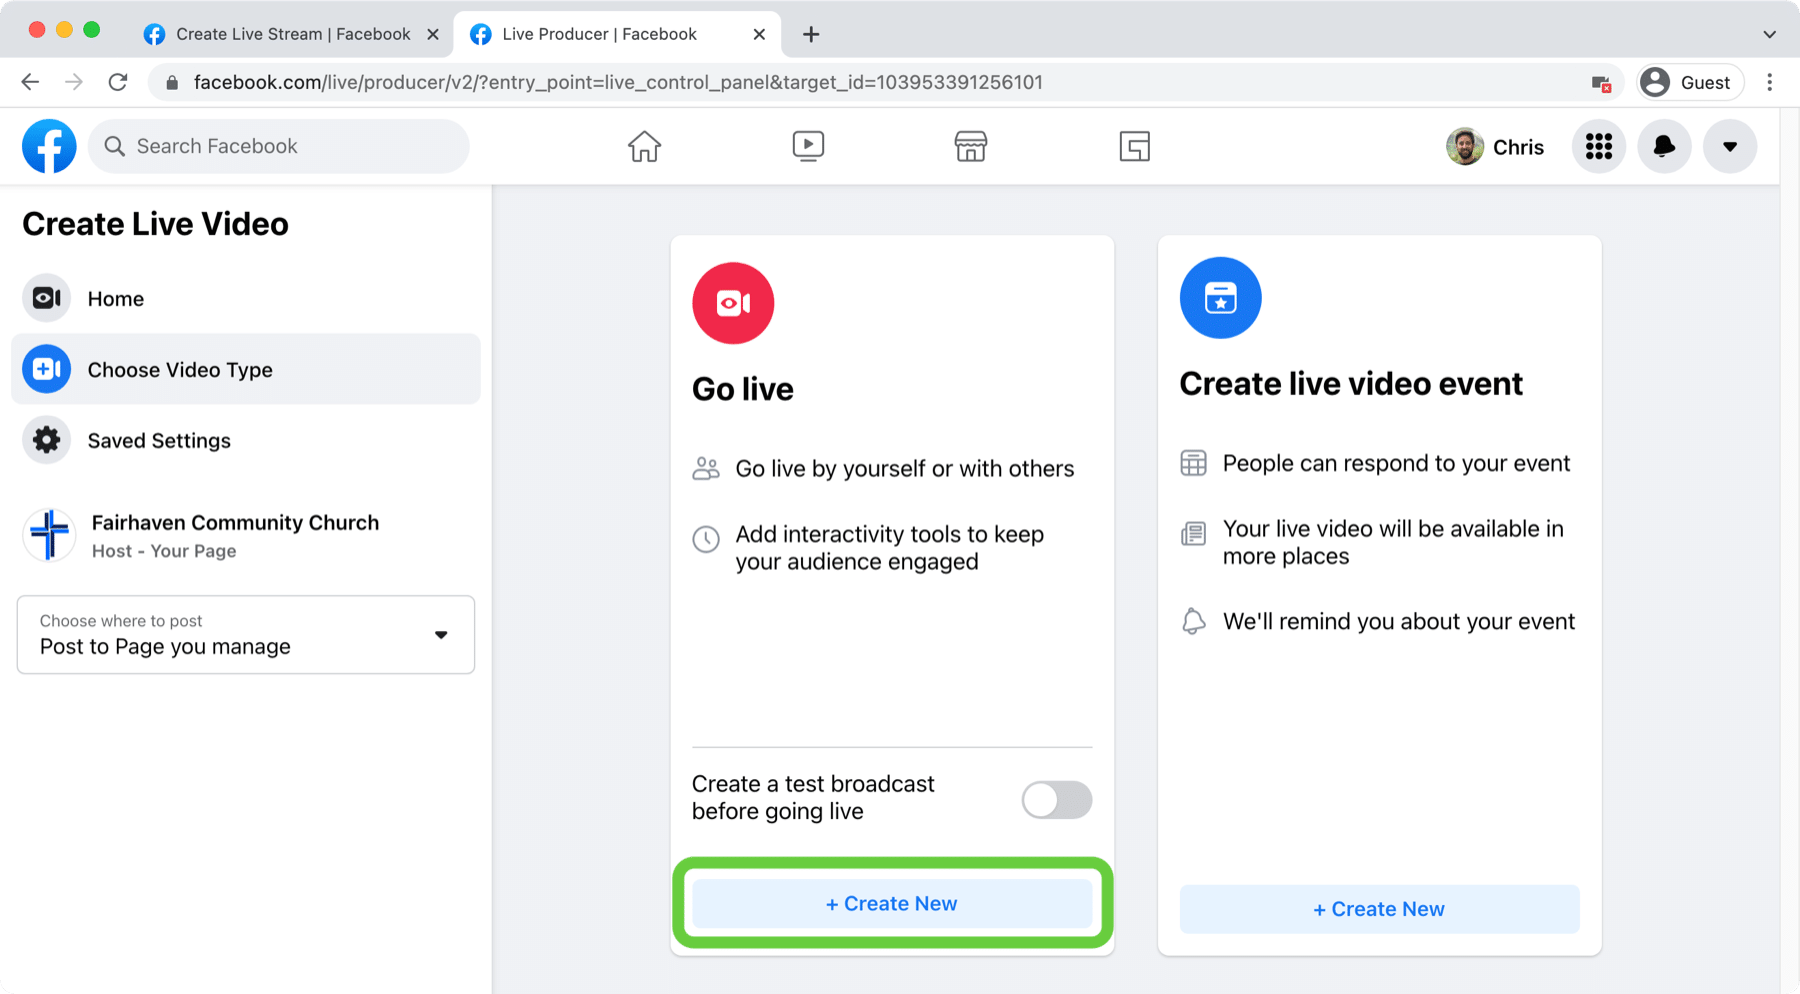
Setting Up A Live Video
Finding your Facebook Stream Key is essential for setting up a live video. Navigate to Facebook Live Producer, and you’ll find the Stream Key under the Stream Setup section. Copy and paste it into your streaming software to begin your broadcast.
Setting up a live video on Facebook can be a thrilling way to connect with your audience in real-time. Whether you’re hosting a Q&A session, streaming a tutorial, or sharing an event, getting started is easier than you might think. Let’s dive into the essential steps to ensure your live stream goes smoothly.Select Go Live Option
To begin, head over to your Facebook page or profile. Look for the “Create Post” area. You’ll see options like “Photo/Video” or “Feeling/Activity.” Click on “Live Video.” A new window will open, taking you to Facebook’s Live Producer. Here, you can choose between streaming from your webcam or using streaming software. Select the option that fits your setup. Choosing the right option is crucial. If you’re using professional equipment, opt for streaming software for better control.Adjust Stream Settings
Once you’re in Live Producer, it’s time to adjust your stream settings. Start by giving your live video a catchy title. This will grab attention and entice viewers. Next, add a description. Think of it as your chance to tell viewers why they should watch. Be clear and compelling. You can also tag friends, add a location, and select who can see your stream. Be mindful of your privacy settings to ensure the right audience sees your content. Don’t forget to test your audio and video. Make sure everything is working perfectly before you go live. This step can prevent technical hiccups that might disrupt your stream. Now, you’re ready to rock your live video. Have you ever had a moment where everything clicked, and your audience was fully engaged? What did you do differently? Share your thoughts in the comments below! By following these steps, setting up a live video becomes a straightforward process, allowing you to focus on delivering great content and engaging with your audience.Finding The Stream Key
Streaming live on Facebook is a fantastic way to engage your audience. But before you go live, you need to find your stream key. This unique code connects your streaming software to your Facebook account. Let’s dive into how you can easily find this key.
Access Stream Key
First, log into your Facebook account. Navigate to the page where you want to start your live stream. Click on the “Live” button located at the top of your page.
In the “Live Producer” dashboard, look for the “Stream Setup” section. Here, you’ll find the stream key. It’s usually under the “Get Started” tab.
Copy Stream Key
Once you locate the stream key, click on the “Copy” button. This ensures the key is ready to be pasted into your streaming software.
Double-check that the key is copied correctly. Mistakes can prevent your stream from working.
Remember, the stream key is essential for connecting your streaming software to Facebook. Without it, your audience won’t see your live video. Have you encountered any issues while finding your stream key? Share your experiences!
Integrating Stream Key With Streaming Software
Integrating your Facebook stream key with streaming software is a crucial step for successful live broadcasts. This process ensures your stream connects directly to Facebook, allowing your audience to view your content in real-time. Follow these steps to integrate your stream key seamlessly.
Open Streaming Software
First, launch your streaming software. Common choices include OBS Studio, Streamlabs, and XSplit. Each software has a settings menu where you can configure your stream settings.
In OBS Studio, for example, go to ‘Settings’ in the bottom-right corner. Then, click on ‘Stream’ in the left-hand menu. This section is where you will enter your stream key.
Paste Stream Key
Copy the stream key from your Facebook Live setup. Return to your streaming software’s settings. In the ‘Stream’ section, find the ‘Stream Key’ box. Paste your stream key here. Ensure there are no extra spaces or characters.
Finally, save your settings. Your streaming software is now ready to connect to Facebook. Start streaming to see your live broadcast go online.
Credit: support.proclaim.logos.com
Testing The Stream
Discovering your Facebook Stream Key is crucial for live streaming. Navigate to Facebook’s Live Producer, locate the Stream Key section, and copy the key for use in your streaming software. Ensure privacy by keeping the key secure.
Testing your stream is an essential part of ensuring a smooth and enjoyable experience for your audience. Before you go live on Facebook, it’s crucial to run a test stream to identify any potential issues that could disrupt your broadcast. This step helps you troubleshoot problems and fine-tune your setup.Run A Test Stream
First, create a test broadcast on Facebook. Make sure your test stream is set to private or visible only to you to avoid notifying your followers. Start streaming and monitor the quality of your video and audio. Use this opportunity to check your internet connection, camera angles, and lighting. Experiment with different settings to see what works best for your setup.Check For Issues
Pay close attention to any lag or buffering during your test stream. These issues can frustrate your viewers and cause them to leave your broadcast. Adjust your streaming software settings or check your internet speed to fix any problems. Listen to the audio carefully. Make sure there are no echoes, background noise, or volume issues. Your voice should be clear and at a comfortable volume. Inspect the video quality too. Ensure the resolution is high enough for a clear picture but not so high that it causes buffering. Test different lighting conditions to see how they affect the video quality. Have a friend or family member watch your test stream and give feedback. They can provide valuable insights you might not notice on your own. By running a thorough test stream and checking for issues, you can ensure a seamless and professional broadcast when you go live. What steps will you take to troubleshoot your stream before going live?Starting The Live Stream
Finding your Facebook Stream Key is simple. Go to your Facebook Live Producer. Then, click on “Create Live” and locate the stream key under “Stream Setup. ” Copy it to start your live stream.
Starting your live stream on Facebook can seem daunting, but with the right steps, it becomes a breeze. Whether you’re streaming for fun or for business, having a smooth start is crucial. Let’s dive into how you can begin your live stream effortlessly.Initiate Live Stream
First things first, head over to your Facebook page. Look for the “Live” button, typically found in the status update section. Click it, and you’ll be taken to the live stream setup page. Here, you’ll see options to set up your stream, including adding a title and description. Next, locate your stream key. This is essential for connecting your streaming software to Facebook. You’ll find it in the Stream Setup section. Copy this key; you’ll need it soon.Monitor Stream Performance
Once you’re live, keeping an eye on your stream’s performance is vital. Open your streaming software and paste the copied stream key into the appropriate field. This will link your software to Facebook. As you begin streaming, pay attention to metrics like viewer count and engagement. Facebook provides real-time data, so use it to adjust your content on the fly. Check the comments section regularly. Engaging with your audience can boost your stream’s popularity and keep viewers coming back. Starting your live stream doesn’t have to be complicated. By following these steps, you can ensure a smooth and engaging broadcast. Are you ready to go live and share your content with the world?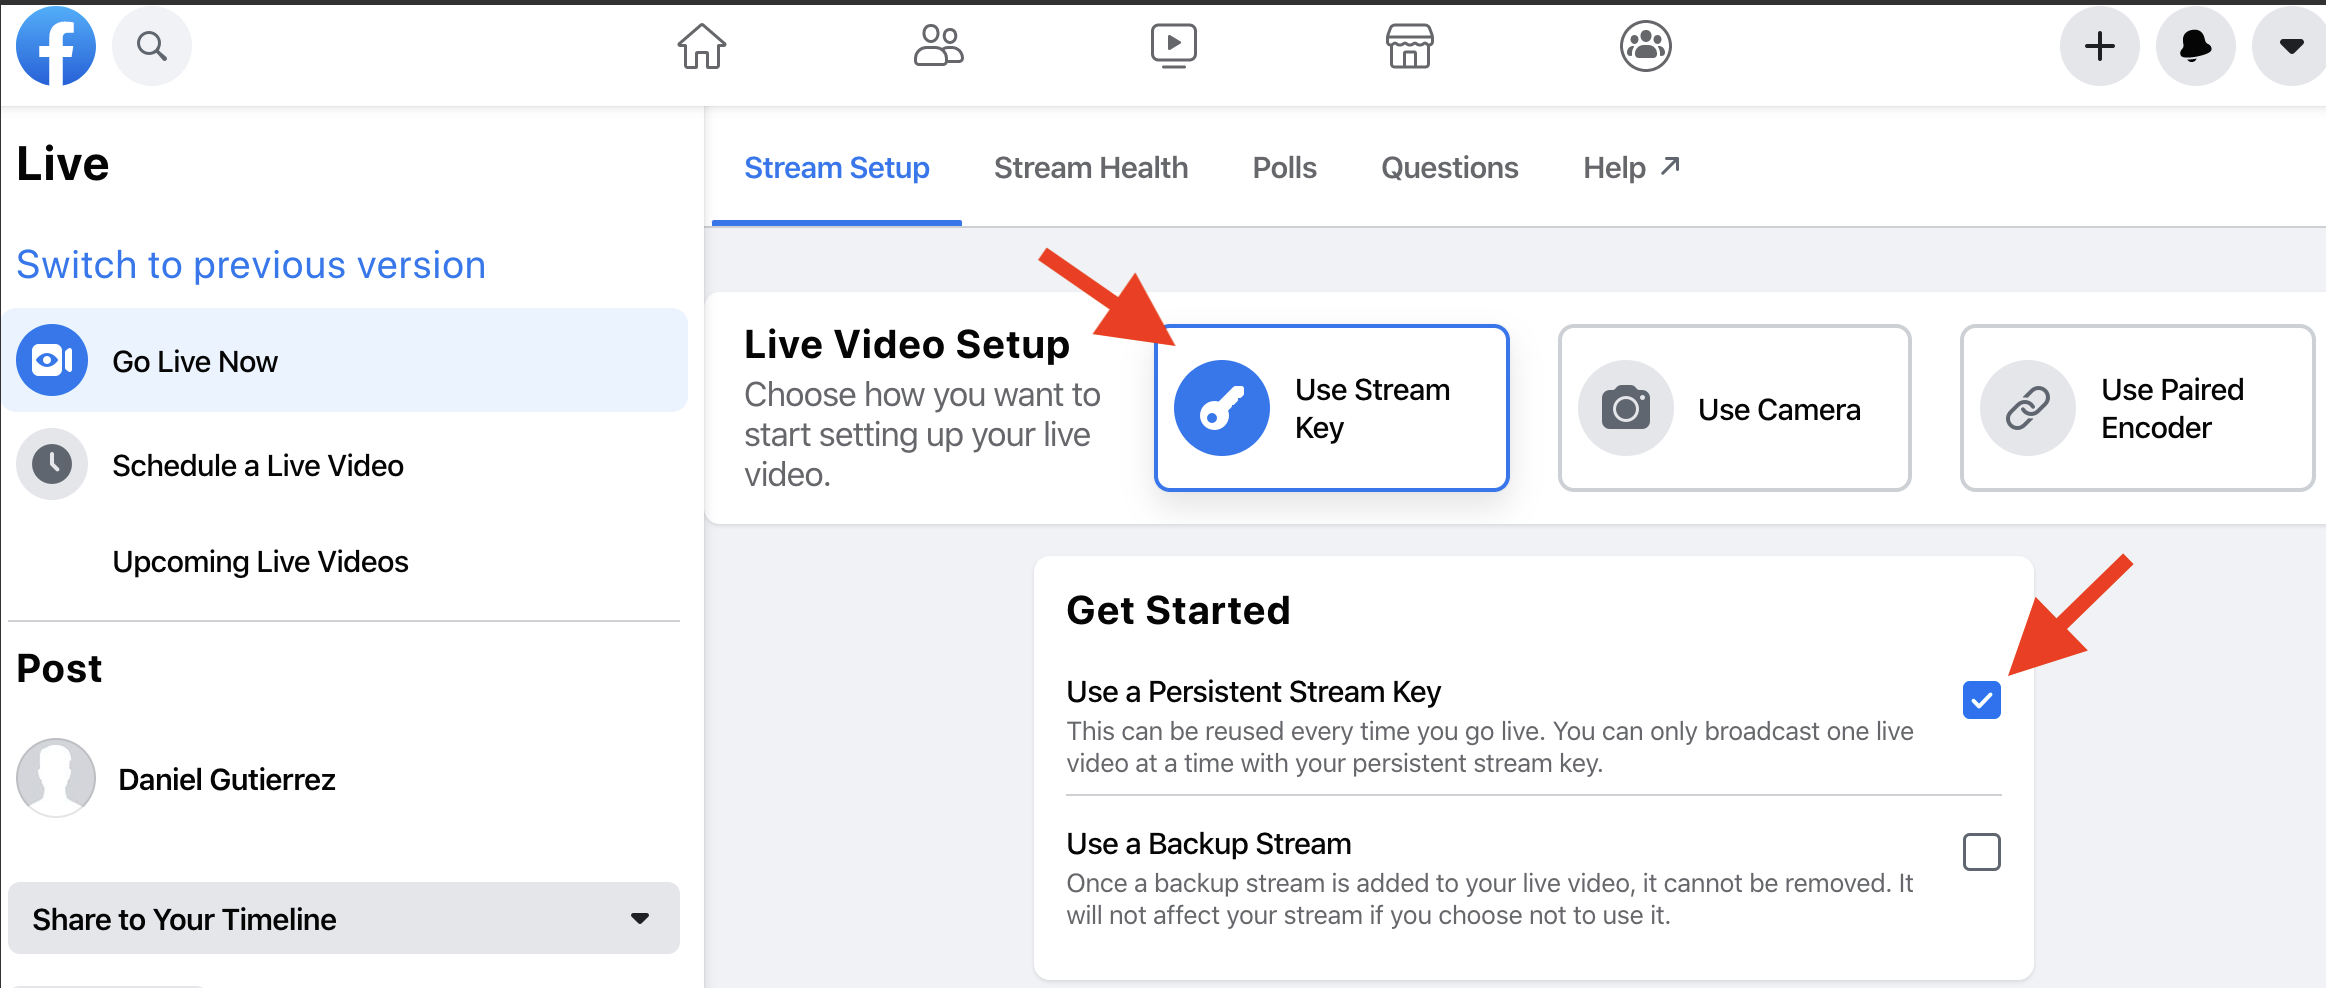
Credit: cwm-knowledge-base.groovehq.com
Troubleshooting Common Issues
So, you’ve got your Facebook stream key, but you’re hitting a few bumps on the road? No worries. We’ve all been there. Let’s tackle some common issues you might encounter and how to fix them.
Connection Problems
Is your stream disconnecting frequently? Check your internet connection first. A stable and fast connection is key.
Ensure your streaming software is up-to-date. Sometimes, outdated software can cause connectivity issues.
Also, verify if the stream key you entered is correct. It’s easy to make a typo, and that can cause connection problems.
Stream Quality Issues
Struggling with blurry or laggy streams? Adjust your bitrate settings. Lowering the bitrate can help if your internet speed is on the slower side.
Optimize your resolution settings. Streaming in 1080p might be too much if your connection isn’t robust.
Ensure your hardware is up to the task. Older computers might struggle with high-quality streaming.
Think about it: Did you ever watch a stream that kept buffering? Frustrating, right? Make sure your viewers don’t have the same experience.
What other issues have you encountered while streaming on Facebook? Let’s work together to solve them.
Frequently Asked Questions
How To Get Stream Key For Facebook?
To get your Facebook stream key, go to Creator Studio, select “Create Live”, then find the stream key under “Setup Live Video”.
How Do I Find My Stream Key?
To find your stream key, log in to your streaming platform. Navigate to the settings or dashboard. Look for “Stream Key” under the broadcast or stream settings section. Copy the key provided.
Where Can I Find My Facebook Stream Url?
To find your Facebook stream URL, go to your Facebook Live Producer. Copy the Stream Key and Server URL provided there.
Where Is The Live Stream Button On Facebook?
The live stream button on Facebook is located on the homepage. Click “Live Video” next to the “Create Post” section.
Conclusion
Finding your Facebook stream key is simple with the right steps. Follow the guide, and you’ll be streaming in no time. Always remember to keep your key secure. It’s important for your account’s safety. Now, you can connect with your audience easily.
Happy streaming!