How to Put Stream Key in OBS: A Step-by-Step Guide
Want to know how to put a stream key in OBS? It’s simple.
Follow these steps to get started. Streaming with OBS Studio can be exciting. But it can be confusing for beginners. One key step is adding your stream key. This key connects OBS to your streaming platform. Without it, you can’t go live.
In this guide, we’ll show you how to put your stream key in OBS. You’ll be ready to stream in no time. Let’s dive in and make it easy for you to start your streaming journey.

Credit: www.pcmag.com
Prerequisites
Before you can put your stream key in OBS, you need to meet a few prerequisites. These steps ensure you have the necessary tools and accounts ready. Let’s dive into the essentials.
Required Software
First, you need OBS Studio. OBS Studio is free and open-source software. It is available on Windows, macOS, and Linux. Download it from the official OBS website. Install it following the on-screen instructions.
Account Setup
Next, you need an account on the platform where you wish to stream. Popular platforms include Twitch, YouTube, and Facebook Gaming. Sign up on the platform of your choice. Verify your email address. Complete any additional setup steps required by the platform.
Once your account is set up, you can find your stream key. This key is necessary for OBS to connect to your streaming platform. On Twitch, go to the Creator Dashboard. On YouTube, check the Live Streaming section. On Facebook Gaming, visit the Creator Studio. Copy the stream key provided.
Finding Your Stream Key
Streaming has become a popular way to share your gaming experiences, creative processes, and live content with the world. To get started, you’ll need to know how to find and input your stream key into OBS (Open Broadcaster Software). This can seem daunting if you’re new to streaming, but don’t worry—I’ve got you covered. Let’s break it down by platform.
Twitch
Finding your stream key on Twitch is straightforward. First, log in to your Twitch account and navigate to your Creator Dashboard. You’ll find this by clicking on your profile picture in the top-right corner and selecting it from the drop-down menu.
Once you’re in the Creator Dashboard, look for the Settings section on the left-hand sidebar. Click on Channel. Here, you’ll see your Primary Stream Key. Copy this key. Be careful not to share it with anyone, as it gives access to broadcast on your channel.
Youtube
YouTube also makes it simple to find your stream key. Log in to your YouTube account and click on the Create button (a camera icon with a plus sign) at the top-right corner. Select Go Live from the drop-down menu.
You’ll be taken to the YouTube Studio. On the left sidebar, click on Stream. Here, under the Stream Settings, you’ll find your Stream Key. Copy it and keep it safe. Remember, anyone with this key can stream on your account.
For Facebook, the process is just as simple. Log in to your Facebook account and navigate to your page or profile where you want to stream. Click on Live Video in the Create section.
You’ll be directed to the Live Producer page. Under the Stream Setup tab, you’ll see your Stream Key. Copy it and be cautious not to share it. This key is your gateway to broadcasting live on your Facebook page.
Now that you know where to find your stream key, you’re one step closer to sharing your content with the world. Have you ever experienced any issues finding your stream key on these platforms? How did you resolve it? Share your thoughts and tips in the comments below.
Accessing Obs Settings
To stream using OBS, you need to input your stream key. This process requires accessing the OBS settings. It’s straightforward, and we’ll guide you step-by-step.
Opening Obs
First, ensure OBS Studio is installed on your computer. Open the OBS application by double-clicking the OBS icon. The main OBS interface will appear, showing various controls and options.
Navigating To Settings
Once OBS is open, find the “File” menu at the top left corner of the screen. Click on “File” to reveal a dropdown menu. In this menu, select “Settings.” A new window will open, displaying different settings tabs.
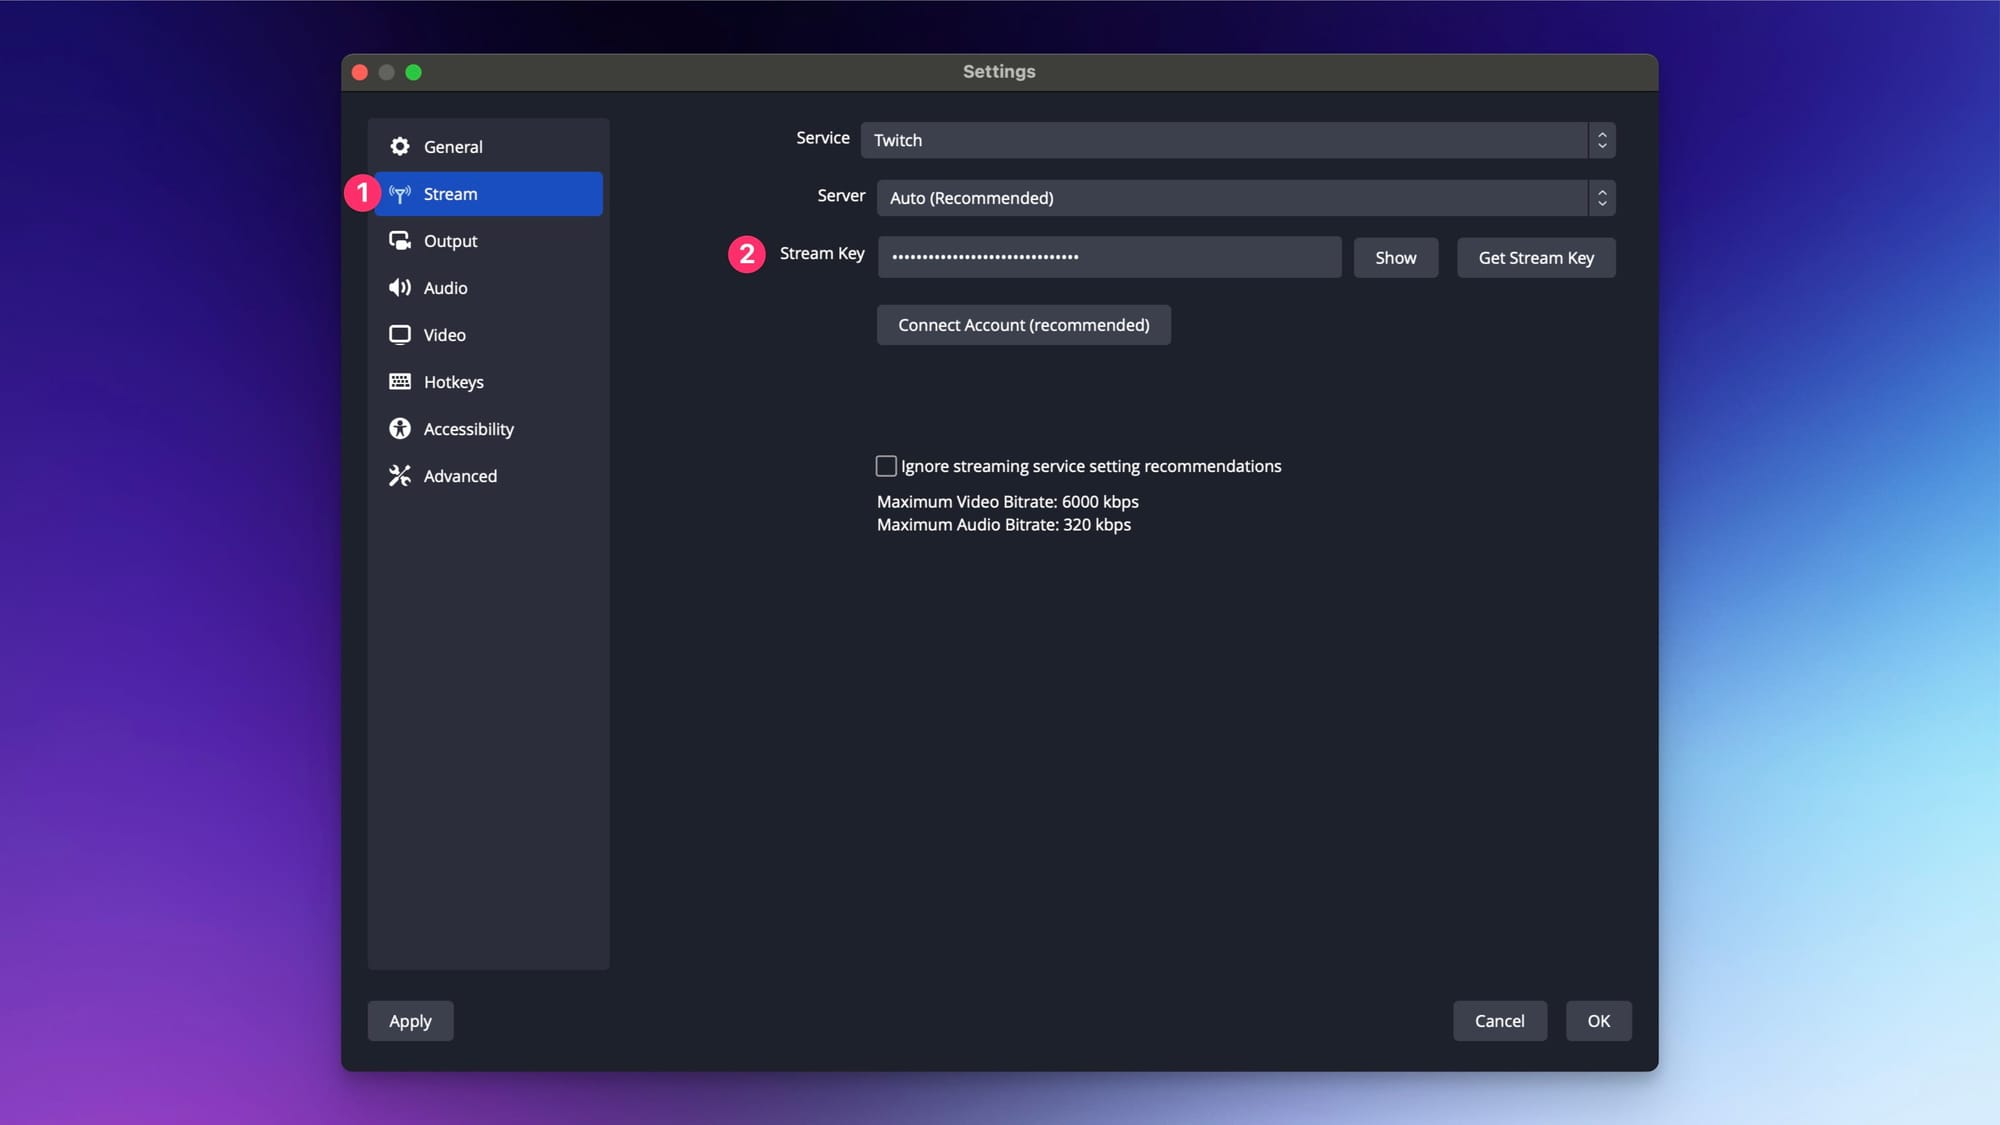
In the settings window, look for the “Stream” tab on the left side. Click on the “Stream” tab to access the streaming settings. Here, you can input your stream key.
Entering The Stream Key
Enter the stream key in OBS to start live streaming. Find your unique key from your streaming platform’s settings. Copy and paste it into OBS under the Stream settings tab.
Entering the Stream Key is a crucial step to start streaming your content through OBS (Open Broadcaster Software). Without this key, you won’t be able to connect OBS with your streaming platform. Let’s break down the process into simple steps to ensure you’re ready to go live without a hitch.Locating The Stream Tab
First, open OBS on your computer. Navigate to the “Settings” button in the bottom-right corner of the screen. Once the Settings window pops up, click on the “Stream” tab on the left-hand side. This tab is where you will enter essential streaming information, including your stream key.Pasting The Stream Key
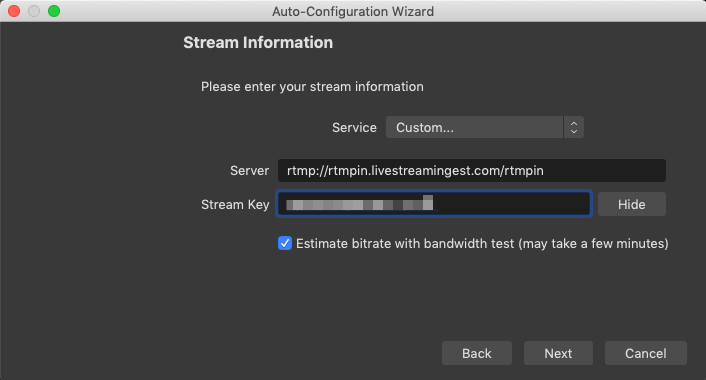
Now, log in to your streaming platform (like Twitch, YouTube, or Facebook). Go to the settings or dashboard area where your stream key is located. Copy your stream key to your clipboard. Return to OBS, and paste the stream key into the designated field in the Stream tab. Make sure to hit “Apply” and then “OK” to save your settings. With these steps, you’re all set to start streaming. Have you ever missed a step and had to figure out what went wrong? Double-checking your stream key can save you a lot of troubleshooting later. Is there a part of the setup process that always trips you up? Share your experiences in the comments to help others in the community!Testing Your Stream
To put your stream key in OBS, first open OBS Studio. Navigate to the “Settings” menu and select “Stream. ” Paste your stream key into the provided field and click “Apply. ” Now you are ready to start streaming.
Testing Your Stream is a crucial step to ensure your live broadcast runs smoothly. You wouldn’t want technical glitches to ruin your stream, right? By running a test stream, you can identify and resolve potential issues before going live.Starting A Test Stream
Once you’ve set up your stream key in OBS, it’s time to start a test stream. Begin by clicking on the “Start Streaming” button. This will initiate your broadcast. Make sure your stream is set to private or unlisted, so only you can view it. This way, you can test without your audience noticing.Monitoring Performance
While your test stream is running, keep an eye on the OBS stats. Look out for dropped frames, which indicate network issues. You want to maintain a stable connection. Pay attention to the audio and video quality. Ensure your voice is clear and the video is crisp. If there are issues, tweak your settings until it’s perfect. Consider watching your stream on another device. This gives you a viewer’s perspective and helps identify any problems you might miss while focusing on OBS. Are you satisfied with the performance? If yes, you’re ready to go live for real. Testing your stream thoroughly can make all the difference. It’s the key to delivering a professional and enjoyable experience for your audience.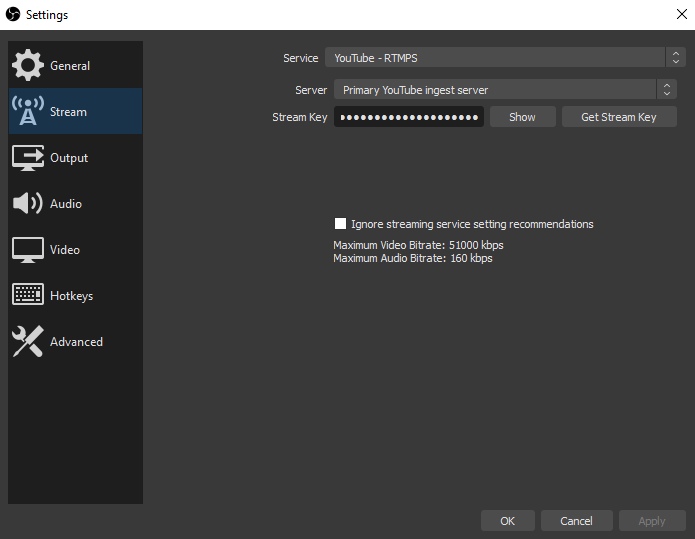
Credit: www.own3d.tv
Troubleshooting Common Issues
Setting up a stream in OBS can be tricky. Sometimes, even after following all the steps, you might encounter issues. This section will help you troubleshoot common problems you might face when entering your stream key in OBS.
Invalid Stream Key
An invalid stream key error is common. First, ensure you copied the correct stream key from your streaming platform. A single wrong character can cause this error. Double-check the key. If it still doesn’t work, try generating a new stream key from your streaming platform and enter it again in OBS.
Another reason could be an expired or deactivated stream key. Some platforms deactivate keys after a certain period. Check your account settings to make sure your stream key is active.
Connection Problems
Connection problems can disrupt your streaming. Start by checking your internet connection. Ensure it is stable and fast enough for streaming. A slow or unstable connection can cause issues.
Next, verify your streaming settings in OBS. Ensure you selected the correct streaming server for your platform. Sometimes, choosing a server that is too far from your location can cause latency issues.
Firewall or antivirus software can also block OBS from connecting to the streaming server. Temporarily disable them to see if they are the cause. If they are, add OBS to the list of trusted applications in your firewall or antivirus settings.
Additional Tips
Once you’ve entered your stream key in OBS, you’ll want to make the most of your streaming experience. These additional tips will help you optimize your setup and ensure smooth streaming. By following these, you can enhance the quality and functionality of your streams.
Optimizing Stream Quality
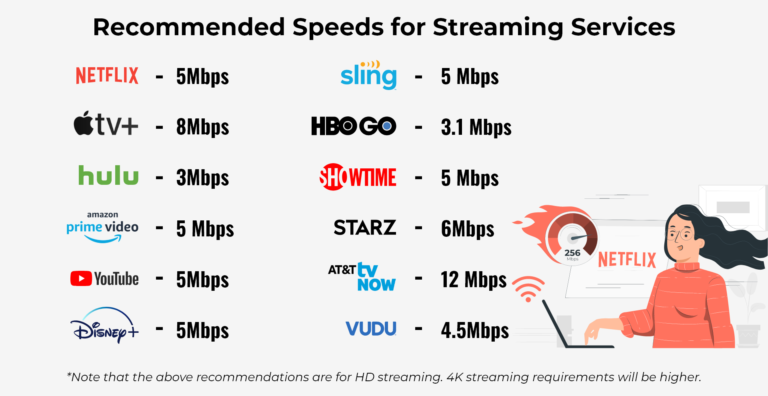
To provide the best viewing experience, adjust your video settings. Set your resolution to match your streaming platform’s requirements. A common resolution is 1920×1080. Choose the right bitrate. For 1080p streaming, a bitrate of 4500 to 6000 kbps is ideal.
Adjust the frame rate. A higher frame rate, like 60 fps, is better for fast-paced content. Ensure your internet connection is stable. A wired connection is often more reliable than Wi-Fi. Monitor your stream’s performance. Use OBS’s statistics window to check for dropped frames.
Using Plugins
OBS supports many plugins that can improve your streaming experience. Install plugins for added functionality. Some popular plugins include StreamFX and OBS WebSocket. StreamFX allows for advanced video effects and transitions. OBS WebSocket lets you control OBS from another device.
Use plugins to integrate alerts and overlays. This can make your stream more engaging for viewers. Many plugins are free and easy to install. Follow the installation instructions carefully. Regularly update your plugins. This ensures they stay compatible with the latest OBS version.
Credit: help.vimeo.com
Frequently Asked Questions
Where Do I Put The Twitch Stream Key In Obs?
Go to OBS settings, select “Stream,” choose “Twitch” as the service, then paste your stream key in the “Stream Key” field.
How Do I Add A Stream Key?
To add a stream key, go to your streaming platform’s settings. Find the stream key section. Copy your unique key. Paste it into your streaming software’s stream key field. Save the settings.
How Do I Add Another Stream Key To Obs?
To add another stream key to OBS, go to “Settings,” select “Stream,” and enter the new stream key in the “Stream Key” field. Save changes.
Where To Put Youtube Stream Key In Obs?
Go to OBS settings, select “Stream,” choose “YouTube,” and paste your YouTube stream key into the Stream Key field.
Conclusion
Setting up your stream key in OBS is simple and quick. Follow these steps, and your stream will be ready in no time. This guide should help you avoid common mistakes. Enjoy streaming without any hassle. Have fun sharing your content with the world.
Happy streaming!