How to Stream Kick on Obs: Ultimate Guide for Beginners
Streaming Kick on OBS is easy. You just need the right steps.
OBS, or Open Broadcaster Software, is a popular tool for live streaming. It allows you to broadcast your content to various platforms, including Kick. Whether you’re a gamer, artist, or just want to share your experiences, OBS can help. In this guide, you will learn how to stream Kick using OBS.
We will break down the process into simple steps. This will make it easy for you to follow along. By the end, you’ll be ready to stream like a pro. So, let’s get started and dive into the world of live streaming with OBS!

Credit: www.streamdesignz.com
Introduction To Obs Streaming
Welcome to our guide on streaming Kick with OBS. Whether you’re a beginner or looking to improve your skills, this post will help you get started with OBS streaming. Let’s dive into the basics and understand why OBS is a great tool for your streaming needs.
What Is Obs?
OBS stands for Open Broadcaster Software. It’s a free and open-source tool for live streaming and recording. Many streamers use OBS because it offers powerful features and flexibility.
Why Use Obs For Streaming?
OBS is user-friendly and supports multiple platforms. You can stream to Kick, Twitch, YouTube, and more. The software is highly customizable, allowing you to create unique streams. It also supports plugins to enhance your streaming experience.
Another key benefit is its performance. OBS is lightweight and runs smoothly on most systems. This ensures a lag-free streaming experience for your audience. Plus, OBS is updated regularly, so you get new features and improvements often.
In summary, OBS offers versatility, customization, and reliability. These make it an excellent choice for both new and experienced streamers.
Setting Up Obs
Streaming Kick on OBS can seem tricky. But with the right steps, it’s simple. This guide will help you get started. Follow the steps, and you’ll be streaming in no time.
Downloading And Installing Obs
First, you need to download OBS Studio. Visit the official OBS website. Choose the right version for your operating system. There are versions for Windows, Mac, and Linux.
Click on the download button. Once the download completes, open the installer file. Follow the on-screen instructions. The installation process is straightforward. Just click “Next” and agree to the terms. Soon, OBS will be installed on your computer.
Basic Configuration
Now, launch OBS Studio. The first time you open it, you’ll see the Auto-Configuration Wizard. This tool helps set up the best settings for your system. Click “Yes” to run the wizard.
Choose “Optimize for streaming” when asked. OBS will test your system and network. It will then select the best settings for you. This includes resolution, bitrate, and more. Let the wizard finish. Click “Apply Settings” at the end.
Next, you need to add a source. Click the “+” button under “Sources.” Select “Display Capture” to capture your whole screen. Name your source and click “OK.” You will see your screen in the OBS preview window.
Check your audio settings. Go to “Settings” and then “Audio.” Ensure your microphone and desktop audio devices are selected. You can adjust the audio levels as needed.
Finally, link OBS to your Kick account. Get your stream key from your Kick account settings. In OBS, go to “Settings,” then “Stream.” Select “Custom” as your service. Paste your stream key in the appropriate box. Click “OK” to save.
Now, you are ready to start streaming. Click “Start Streaming” in OBS. Watch the preview to ensure everything looks good. Happy streaming!
Creating Your Obs Scene
Creating your OBS scene is crucial for streaming on Kick. A well-designed scene keeps viewers engaged and enhances your stream’s quality. Let’s dive into the steps to create an effective OBS scene.
Adding Sources
Sources are the elements that make up your scene. Click the “+” button in the “Sources” box to add a new source. Add your webcam by selecting “Video Capture Device” and adjust the settings. To share your screen, select “Display Capture” or “Window Capture.” You can also add images, text, and game captures. Ensure each source is correctly configured.
Organizing Layout
Organize your sources to create a visually appealing layout. Drag and resize each source to fit your design. Position your webcam in a corner for better visibility. Arrange text and images to avoid clutter. Keep important elements in focus. Use the “Order” option to layer sources correctly. A clean layout improves viewer experience.

Credit: www.youtube.com
Optimizing Stream Settings
Optimizing your stream settings is key to providing your viewers with a smooth and enjoyable experience. Whether you’re new to streaming or looking to fine-tune your setup, focusing on the right settings can make a world of difference. Let’s dive into two crucial aspects: resolution and bitrate, and audio settings.
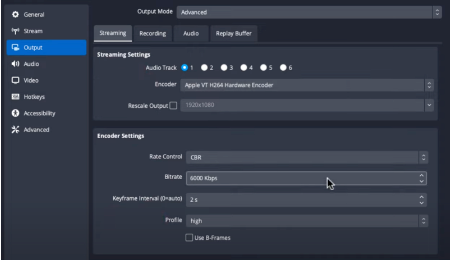
Resolution And Bitrate
Your stream’s resolution and bitrate directly impact the quality of your video. Higher resolutions provide clearer images but require more bandwidth. If your internet connection isn’t stable, a lower resolution might be better.
For example, streaming at 720p with a bitrate of 2500-4000 Kbps is a good balance for many streamers. This setting offers decent quality without demanding too much from your connection. Experiment with these numbers to see what works best for you.
Remember, a higher bitrate can lead to buffering issues for viewers with slower internet. It’s all about finding that sweet spot where quality and performance meet. Always test your stream to ensure it’s running smoothly.
Audio Settings
Audio quality is just as important as video. Poor sound can drive viewers away faster than a slightly blurry image. Use a good microphone and set your audio bitrate to at least 128 Kbps for clear sound.
Adjust your microphone settings within OBS to reduce background noise. You can use filters like noise suppression and gain to improve audio clarity. Test your audio levels before going live to avoid any unpleasant surprises.
Think about your audience’s experience. Clear, crisp audio keeps viewers engaged and makes your content more professional. A small investment in a quality microphone can make a big difference.
What settings have you found to be the most effective for your stream? Share your tips and experiences in the comments below!
Connecting Obs To Kick
Streaming Kick on OBS involves a few simple steps. Download OBS, set up your scenes, and connect your Kick stream key. Enjoy broadcasting to your audience.
Connecting OBS to Kick is a straightforward process, but it can seem overwhelming if you’re new to streaming. When I first started, I remember feeling a bit lost with all the settings and options. But once you get the hang of it, it becomes second nature. Let’s break it down step-by-step so you can start streaming without a hitch. ###Getting Stream Key From Kick
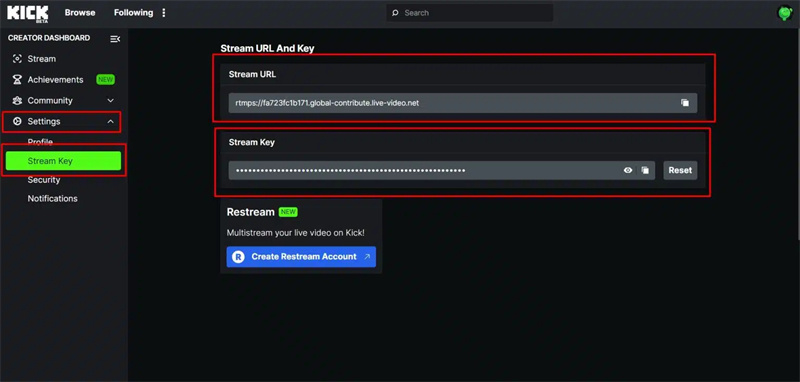
First, you need to get your stream key from Kick. This key is essential as it acts like a password that allows OBS to connect to your Kick account. Log in to your Kick account and navigate to the dashboard. Look for the “Stream Key” section. It’s usually under the settings or streaming tab. Copy the stream key to your clipboard. Be careful not to share this key with anyone, as it grants access to your stream. ###Entering Stream Key In Obs
Open OBS on your computer. If you don’t have it installed, download it from the official website and follow the installation instructions. In OBS, go to “Settings” by clicking on the bottom-right corner. Select the “Stream” tab. Choose “Custom” from the service drop-down menu. Paste your stream key into the “Stream Key” field. Hit “Apply” and then “OK.” Your OBS is now connected to Kick. Take a moment to check your settings and make any adjustments necessary for your stream quality. You might want to do a test stream to ensure everything is running smoothly. Remember, streaming is a journey. The more you practice, the better you’ll get at tweaking settings to suit your needs. Have you ever faced any challenges while setting up your stream? Share your experiences in the comments below!Customizing Your Stream
Customizing your stream can elevate the viewer experience. Personal touches make your stream unique. Here’s how to add overlays, alerts, and widgets using OBS for Kick streaming.
Adding Overlays
Overlays add a personal touch to your stream. They can display your brand colors or logos. To add overlays in OBS, first, create or download the design. Then, in OBS, click on the ‘+’ sign in the ‘Sources’ box. Select ‘Image’ or ‘Media Source’ depending on your file type. Locate your overlay file on your computer and add it. Adjust the overlay’s size and position. Ensure it doesn’t cover important parts of your stream. Save the changes. Now, your stream has a unique look.
Using Alerts And Widgets
Alerts and widgets keep your viewers engaged. They can show new followers, donations, or messages. To add alerts in OBS, use a service like Streamlabs or StreamElements. Create an account and set up your alerts. Customize the alert sounds and animations. Copy the alert box link. In OBS, click on the ‘+’ sign in the ‘Sources’ box. Select ‘Browser’ and paste the link. Adjust the size and position of the alert box. Now, your stream will show alerts when triggered.
Widgets add extra information to your stream. This can include chat boxes, goal trackers, or event lists. To add a widget, follow the same steps as alerts. Copy the widget link from your service provider. Add it to OBS as a ‘Browser’ source. Resize and move the widget as needed. Widgets keep your stream interactive. They provide real-time information to viewers.
Testing Your Stream
Testing your stream is a crucial step before going live. It ensures that your viewers will have a smooth experience and that you won’t run into any technical issues. Here’s how you can thoroughly test your stream on OBS before you start broadcasting to the world.
Running A Test Stream
First, set up your OBS with all the necessary scenes and sources. Make sure your audio levels are balanced and your video quality is set to your desired resolution.
Click on the “Start Streaming” button in OBS, but instead of streaming to your main channel, create a private or unlisted stream. This way, you can monitor the stream without any audience.
Watch your test stream on a different device. This gives you a viewer’s perspective and helps you identify any issues that might not be apparent from the OBS interface.
Monitoring Performance
While your test stream is running, keep an eye on OBS’s performance metrics. Look for any dropped frames, high CPU usage, or network issues.
If you notice any performance problems, adjust your settings. Lowering the bitrate or resolution can often resolve streaming issues.
Don’t forget to check the audio sync. A common issue in streaming is audio that doesn’t match the video. Make sure everything is in sync and sounds clear.
Testing your stream might seem like an extra step, but it’s worth the effort. How often have you experienced a stream that constantly buffers or has poor audio quality? Don’t let that be your stream. Make sure everything runs smoothly before you go live.
Credit: www.obsbot.com
Troubleshooting Common Issues
Streaming Kick on OBS can be tricky. Issues like lag, audio sync, or black screens are common problems. Quick fixes often involve checking settings and updating software.
When streaming on OBS, encountering technical issues can be frustrating. But don’t worry, you’re not alone. Many streamers face common problems like lag, buffering, and audio-video sync issues. Let’s delve into these issues and find practical solutions to keep your stream smooth and enjoyable.Fixing Lag And Buffering
Lag and buffering can ruin the experience for both you and your viewers. Start by checking your internet connection. A stable, high-speed connection is crucial for a seamless stream. Lower your bitrate in OBS settings. A high bitrate can overload your internet connection, causing lag. Try reducing it incrementally until the stream stabilizes. Optimize your computer’s performance. Close unnecessary applications running in the background. These can consume valuable resources needed for streaming.Audio And Video Sync Problems
Sync issues between audio and video can be annoying. First, ensure your audio devices are set up correctly in OBS. Go to the ‘Audio’ tab in settings and check your devices. Adjust the sync offset. OBS has an option to delay audio or video. Go to the advanced audio properties and tweak the sync offset until it matches. Test your stream before going live. Record a short clip and watch it to check for sync issues. This step can save you from potential embarrassment during a live stream. Have you ever faced a sync issue that made you want to pull your hair out? It’s common, but with these tweaks, you can fix it quickly. Remember, practice makes perfect. Keep adjusting until you find the sweet spot. By addressing these common issues, you can enhance the quality of your stream significantly. Your viewers will appreciate the smooth, professional experience, and you’ll enjoy streaming more without technical hiccups. Happy streaming!Tips For Engaging Streams
Streaming on OBS can be made engaging by interacting with viewers, using overlays, and keeping a consistent schedule. Make sure to test your audio and visuals to avoid technical issues. Engage with your audience through chat and live reactions.
Are you ready to make your streams more engaging? Let’s dive into some practical tips that can help you keep your viewers hooked and coming back for more. Whether you’re a seasoned streamer or just starting out, these tips can elevate your streaming game on OBS (Open Broadcaster Software).Interacting With Viewers
Engaging with your audience is vital. Respond to comments and questions in real-time. It shows viewers that you value their presence. Use their names when replying. This personal touch can make a huge difference. Encourage viewers to participate in polls or give feedback. This interaction creates a sense of community.Improving Stream Quality
High-quality streams are essential. Ensure your video and audio settings are optimized in OBS. Use a good microphone and camera. Clear audio and sharp visuals can significantly enhance viewer experience. Test your internet connection before going live. A stable connection prevents lag and ensures smooth streaming. Remember, engaging streams are about connection. How do you keep your viewers engaged? Try these tips and watch your community grow.Frequently Asked Questions
Can You Stream On Kick With Obs?
Yes, you can stream on Kick using OBS. Install OBS, configure your settings, and start streaming easily.
How Do You Livestream On Kick?
To livestream on Kick, create an account, set up your profile, connect streaming software, and start streaming.
How To Get Kick Chat On Obs?
To get Kick chat on OBS, install the Kick Chat Plugin. Add the chat widget URL in OBS browser source.
What Should My Bitrate Be For Kick?
Your bitrate for Kick should be between 3,000 and 6,000 kbps for optimal streaming quality.
Conclusion
Streaming Kick on OBS is easier than you think. Follow the steps above. You will enjoy a smooth streaming experience. Always check your settings before going live. This ensures the best quality. Happy streaming! If you have questions, leave a comment.
We are here to help. Keep practicing to get better. Enjoy sharing your content with the world.